Time & Attendance
Introducing Time & Attendance
Sign In App plays an important role in many organisations, elevating experiences for visitors while ensuring the safety of everyone on site. When we say everyone, we mean everyone. That's why we continue to build comprehensive and integrated employee sign in features as part of our core visitor management solution.
We believe the workplace works better when everyone is signed in, for safety, for compliance and for the optimal workplace experience, whether you're remote or in the office.
For organisations that are looking to record hours worked, Sign In App provides an easy way to capture hours signed in and translate this into a simple timesheet report. For our customers looking for more flexibility and functionality to help simplify employee time tracking, we're introducing Time & Attendance.
Time & Attendance is a powerful new paid add-on that transforms Sign In App into a robust timekeeping tool, bringing together scheduled working hours, absence reports and the ability to accurately track time spent working - all without sacrificing safety and compliance.
If you are an account administrator, you can start a free 15 day trial of Time & Attendance which includes the following features.
- Activity Status - track and categorise how time is spent while signed in
- Working Hours - create and assign shift patterns
- Absence Management - request, approve and record absences
- Additional enhancements - new group management and reporting tools
Getting started
To ensure you are ready to use Time & Attendance, please ensure any apps that you are using are updated to the latest version so that all functionality is available. The minimum requirements are listed below, but you should ensure the latest version available is installed.
- Sign In Companion (iOS or Android): 3.2.2 or later
- Sign In Companion (Web): 1.2.0 or later
- Sign In App Visitor Management (iPad): 4.3.4 or later
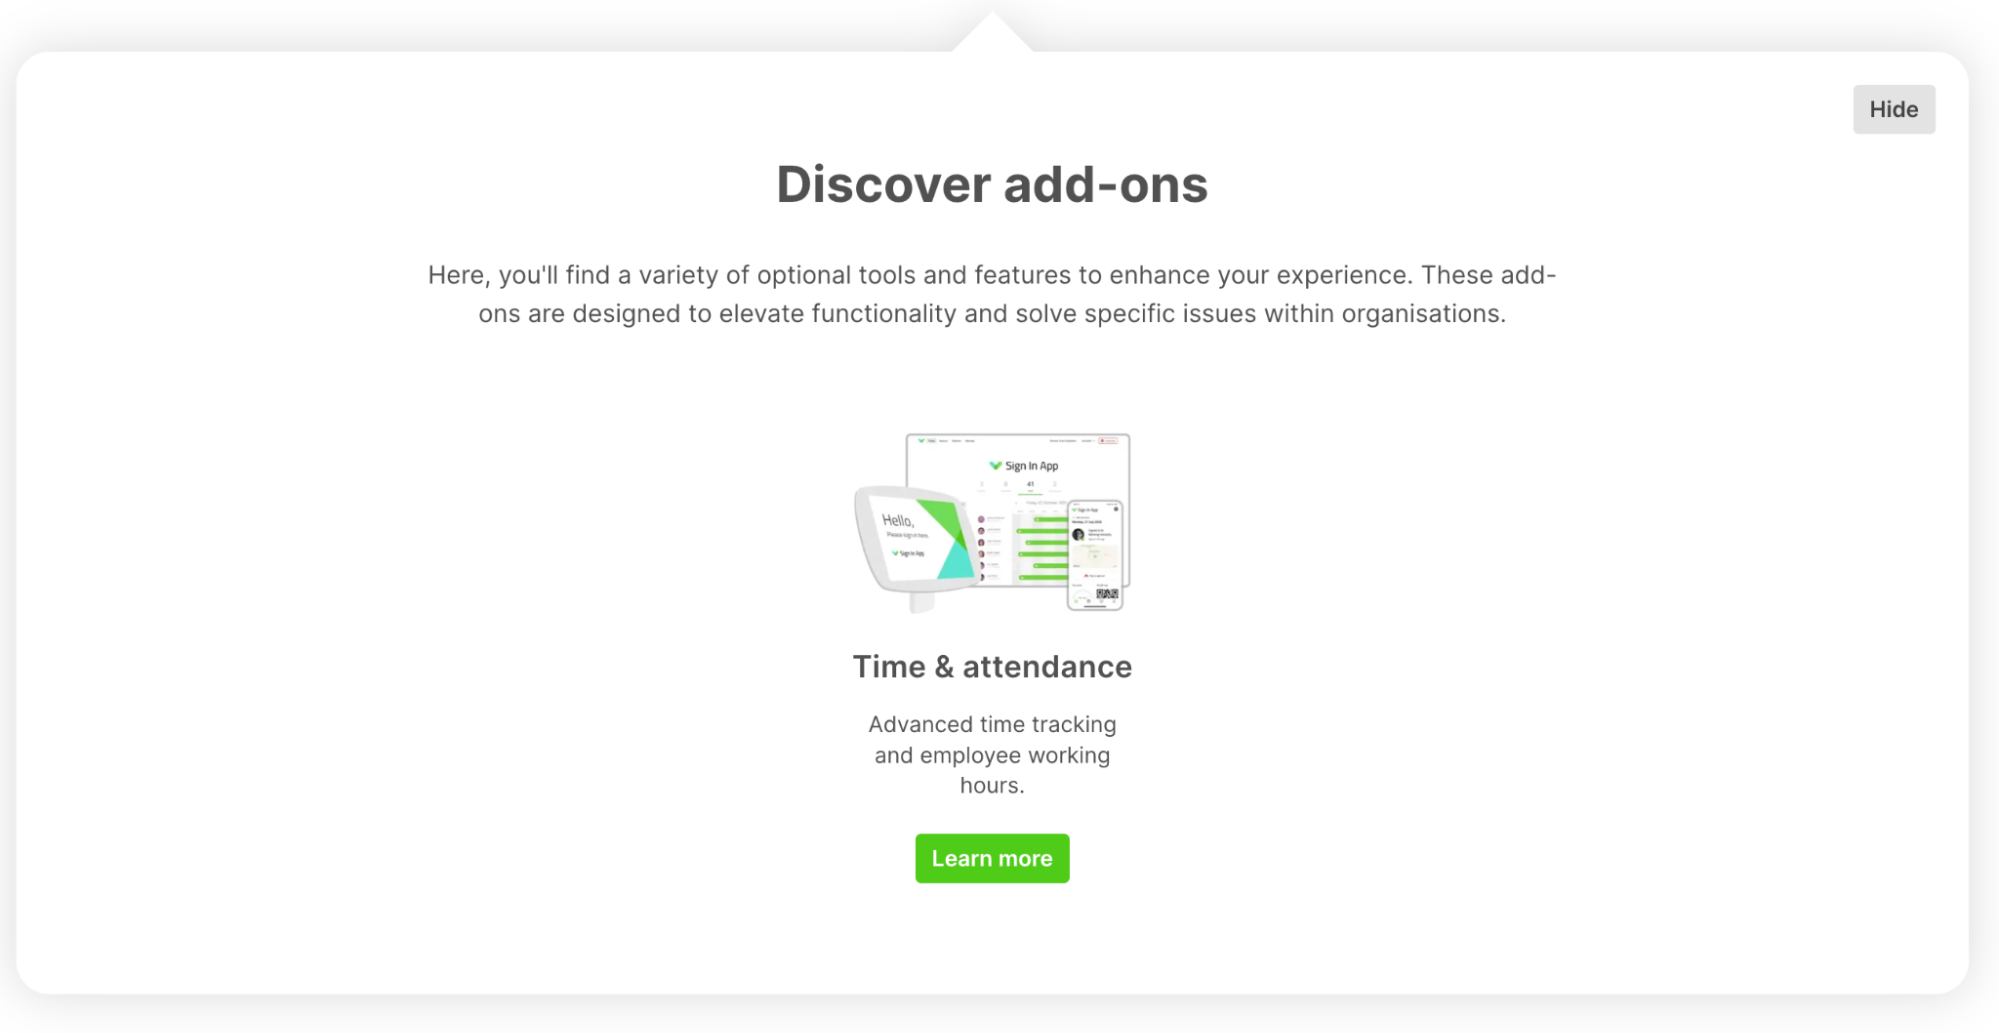
Enabling Time & Attendance on your account is just a few clicks away. From the Sign In App portal at my.signinapp.com go to Manage, scroll down to where you see Discover add-ons and click Learn more under Time & Attendance. From this page, click Start a free trial.
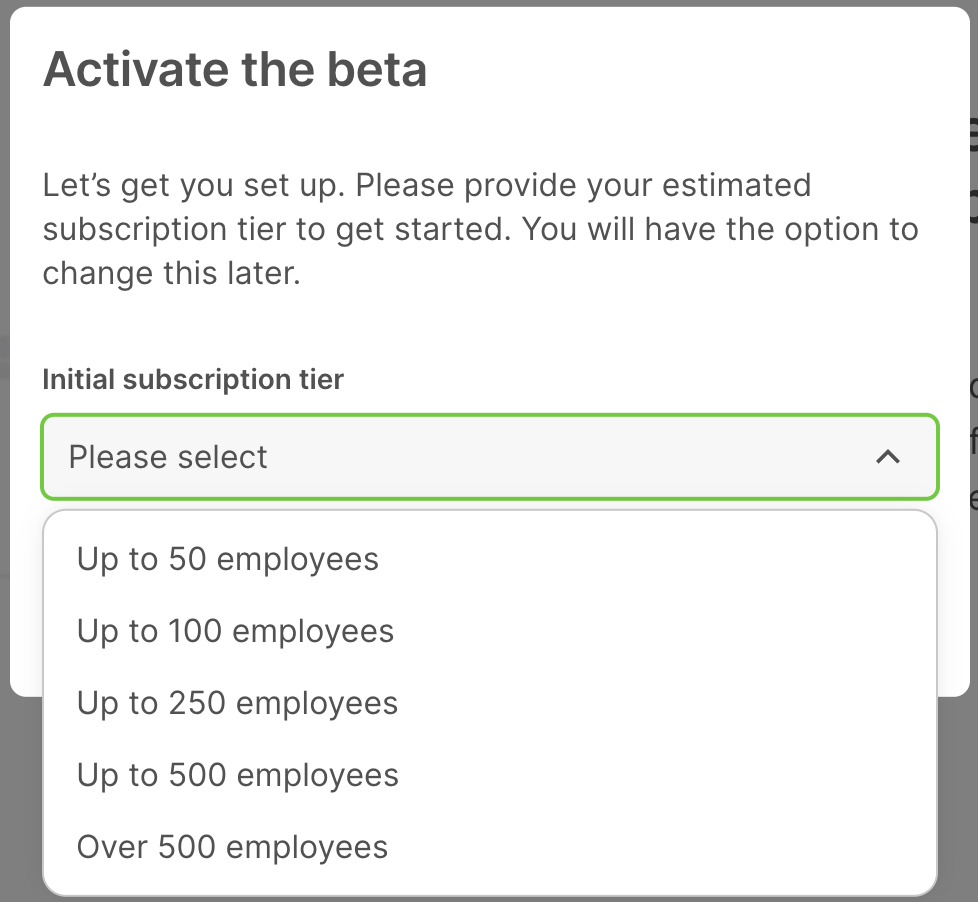
You’ll then be presented with a pop up asking you to select your subscription tier based on the number of employees you wish to enable Time & Attendance for. When it launches, Time & Attendance will be priced based on the number of employees in groups you select in the portal. During the trial phase, you can access the new feature at no extra cost. You will be asked to select the subscription tier for your trial. Iif you later decide to purchase the feature, you will have the option to change this tier.
Once activated, you’ll be taken to the Time & Attendance manage page, which you can also find under Manage > Features.
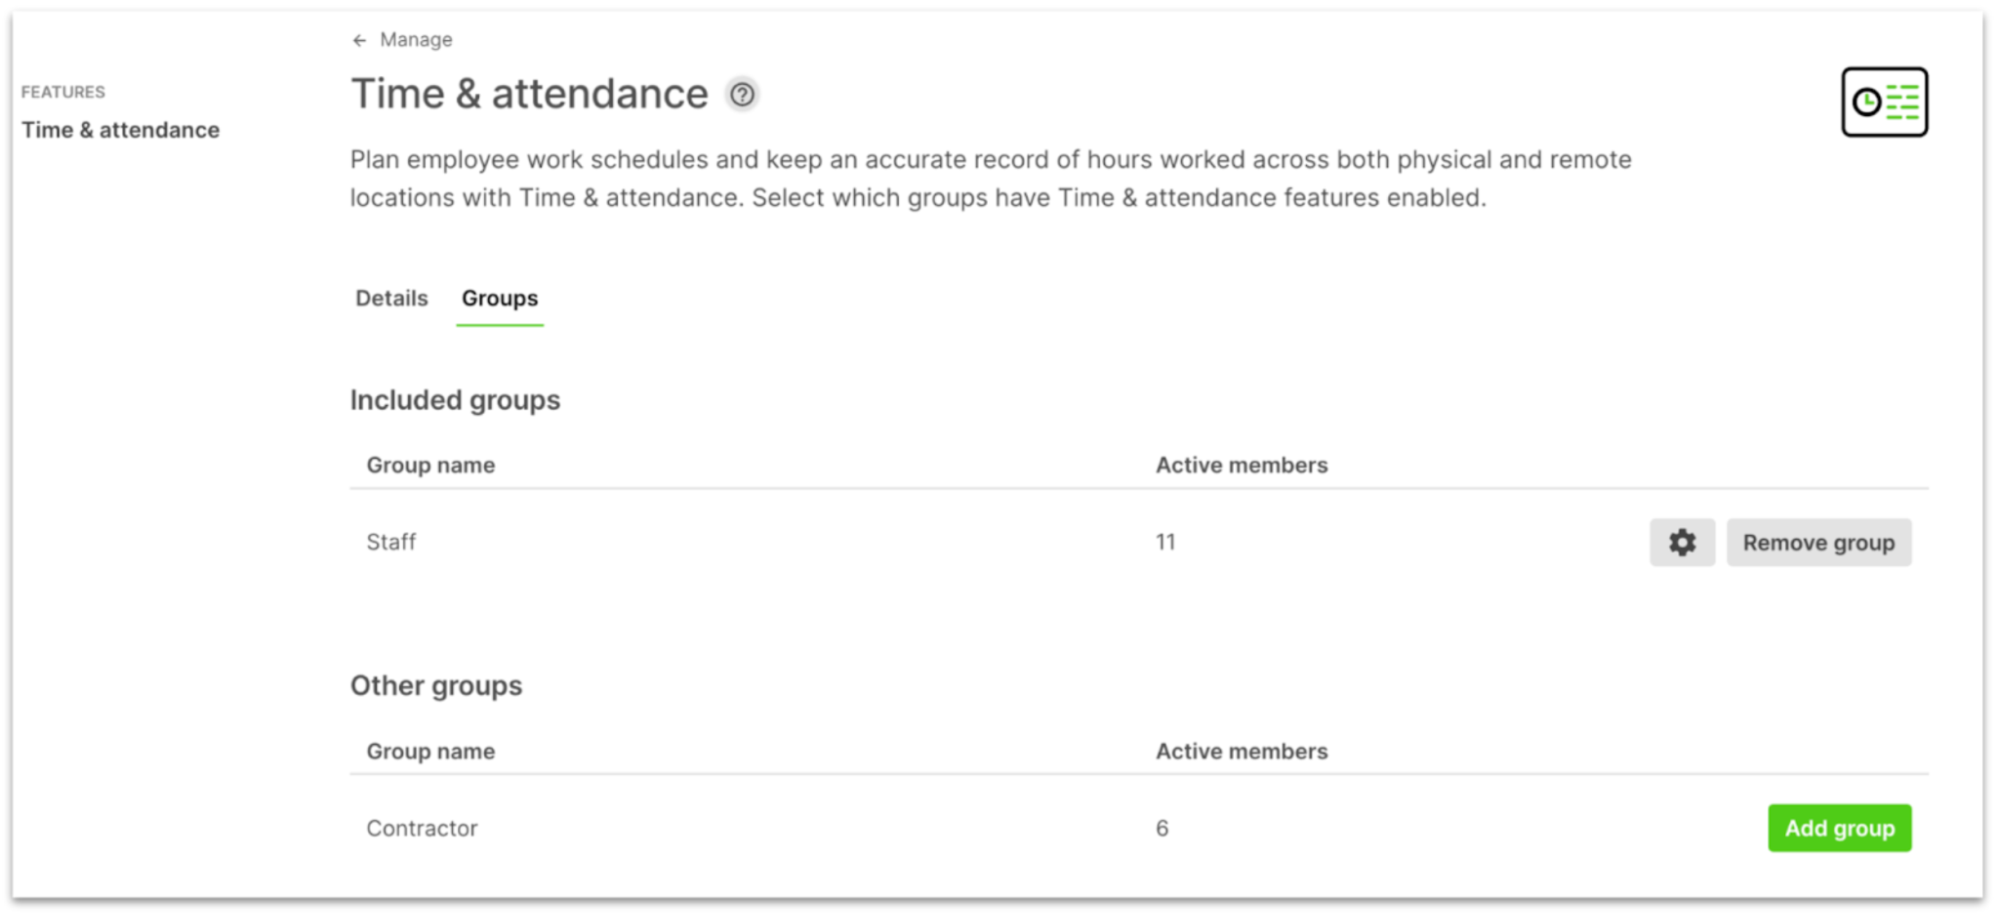
To enable Time & Attendance for repeat or integrated groups, simply select the Groups tab and click Add group next to each group you want to include. New features including Activity Status will immediately appear for all members of selected groups that are using the latest versions of Sign In Companion.
Important
You won’t be able to add groups that take you over your selected usage tier. To upgrade your usage tier, click Change tier.
Activity Status
Activity Status introduces a fresh approach to tracking the work status of employees, whether they’re actively working, on a break or taking lunch breaks, all while staying signed into a site for safety purposes.
For organisations looking for a streamlined way to record and report working hours separately, the ability for employees to switch between these statuses provides a convenient and efficient method for categorising daily activities. When it's time to compile and export this data, Activity Status simplifies the process of excluding unwanted statuses from your calculations.
If you're looking to use Time & Attendance for precise time tracking, the ability to create custom Activity Statuses and seamlessly switch between them unlocks robust project tracking capabilities.
In this section, we'll guide you through the process of updating your Activity Status throughout the day, using this new tool to generate more detailed reports, and even creating your own unique Statuses.
Companion app
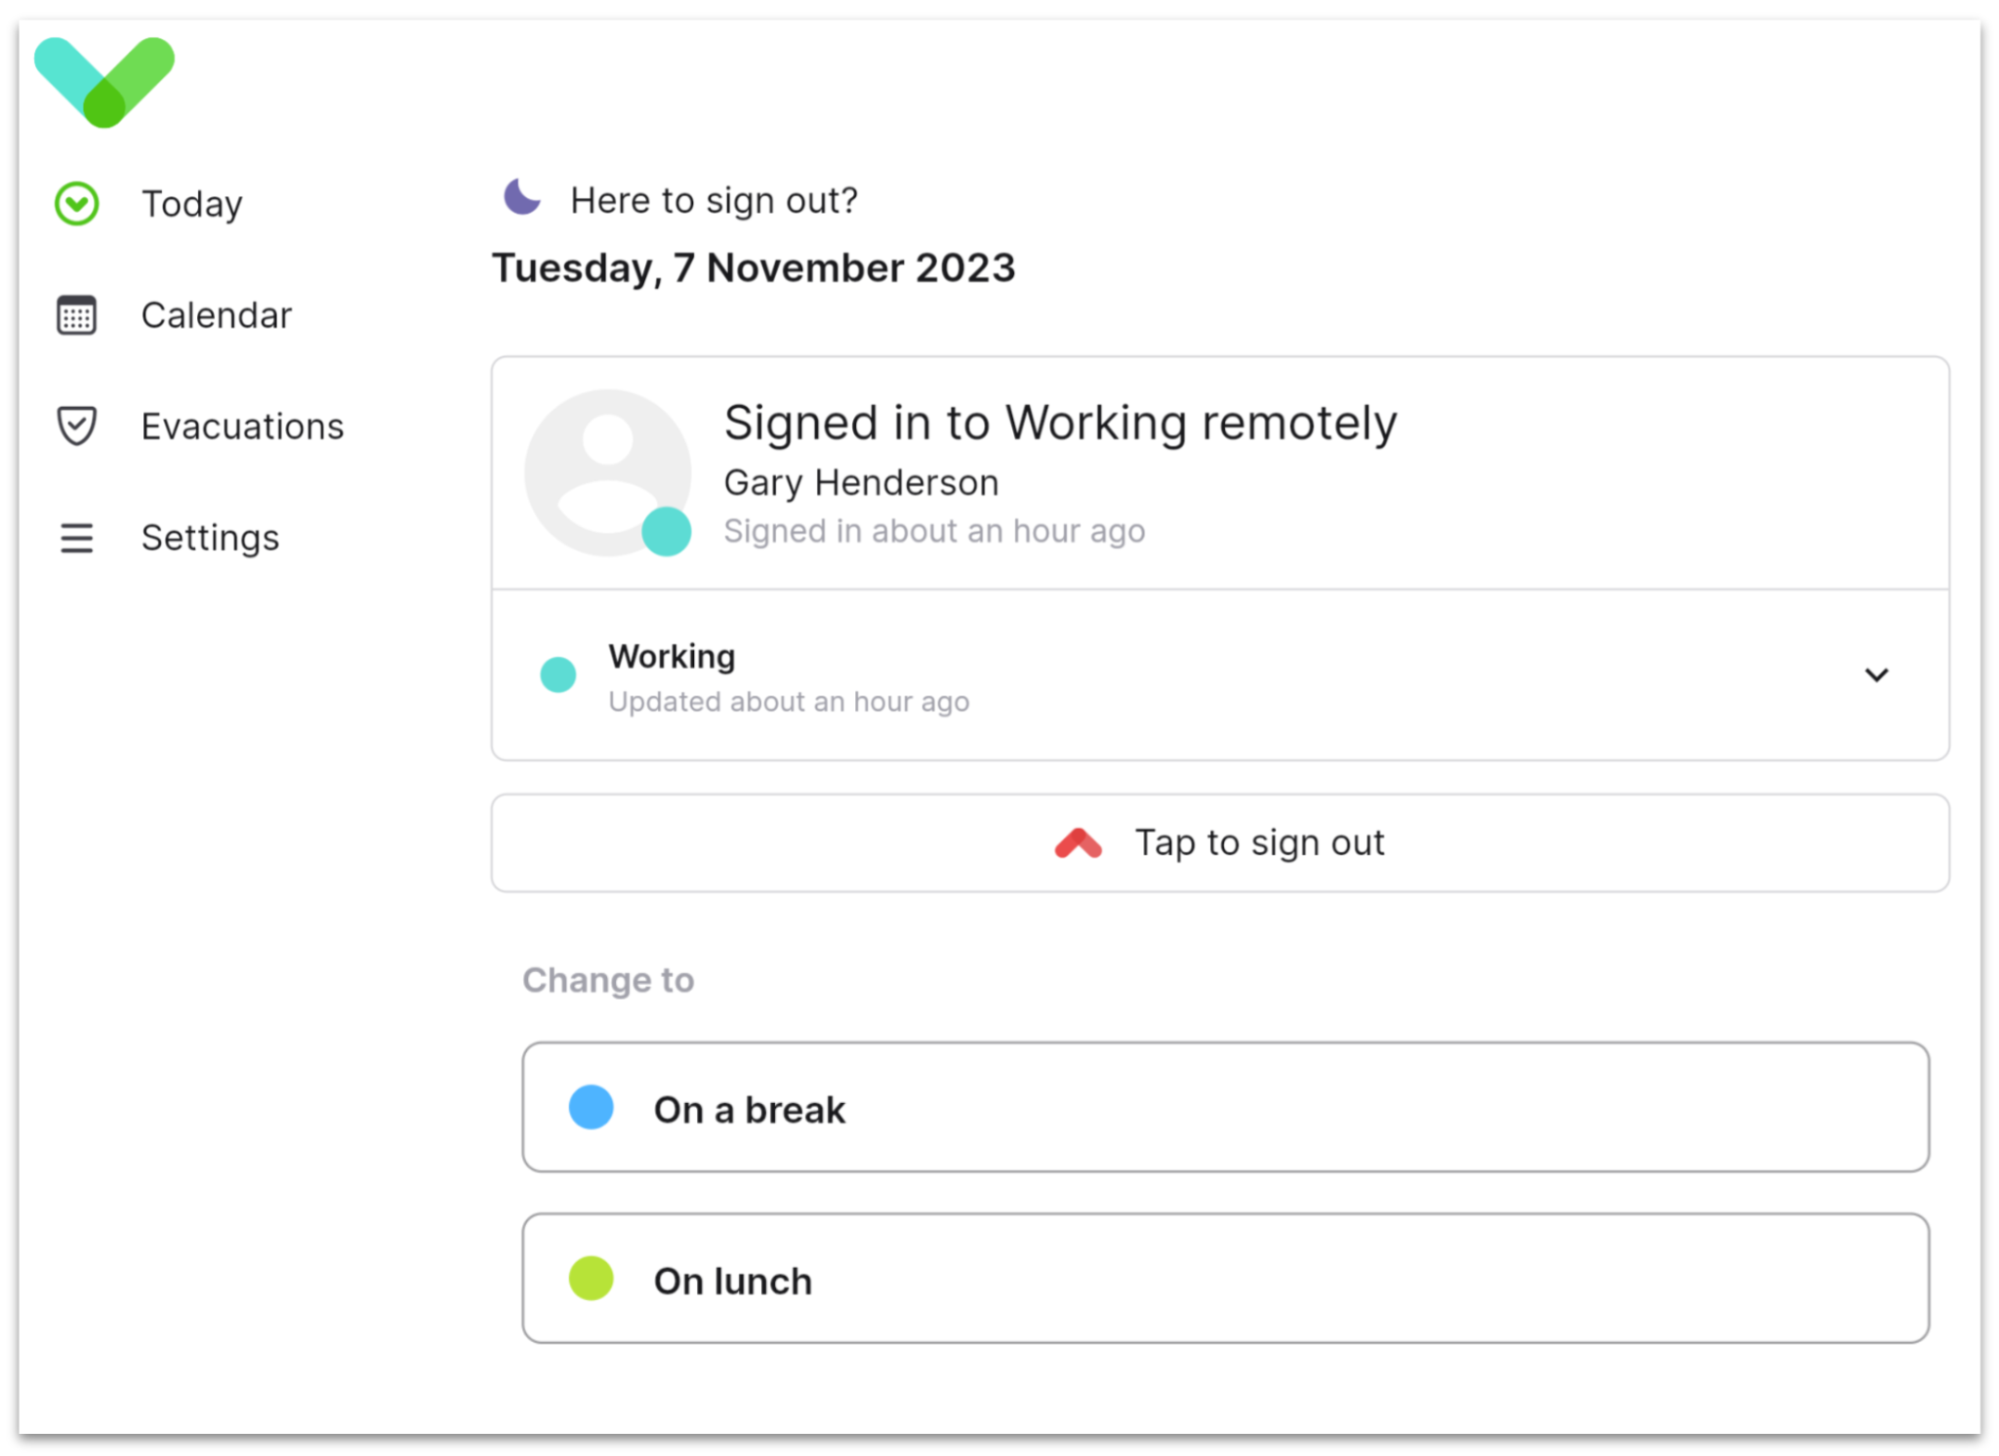
When it’s time to update your Activity Status, it’s as simple as opening Sign In Companion on iOS, Android or the web, and tapping the button that appears under your profile photo on the Today tab. By default it will show as Working (see Customizing activities for information on how to change the default).
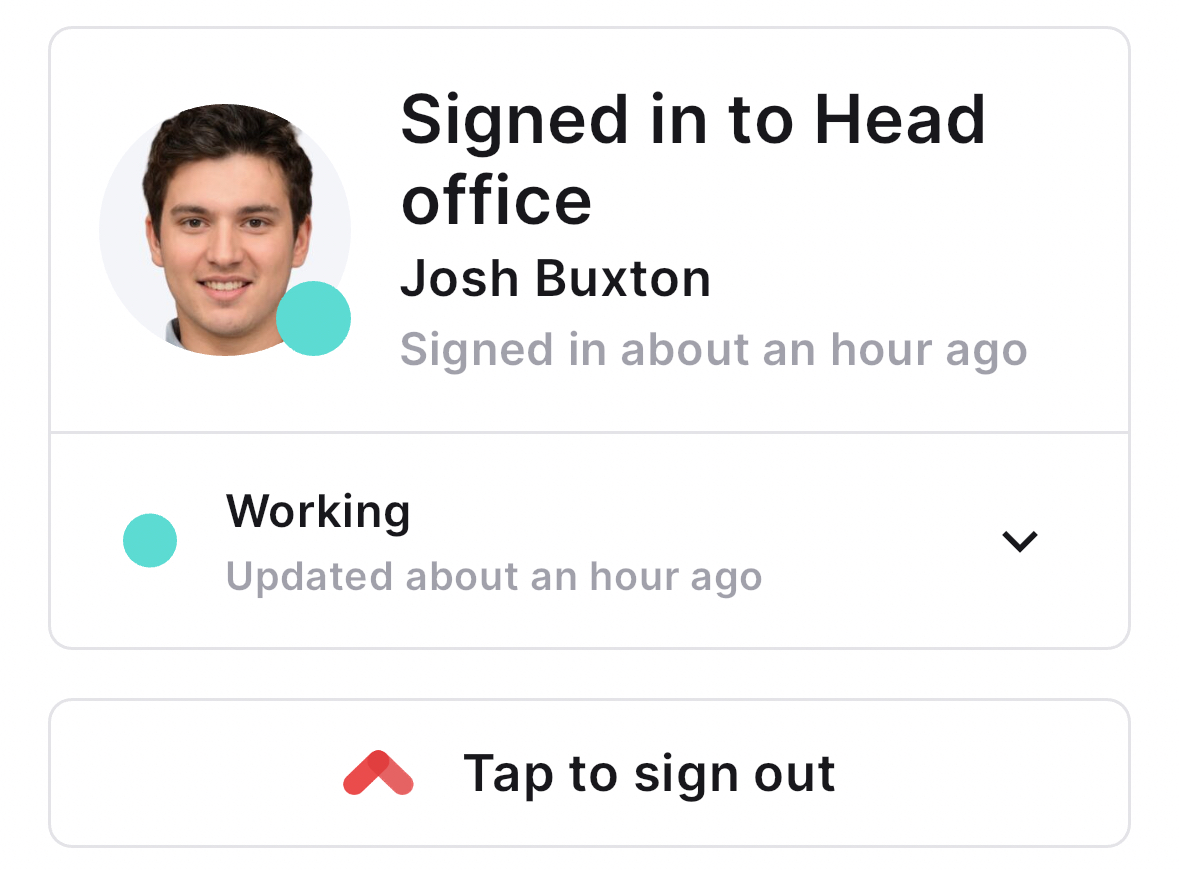
When you tap this button, a list of available Statuses will appear. To select a new Status, tap it from the list. You’ll be returned to the Today tab where the new Status and Status colour will appear.
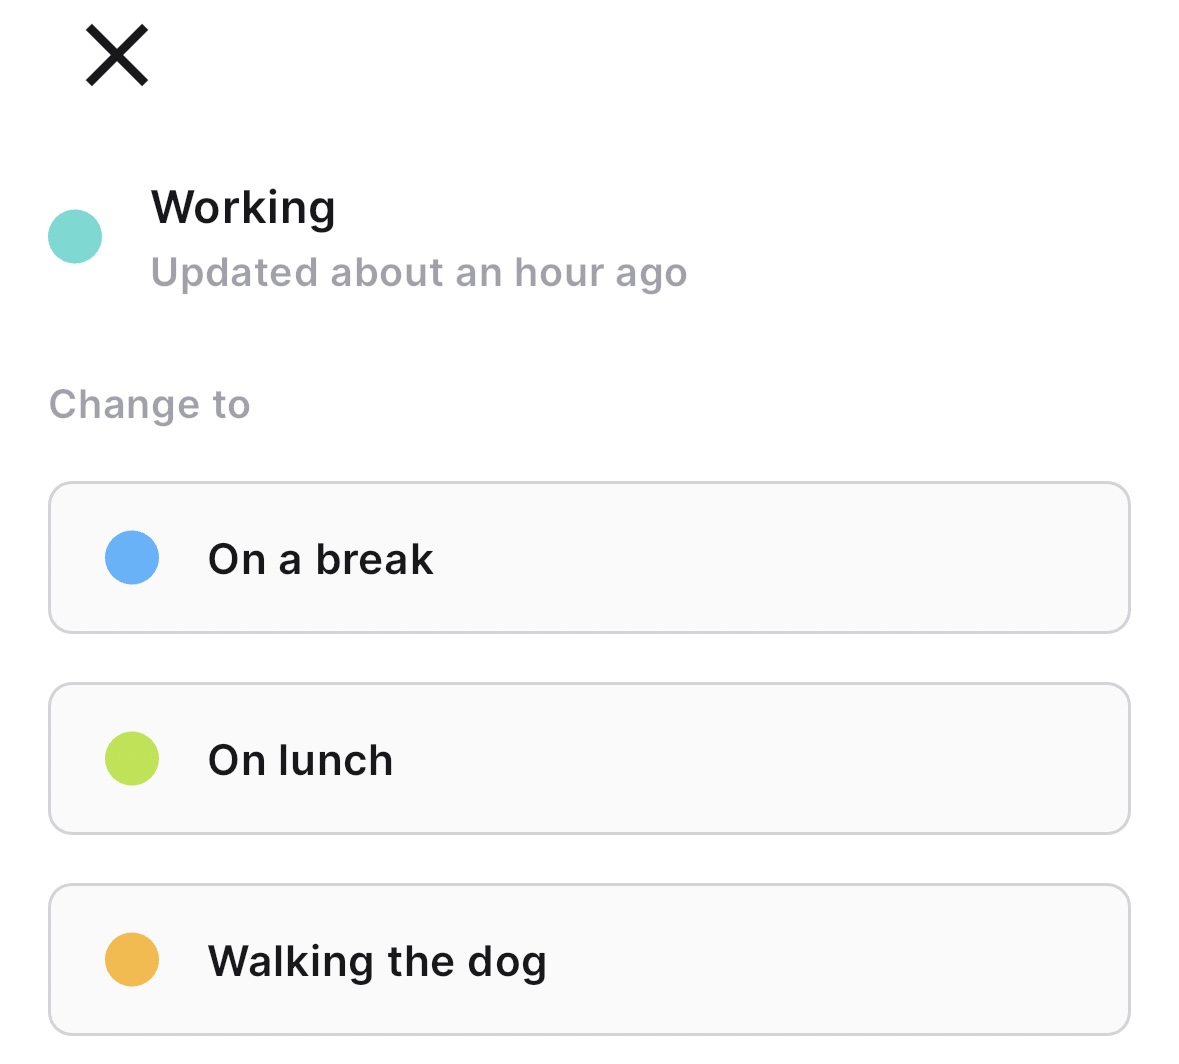
Each time you change your Status, the current time will be recorded.
Since Activity Statuses are designed to help you categorise your time while signed in, you’ll only see the option when you’re signed in to a physical or remote site.
iPad app
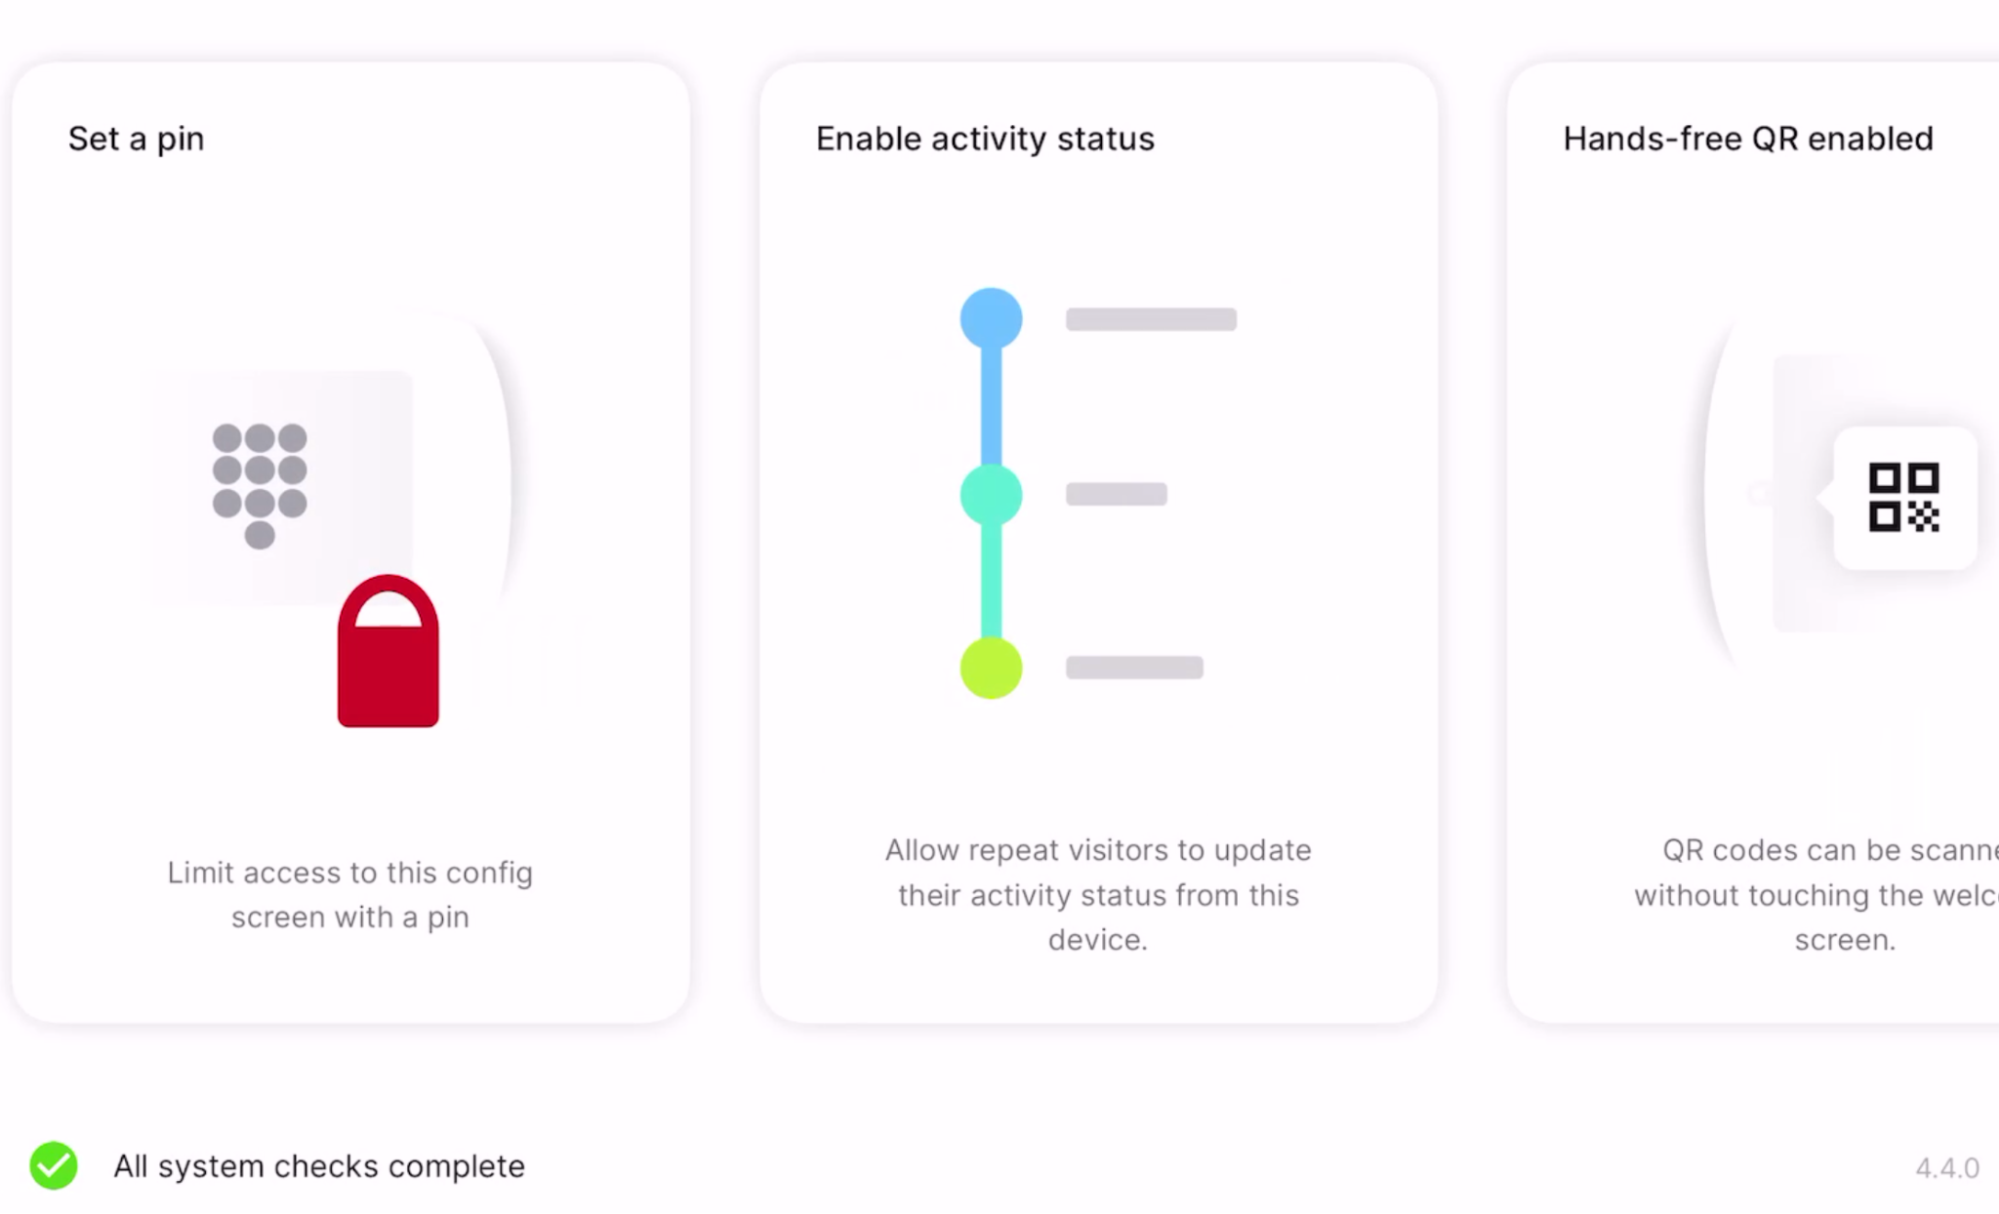
Enabling activity statuses on the iPad app
If you’d like repeat visitors to be able to update their activity status from the iPad app go to the config screen in the iPad app and scroll across to the Enable activity status button.
Signing in manually
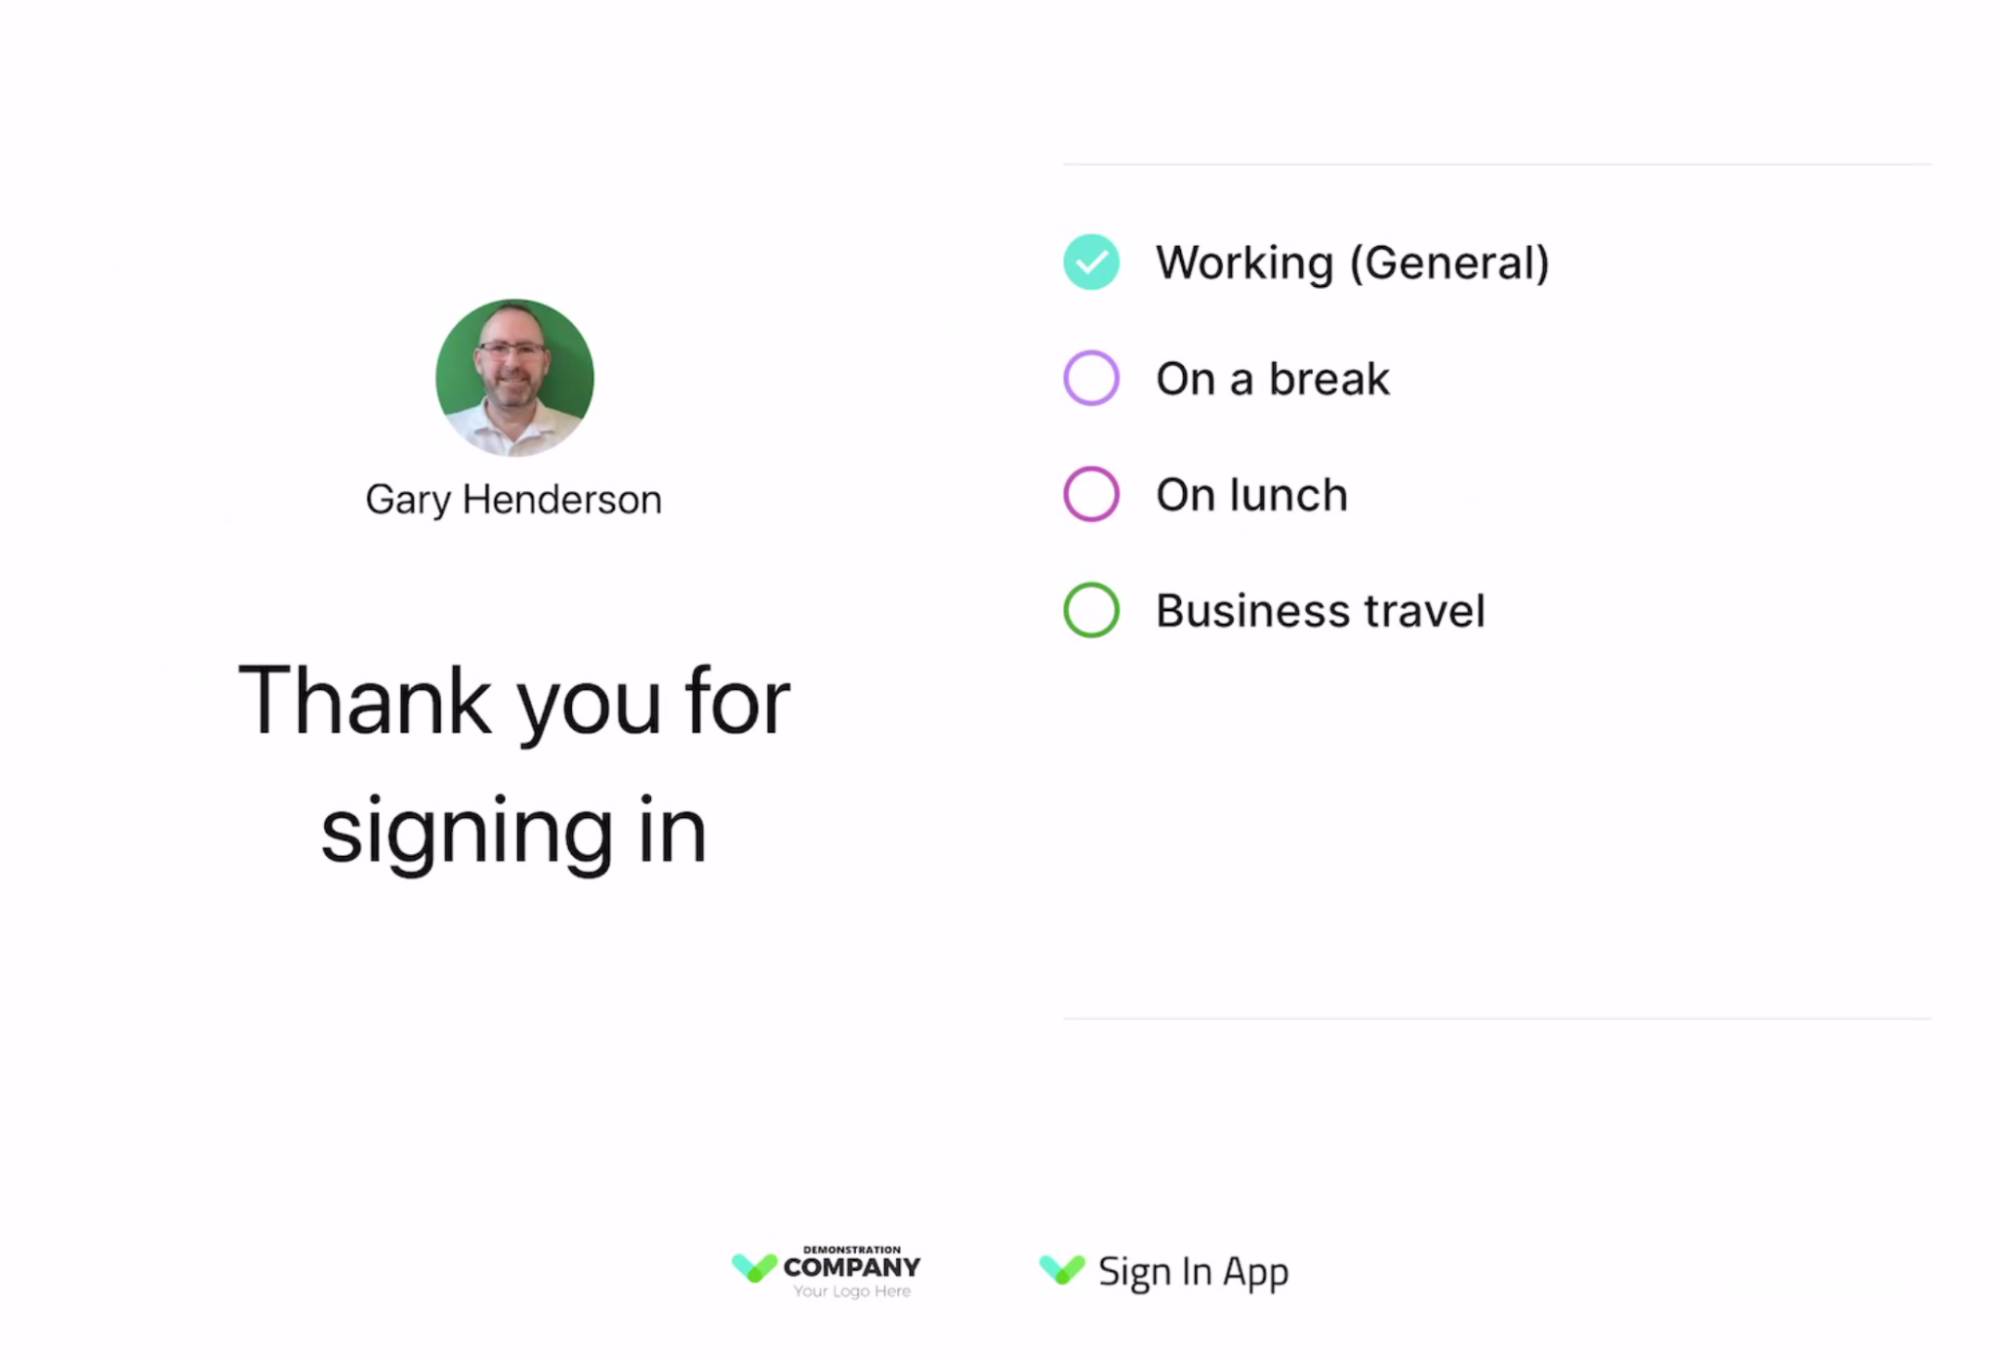
If you tap the Welcome screen in Sign In App, tap Sign in, select the group you’re signing in to, and search for your name you will see the activity status options. Tap one of these options to be signed in with a different activity status. If you don’t change the activity status your status will be updated with your default activity status. In the example below, this is Working (General).
Change status whilst signed in
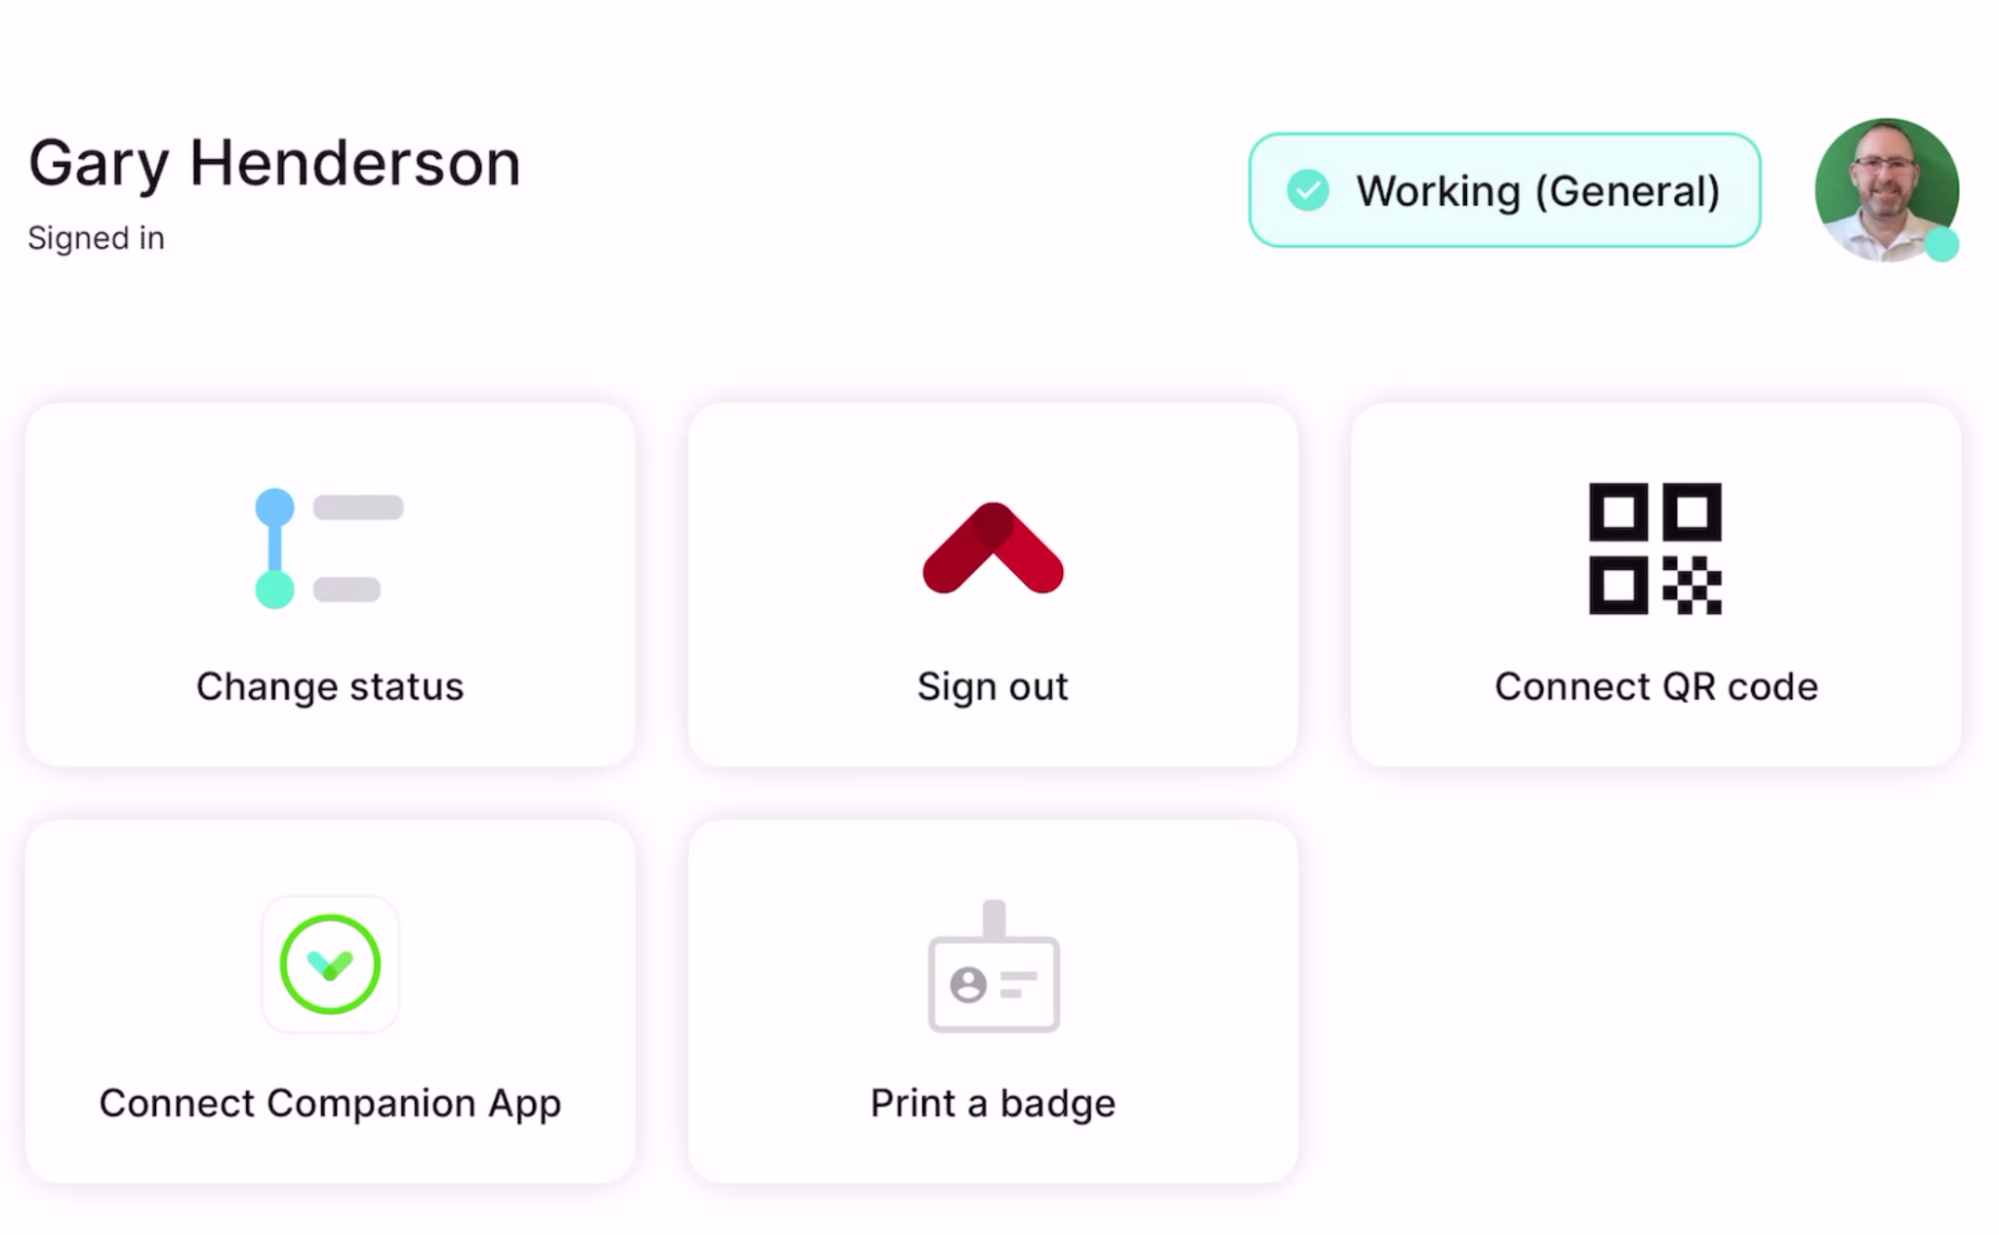
When you tap Sign out, you will be signed out and you’re not given the option to change your activity status. If you need to change your status during the day and you don’t want to sign out, you can tap the Welcome screen, select the magnifying glass in the top right corner, search for yourself, tap your name, and then select Change status.
QR / RFID sign in
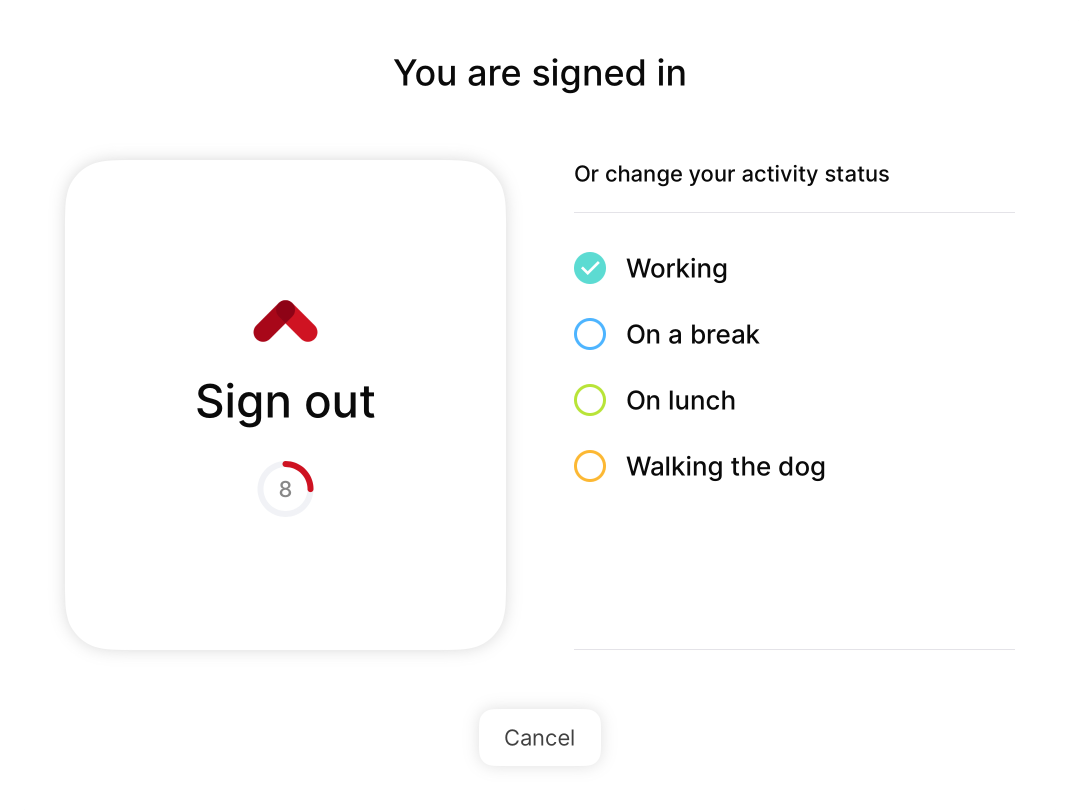
If you use QR codes or RFID tags to sign in/out, the sign in experience is just the same, you will be signed in with your default activity status unless you select a different status. On sign out the experience is slightly different, because we know which group you’re in, a status change option is presented on sign out. This allows you to change your status when you present a QR code / RFID tag the second time. If you don’t select an activity status you will be signed out - there is a countdown to show how long you have before the sign out is completed.
Tip
Using QR codes and RFID tags with Time & Attendance allows you to sign in, sign out, and update your status more easily.
Please contact support@signinapp.com if you’d like some guidance on using QR codes or RFID tags. You can also read about Sign In App Tap here, this allows you to use RFID tags with Sign In App.
Timesheet reports
To see how changing Activity Status affects the timesheet data you’re recording, head over to Reports > Timesheet in the online portal. If you’ve familiar with our existing Timesheet report and its recent improvements, you’ll feel right at home here. If this is your first time using this report, each horizontal ‘pill’ shape represents a sign in for that particular employee. Filters at the top help you select dates and break the data down by site and group.
With Time & Attendance enabled, Activity Status information is overlaid on the existing report and a new Activity filter appears. Each Activity is represented on the bar by its associated colour and hovering your mouse over a particular coloured section will show more detailed information, including the sign in and out times, site name and Activity duration.
To filter the report, click the Activity filter and select one or more Activity Statuses. The coloured bars will update and the totals on each line will be recalculated to only include those hours spent on the selected Activity Statuses.
Exporting data
When you’re ready to export the data, click the Export button at the top right corner of the screen. Your previous filter options will be pre-selected. Confirm the filter options, date range and personal fields to include on the export. When you’re ready, click Export in the bottom right corner of the window and a CSV will start downloading.
Timesheet exports for groups that have Time & Attendance enabled including the ability to filter by activity type and to switch between different formatting options. These filtered results will be applied to your exported report.
Tip
If you need to run a report that includes T&A data and non-T&A data, tick the Include visits without activity status before exporting.
Making or requesting changes and approval
As easy as it is to change Activity Status, people will inevitably forget from time to time, particularly if it’s a new process being introduced for the first time and habits are yet to form. Fortunately, it’s easy for employees to request changes and ensure their timesheet reports remain accurate at all times.
From Sign In Companion, tap the calendar (2nd) tab at the bottom. Navigate to the date of the record you wish to edit and tap on the card that shows the sign in time for that day. A new window will appear that shows each Activity Status change, as well as the start and end times for each sign in.
Under each sign in record, tap Request changes to bring up the edit view. From this view you can amend the sign in or out time, update Activity Status changes and add new ones. You are then asked to provide a reason for the changes before you can tap Submit request.
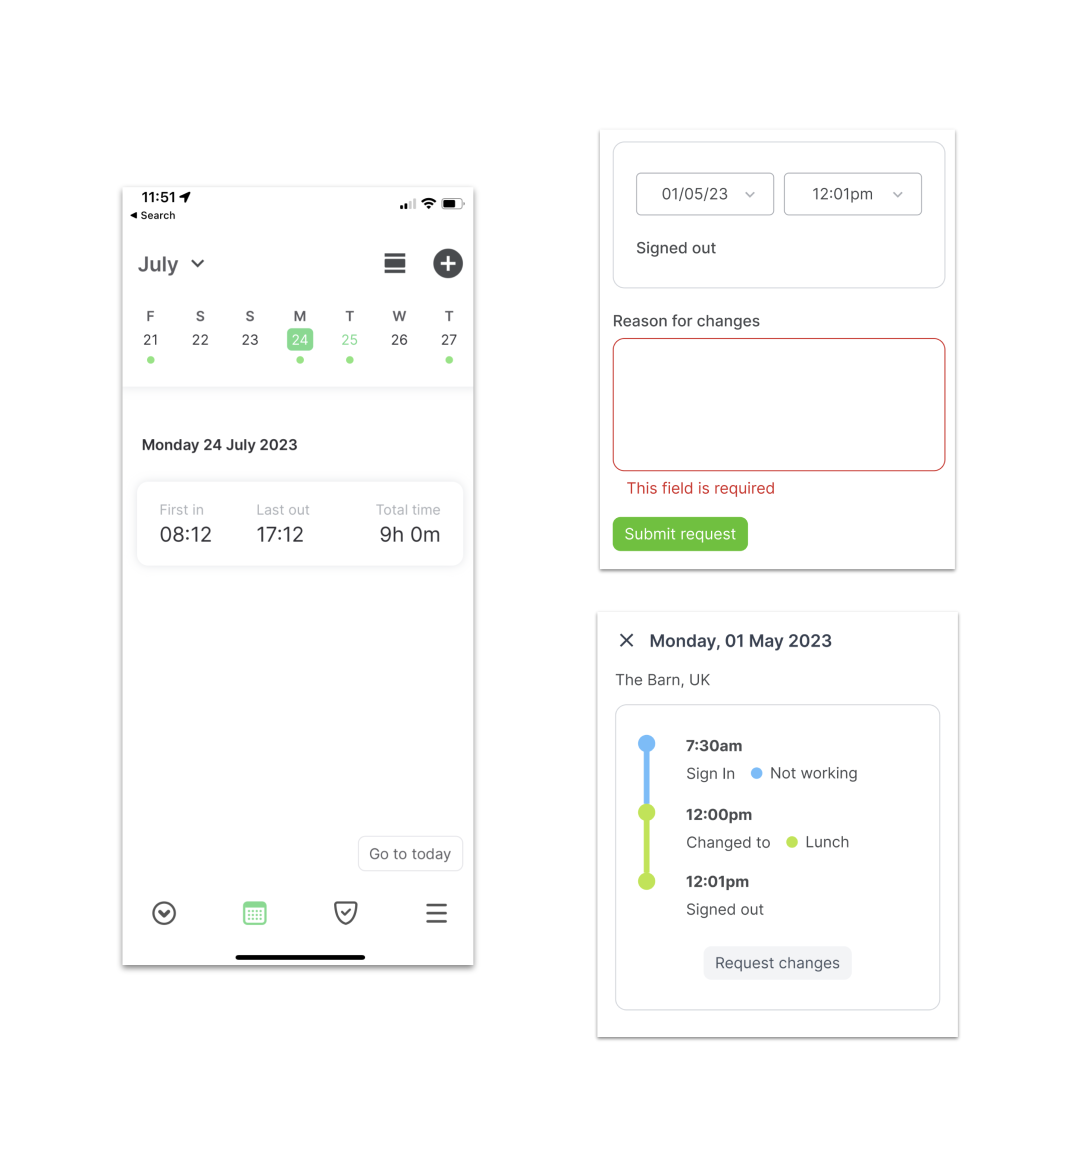
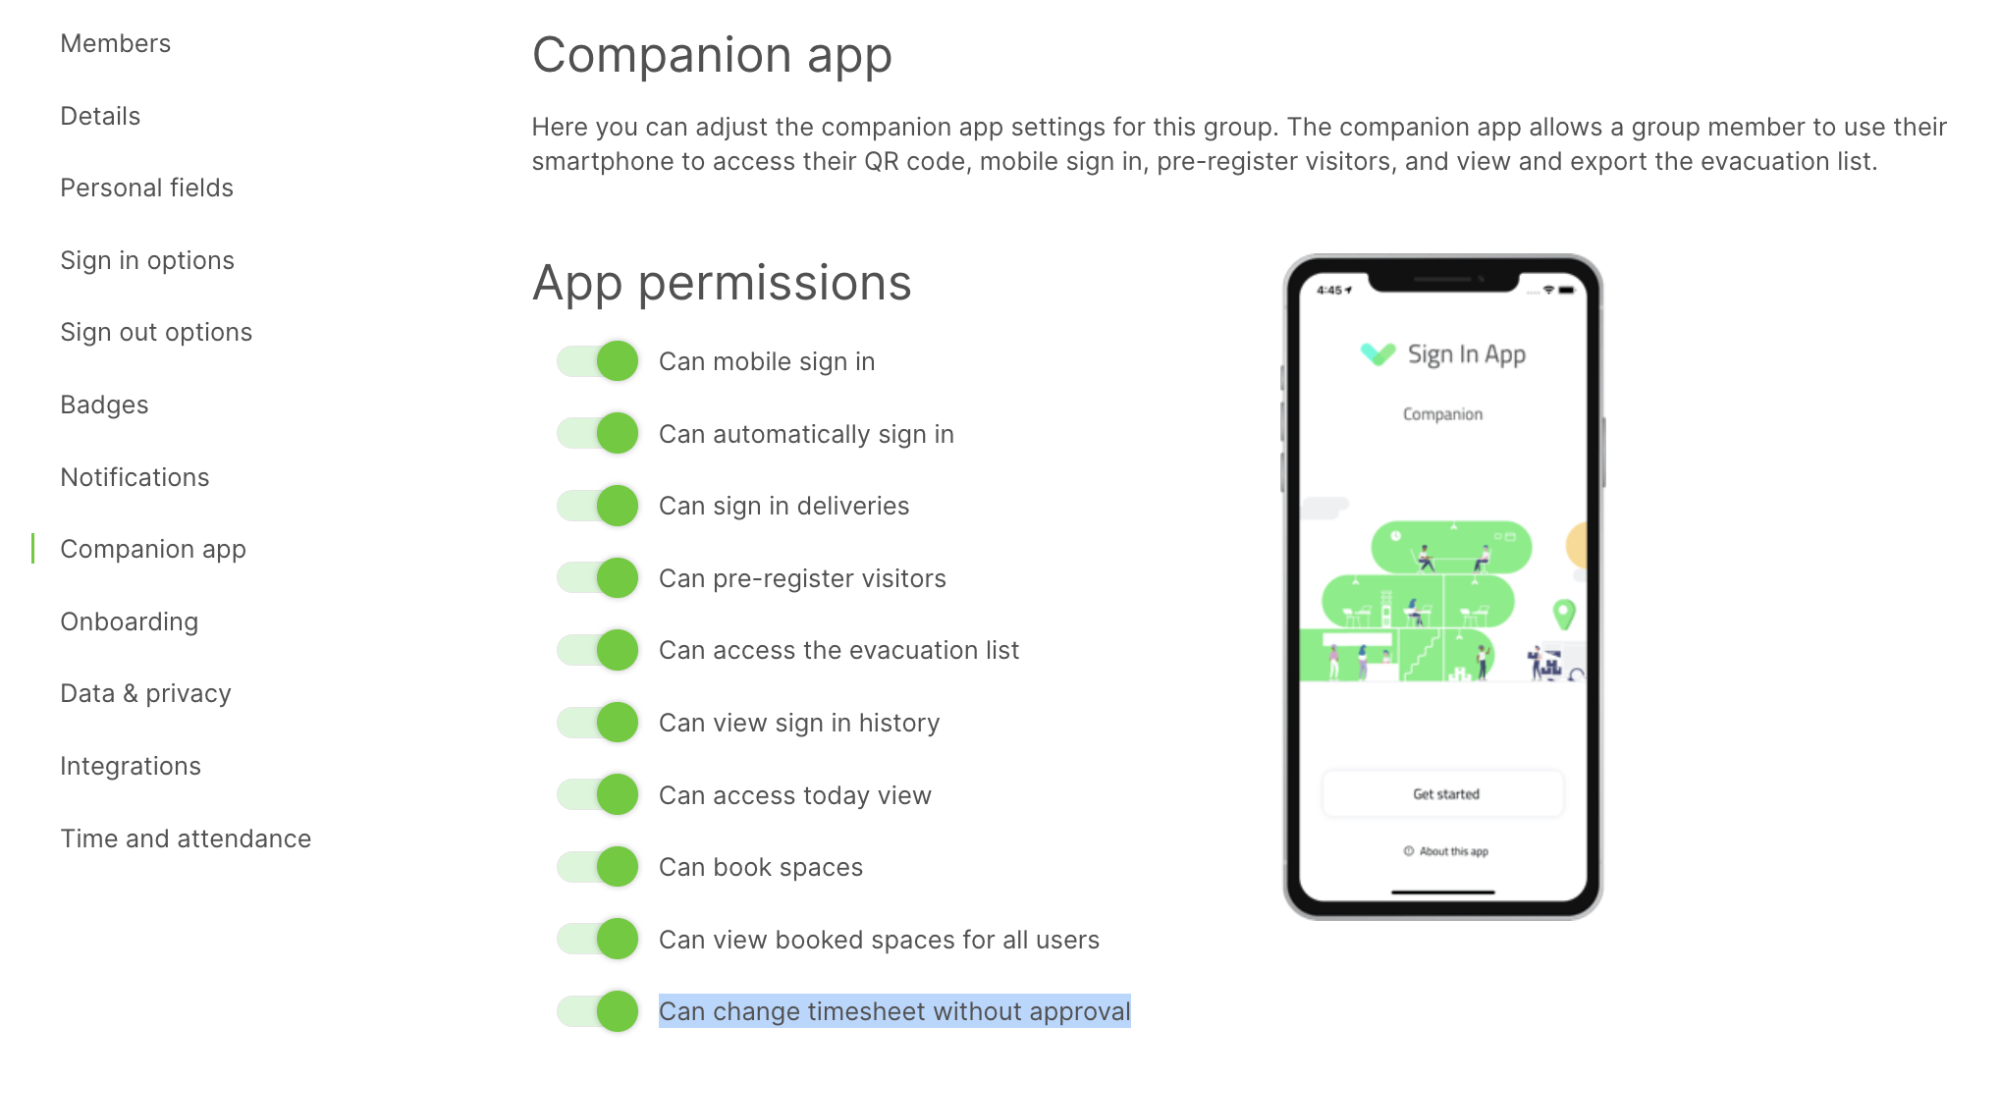
You can configure the system to require approval in the web portal for any requested changes to timesheets, or you can let your employees make the changes directly. The permission for whether an employee can make the change without approval is controlled by a toggle switch in the group or members companion app permissions.
You can set a default for the group, or you can control which individuals within a group can do this. You will find this setting in the web portal at …
(For group default) -
Manage > Group > Select group > Companion App
(For individual member) -
Manage > Group > Select group > Members > Edit member > Companion App
Permission: Can change timesheet without approval
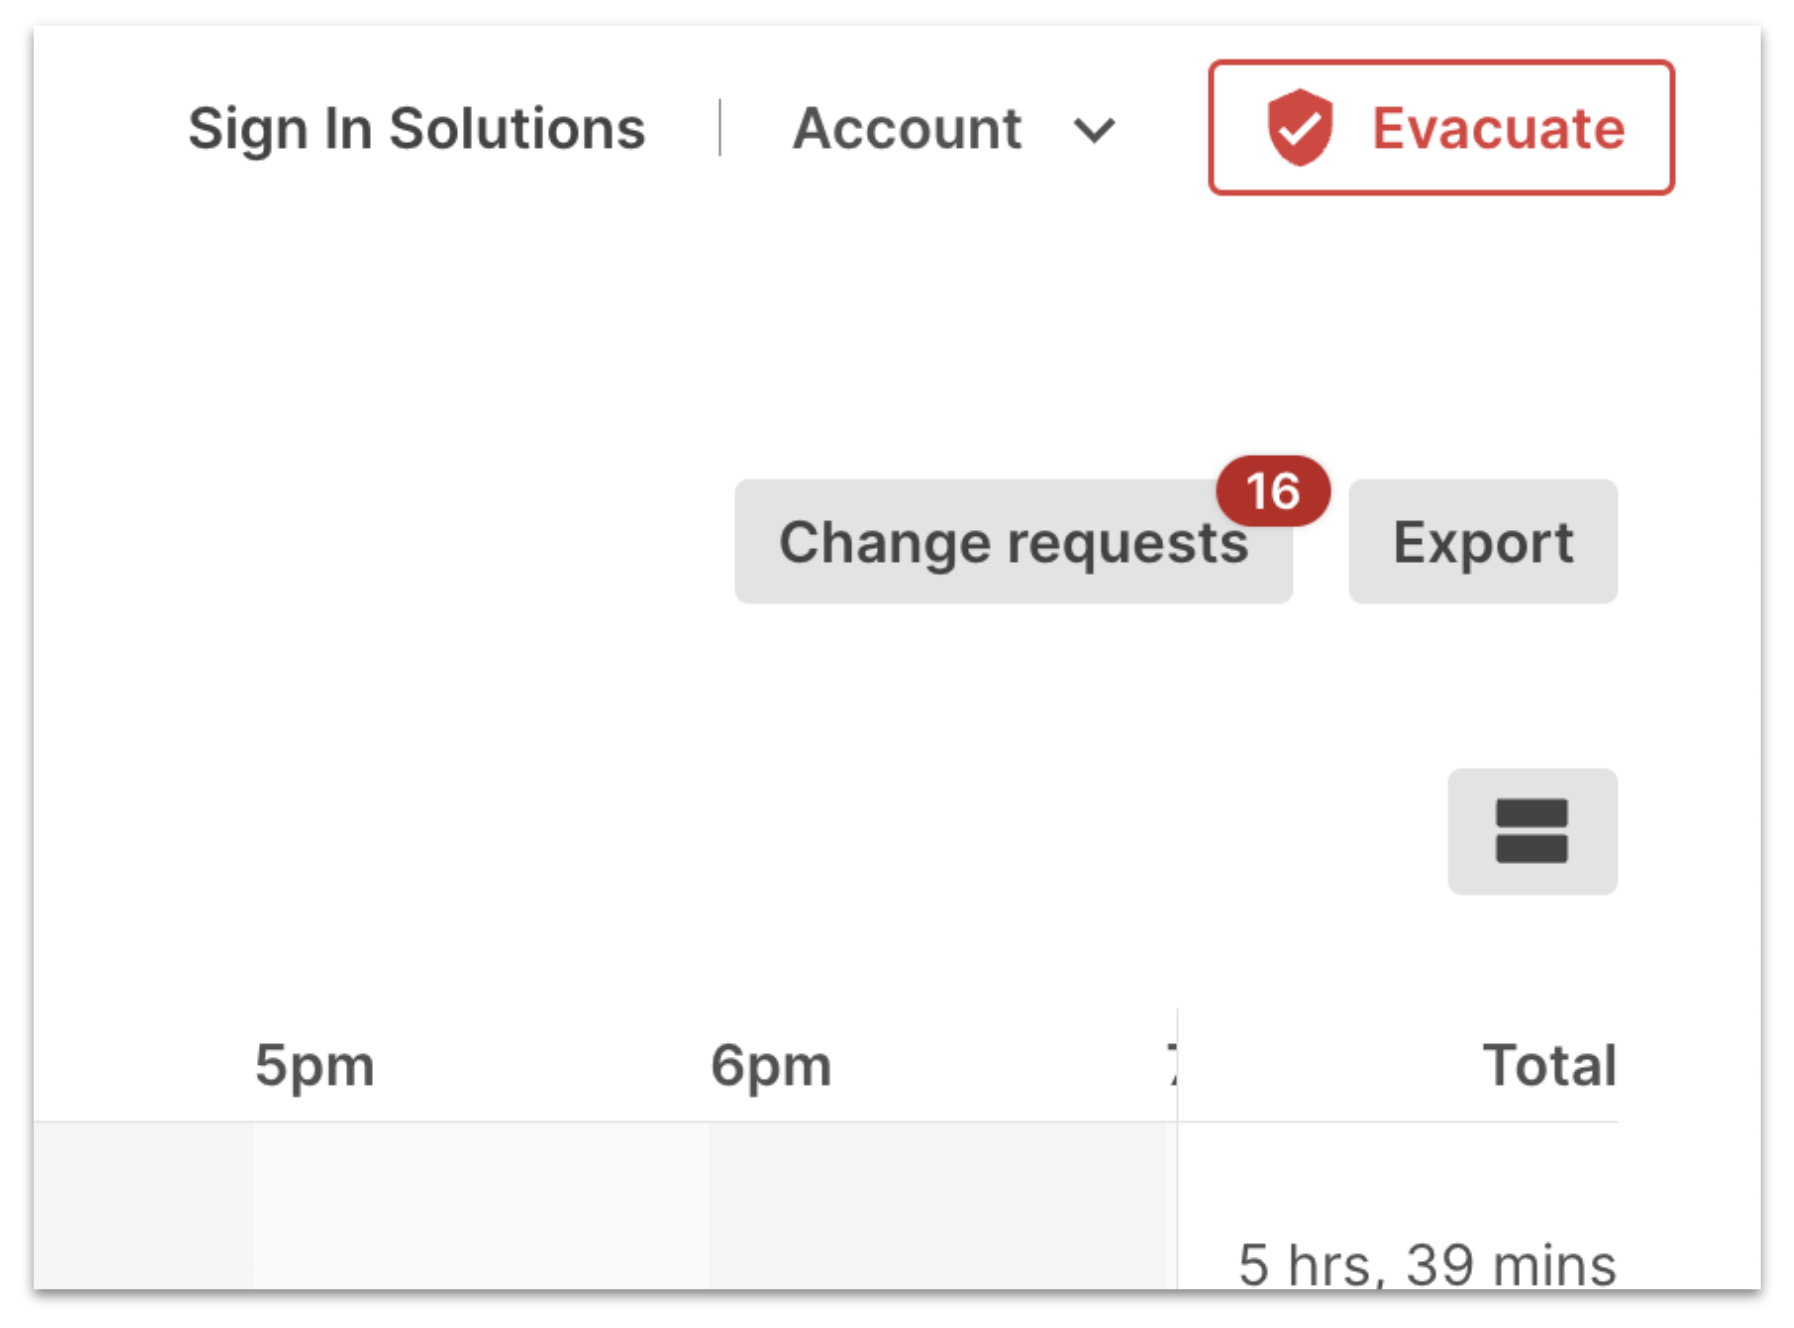
If a user or group does not have this permission to make their own changes, requested changes can be viewed and approved via the online portal at Reports > Timesheet. To approve submitted requests, click Change requests in the top right corner next to Export.
A new window will open detailing each request including the current and proposed timesheets. Either click Approve or Decline, or use the <> buttons to cycle through each request. If a request is rejected you’ll be asked to provide a reason before confirming.
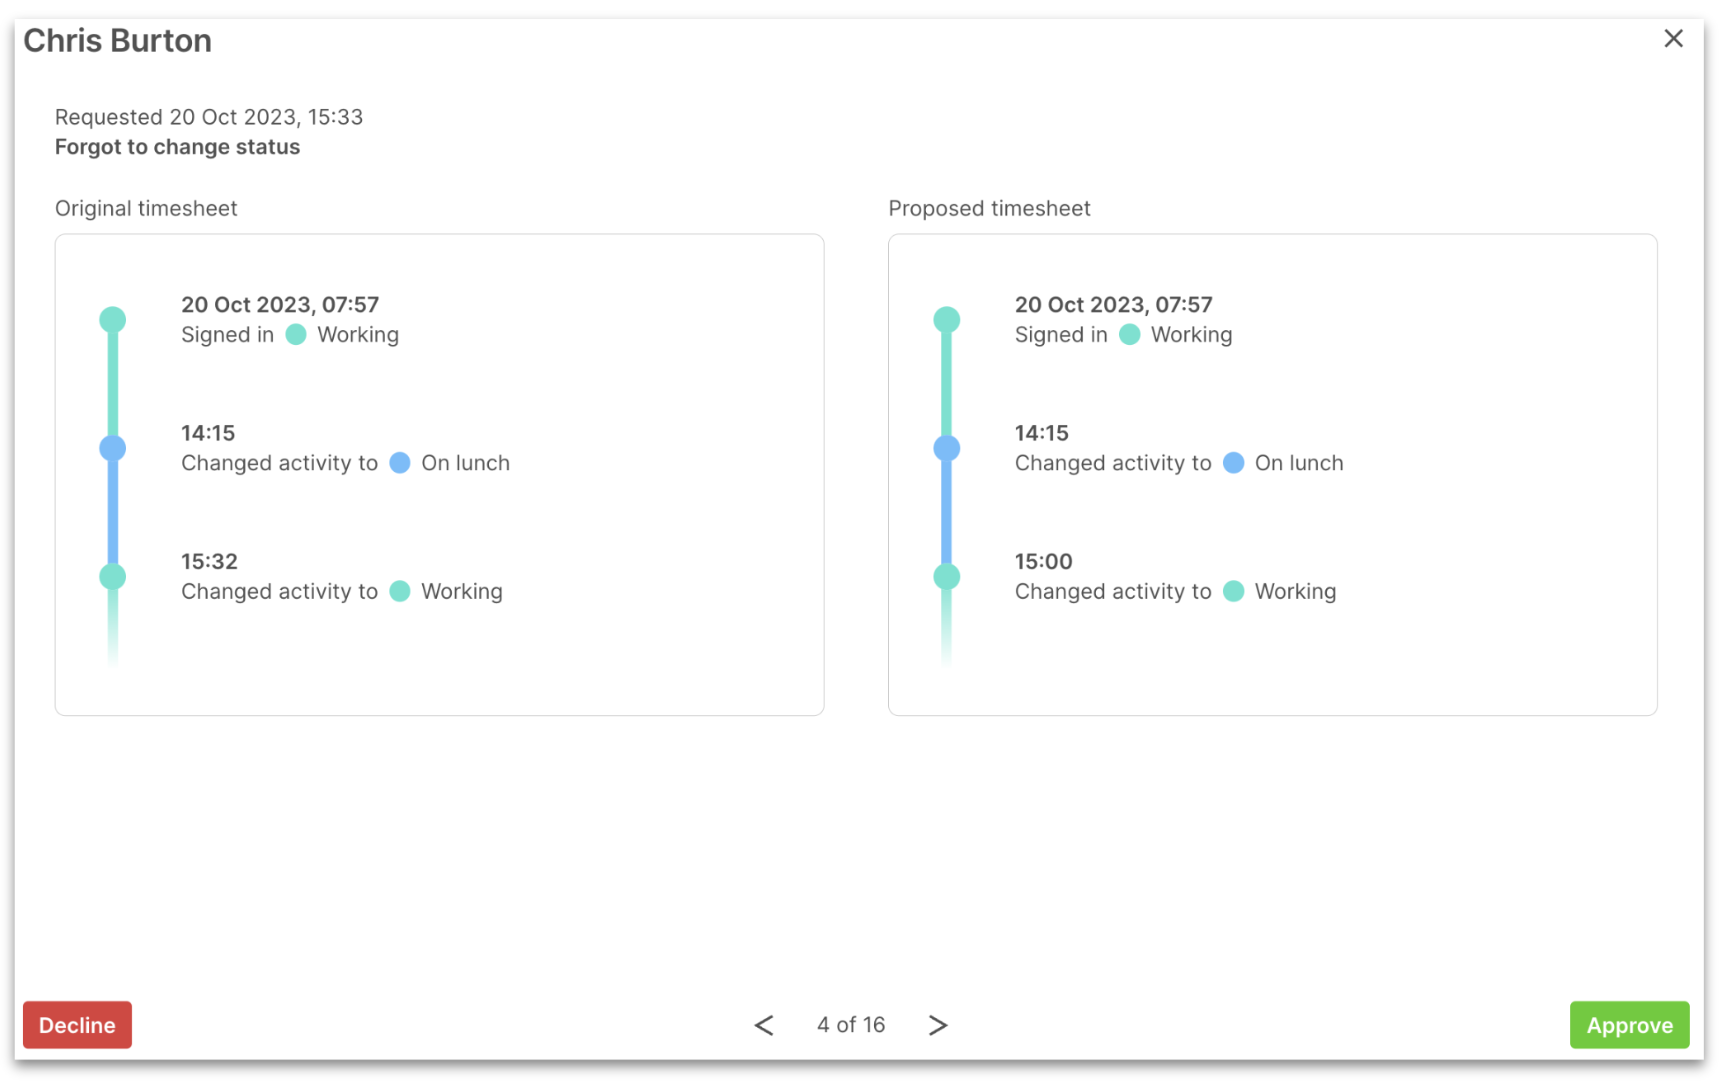
Approved changes are reflected immediately in the Timesheet report and on the employee’s companion app. When there are no more requests to approve, the button will disappear.
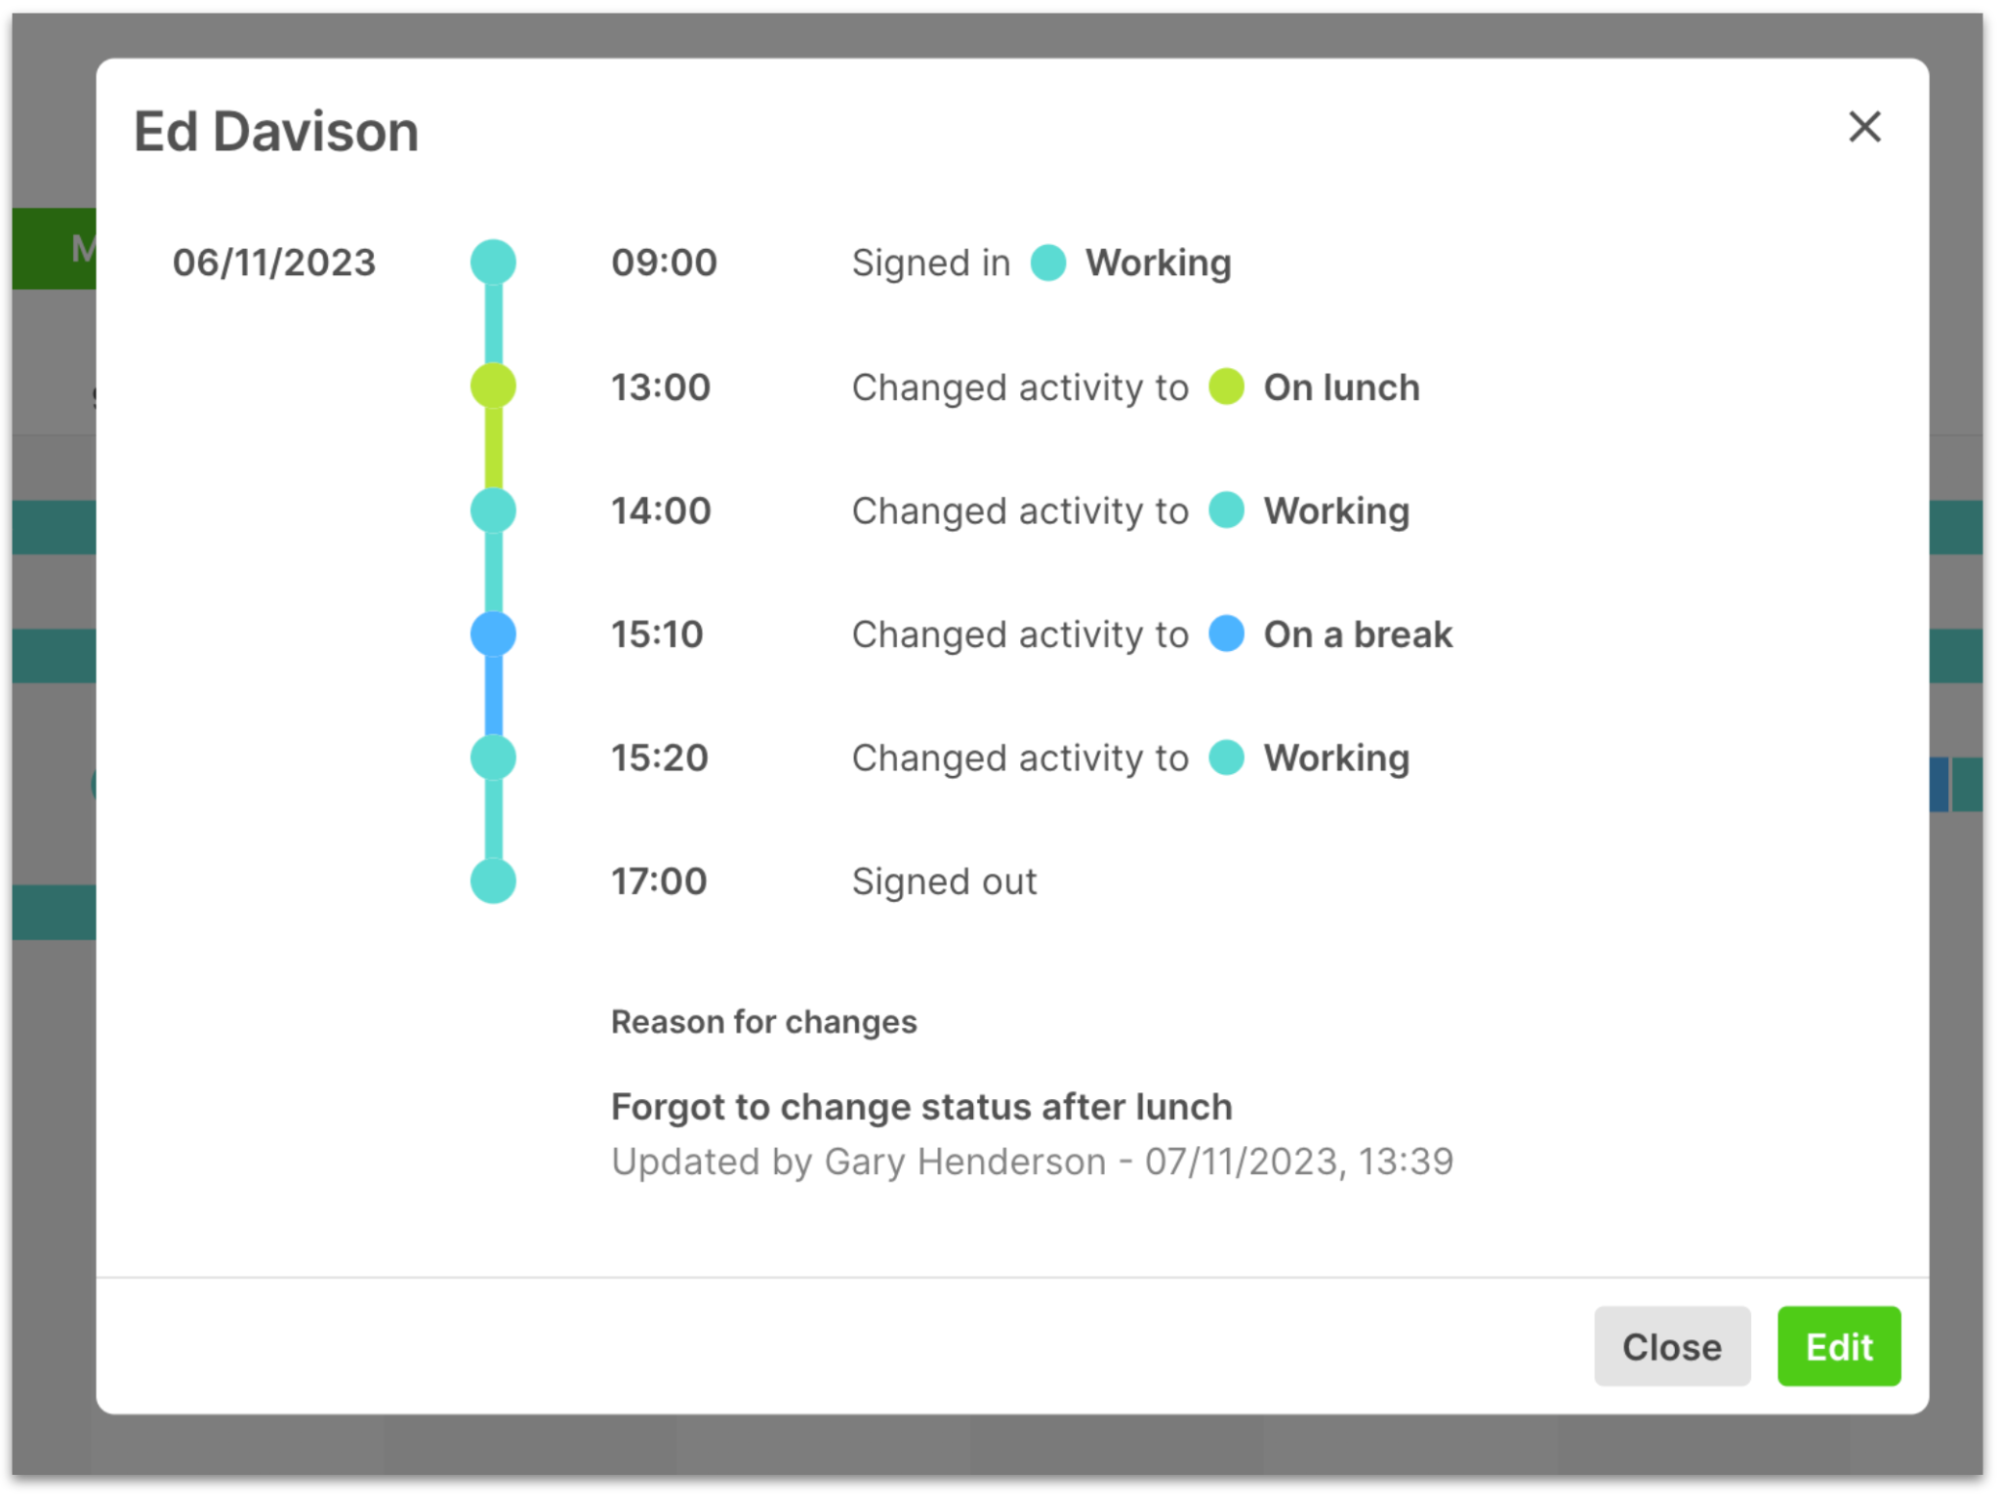
You also have the option to update timesheets directly within the Timesheet report itself. Click into any sign in record, then click the Edit button in the bottom right of the window that appears. You can make all the same changes you can via Companion, but changes made directly to the Timesheet don’t have to be approved.
Customising activities
When enabling Time & Attendance, we’ll automatically create the following Activity Statuses for all selected groups:
- Working
- On break
- On lunch
To amend these, or create your own custom Activity Statuses, go to Manage > Select group > Time and attendance on the online portal. Here you can click the ‘pen’ icon to edit existing Statuses, or click Add new to create your own.
When editing or creating a Status, you can name it and assign a colour that will appear in Companion and the Timesheet report.
To change the order in which the Activity Statuses appear in Companion, click and drag the ‘3 line’ icon and remember to click Save at the bottom right of the screen to commit the changes.
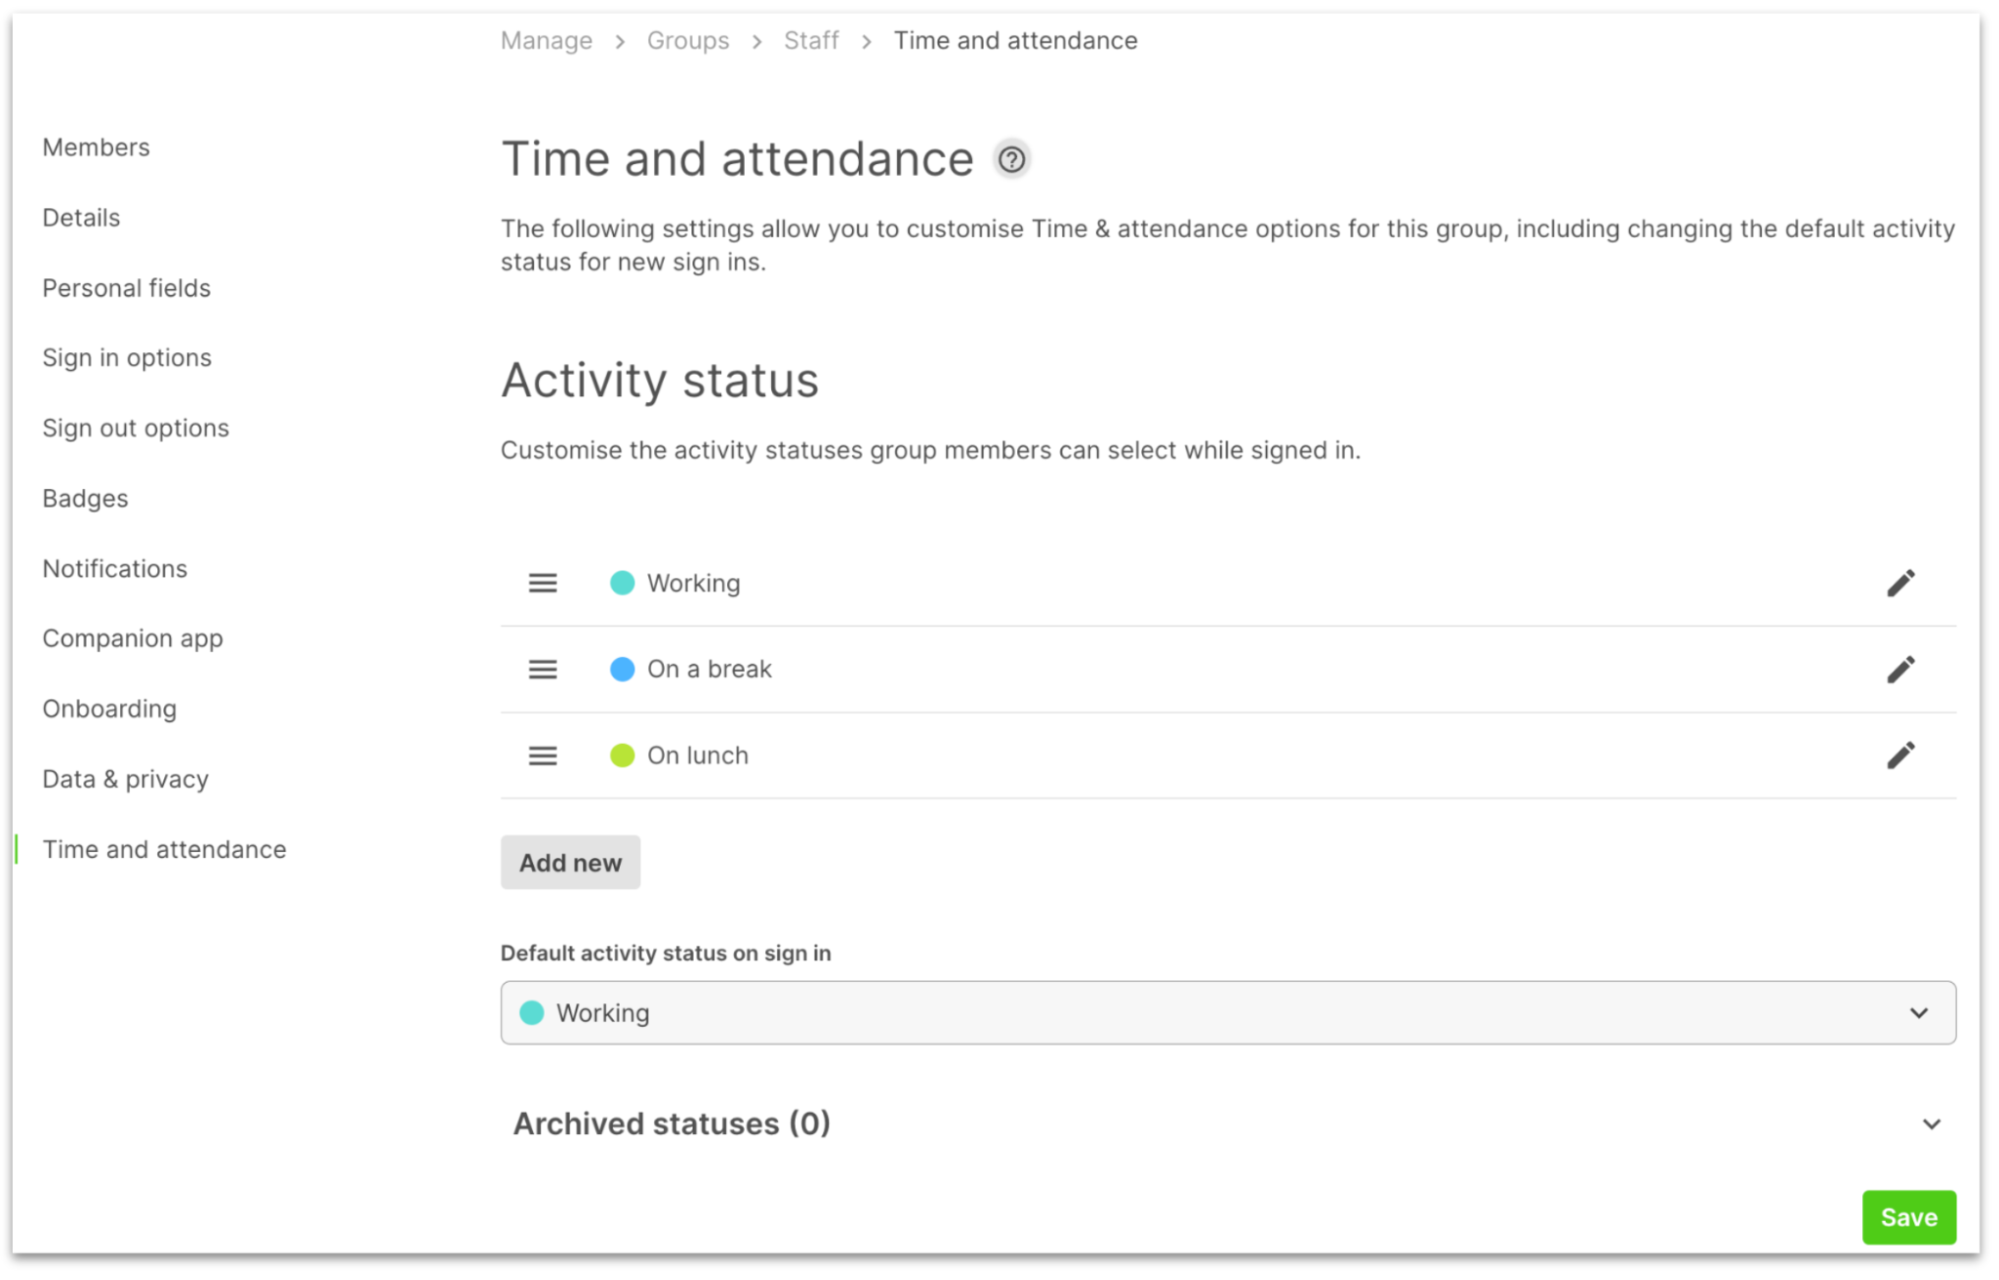
When employees are signed in, they’ll always have an active Activity Status. To change the Status that is assigned by default on sign in, change the option under Default activity status on sign in and remember to Save.
If you’re looking to use Activity Status to record hours spent on project work, you’ll likely be creating and archiving Statuses often. Archiving an Activity Status allows you to continue to report on the data captured, while preventing any future records from being logged against this status. To archive a Status, simply click the ‘pen’ icon to edit it, toggle Status is archived to ON and Save.
You also have the option to delete an Activity Status, however unlike archiving, deleting permanently destroys all associated data.
Managing group members
In addition to the new Activity Status and Working Hours features, we’ve also released additional improvements to help you manage your employees in Sign In App. These include new group member filtering options and improved bulk edit tools.
Group member filtering
When you’re looking to make changes across a number of employees, such as assigning working hours or selecting a Manager for absence request approvals, the bulk edit tools found under Manage > Groups can help streamline the process.
On the Members section of Manage > Group, you’ll notice a new button called Add Filter. Clicking this option lets you select any Personal Field configured for the group. Depending on the Personal Field you select, you’ll be able to either tick the associated values or use the search box. This will allow you to filter your group members by any field (such as Role) to make it easier to select the members you want to edit.
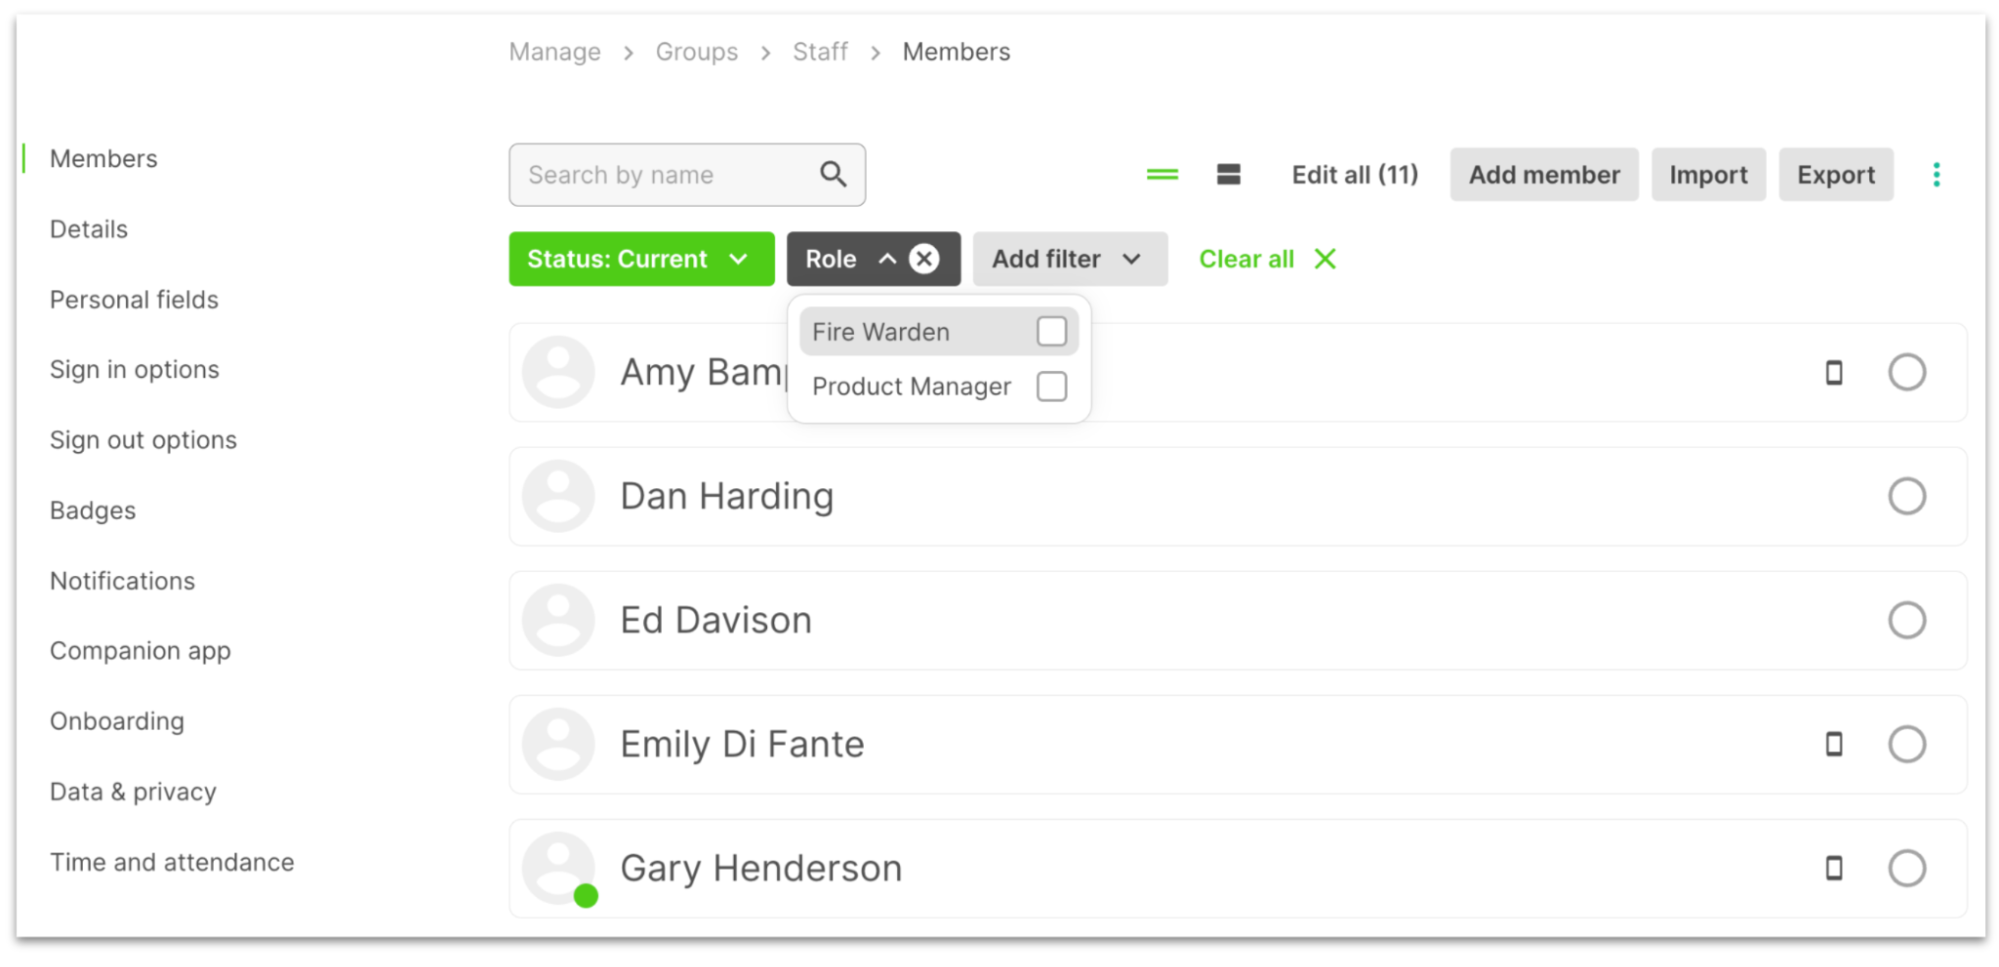
Once you’ve used the filters to show only the members you want to edit, click Edit all to open the bulk edit window.
Improved bulk edit tools
In addition to advanced filtering options, we’ve improved the usability of our bulk edit window. The options are now split into expandable sections, making it easier to navigate. Each section corresponds to a menu option in the group member edit window, so it’s easy to keep track of the changes you’re making. A handy green indicator will appear next to any section with pending changes.
Daily Attendance Report
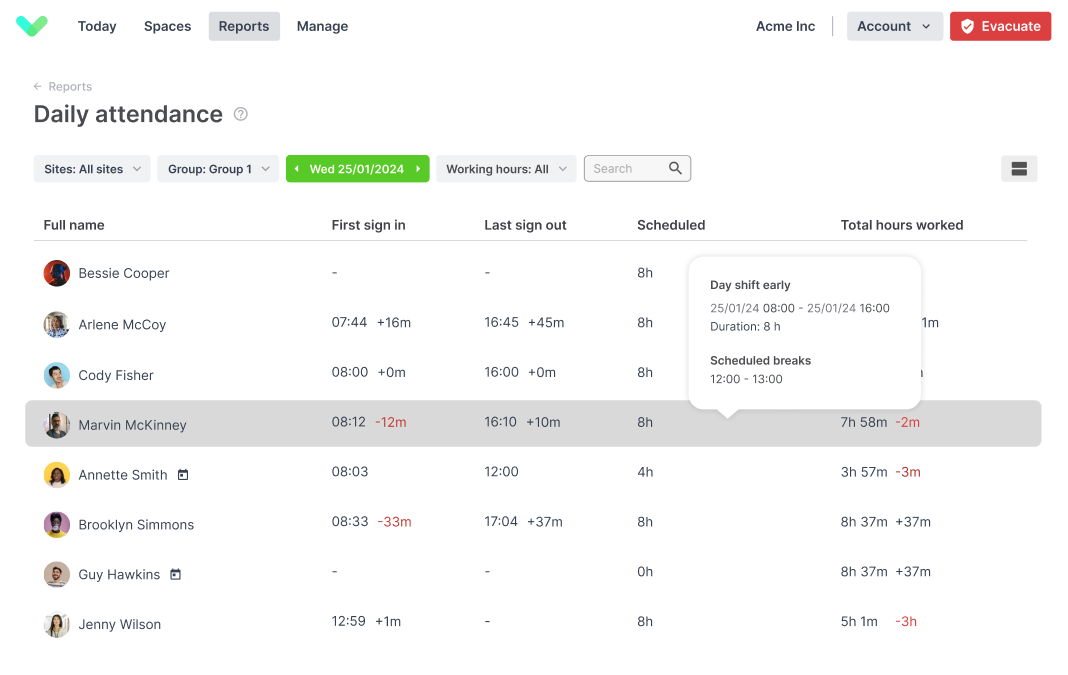
The Daily Attendance Report is a robust tool designed to help you monitor and ensure compliance with scheduled working hours. This report offers comprehensive insights into employee attendance, highlighting any deviations to promote accuracy and accountability.
Key Features
- Actual Sign-In Time: Captures the exact time an employee begins their workday.
- Variance to Expected Sign-In Time: Identifies instances of tardiness or early arrivals.
- Actual Sign-Out Time: Records when an employee ends their workday.
- Variance to Expected Sign-Out Time: Detects early departures or extended stays.
- Scheduled Hours for the Day: Displays planned working hours, adjusting for company closures and approved leave.
- Actual Hours Worked: Summarizes total hours worked by the employee each day.
- Total Variance for the Day: Calculates the difference between scheduled and actual hours worked.
Calculation Details
Total Hours Worked: Aggregates all activity statuses marked as Include in Hours Worked.
Scheduled Hours: Automatically adjusts for closure days and approved leave (including half days) to ensure precise calculations.
This report streamlines attendance tracking, providing the data necessary to maintain adherence to schedules.
Accessing the Overtime & Lateness Report
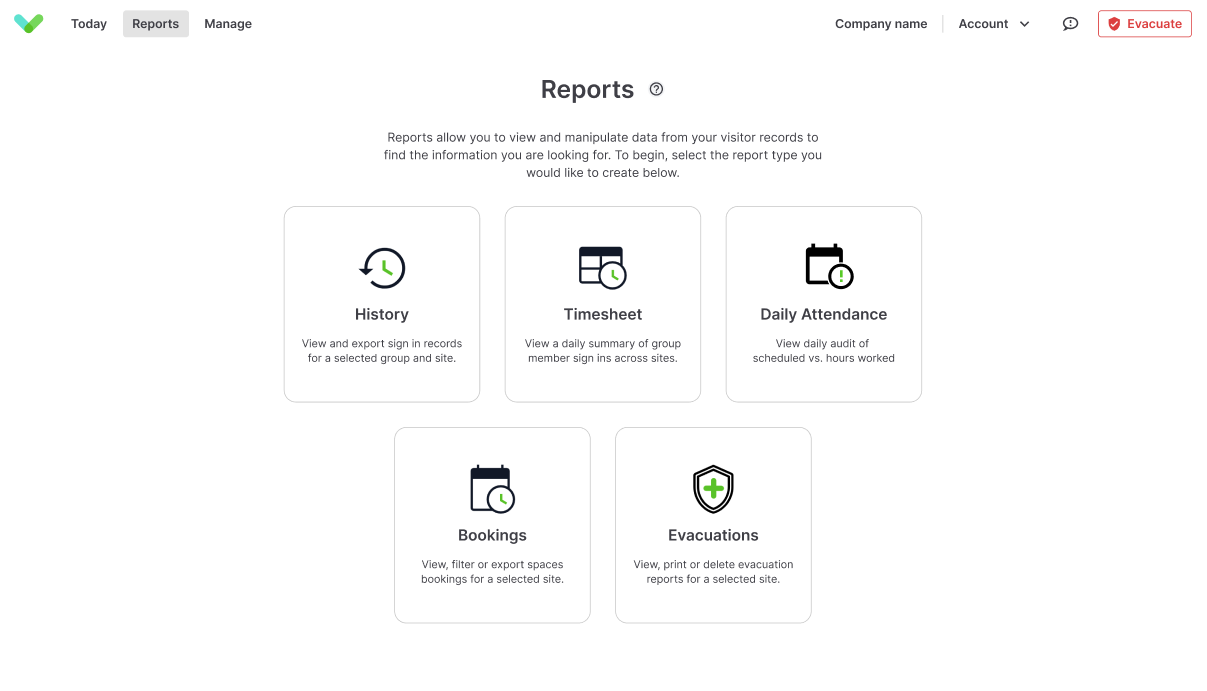
- Navigate to the Reports Section: Log in to your T&A portal and select the
Reportsoption.

- Select the Daily Attendance Report: Within the Reports section, choose
Daily Attendance Reportto view attendance summaries.
- Apply Filters: Utilize filters for site, group, working hours pattern, or search by employee name to customize the report view.

- Review Attendance Data: The report presents a summary of each employee's sign-in data compared to their scheduled hours. It will highlight any discrepancies based on sign in and out times compared to their expected shift start and end times, as well as the total hours worked compared to the total hours of expected work.
Tip
Like the timesheet report, if a particular working hours pattern has a closure scheduled, or the visitor has an absence greater than half a day, then we don't show any expected working hours. However, if the person only has half a day's absence, then the expected working hours would be halved to compensate.
- Further Details and Editing: Clicking on a specific row will open a modal displaying all visits for that day, with options to edit entries as needed.
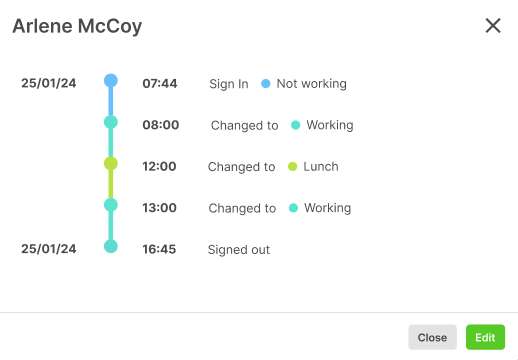
By leveraging the Overtime & Lateness Report, you can effectively monitor attendance patterns, address discrepancies promptly, and uphold organisational standards for working hours.
Working Hours
Working Hours is designed to give you control over your employees’ work schedules. Define either fixed or flexible working hours, set customised break times, and track the hours worked against expected hours. Whether you're aiming to identify patterns of absenteeism or punctuality, or simply need to record absences due to holidays or sickness, Working Hours helps you plan and communicate shifts and absences through tools your employees already use today.
- Choose either flexible hours or scheduled work patterns
- Include flexible or scheduled breaks
- Assign Working Hours to individual employees
- View expected hours in the Timesheet report and compare these to hours worked
- Share expected hours with employees via Sign In Companion
- Allow employees to record absences related to PTO (Paid Time Off) or sickness
Tip
Working hours settings can be configured on the Manage > Manage Features > Time & attendance page.
Creating a working hours pattern
To assign working hours to an employee, you must first create and define a working hours pattern. On the Sign In App portal, go to Manage > Time & attendance and select the Working hours tab. Click Add new to create a new working hours pattern.
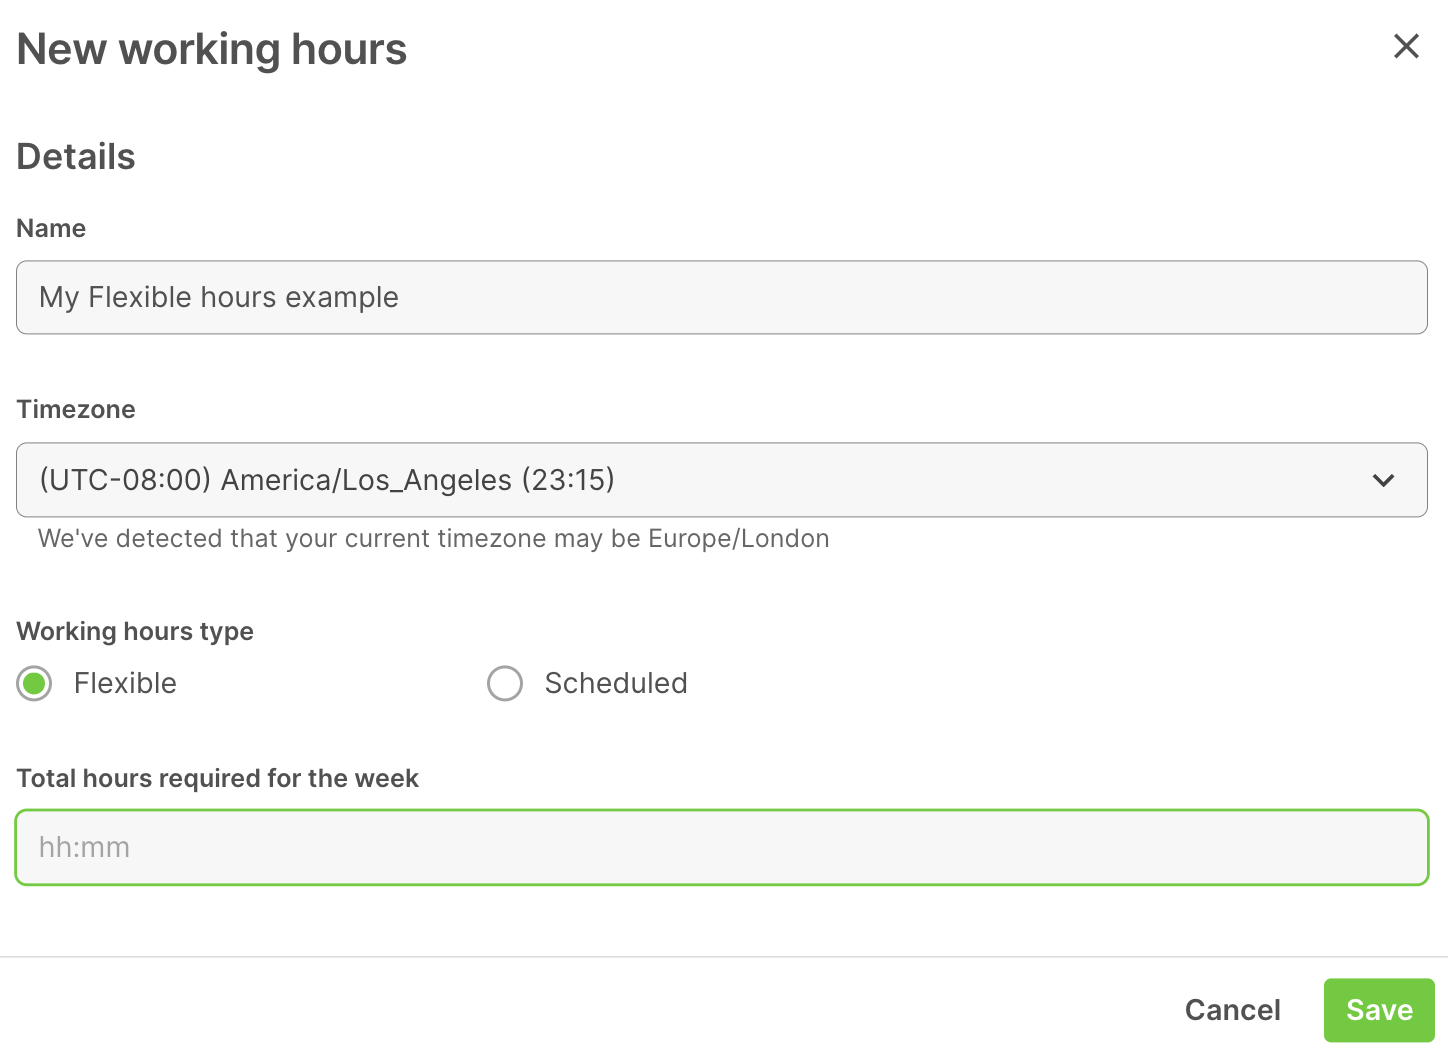
To start, simply provide a name and select the timezone. There are two types of working hours, flexible and scheduled. Please read the descriptions below and follow the relevant setup process for the type of working hours you need.
Flexible working hours
Flexible working hours only require you to provide the total number of hours to be worked in a week. The required format for these hours is hh:mm, e.g. 37:30 for 37.5 hours.
Scheduled working hours
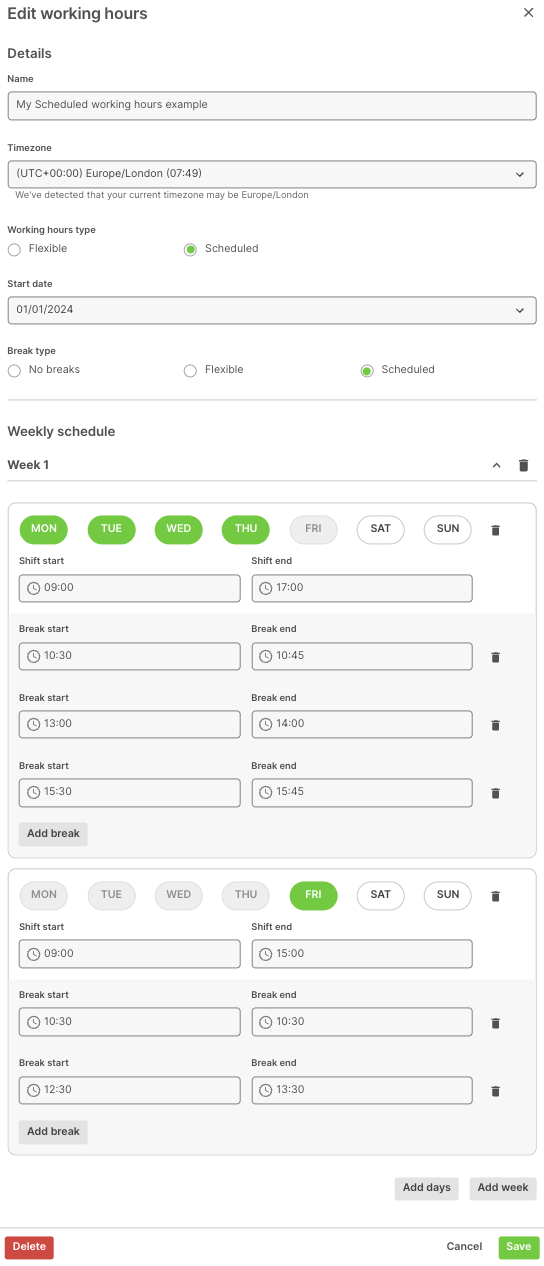
Scheduled working hours patterns can contain up to four separate weeks and will continuously repeat. For this reason, you must select a start date for the repeating pattern.
You can then choose if breaks are included, and whether the break time is flexible or scheduled. Flexible breaks require the ‘Total break time hours per day` in hh:mm format, and scheduled breaks require a start and end time. You can create multiple scheduled breaks in a single day.
When creating a weekly schedule, you select which days the scheduled hours are applicable to. If different days of the week have different hours, you can Add days to enter the specific times for additional days.
Additional weeks can be added if the working hours schedule changes at the start of the following week.
In the example below, we have a single repeating week with flexible breaks. Monday - Thursday have the same start and end times, and Friday has an earlier end time.
Assign working hours
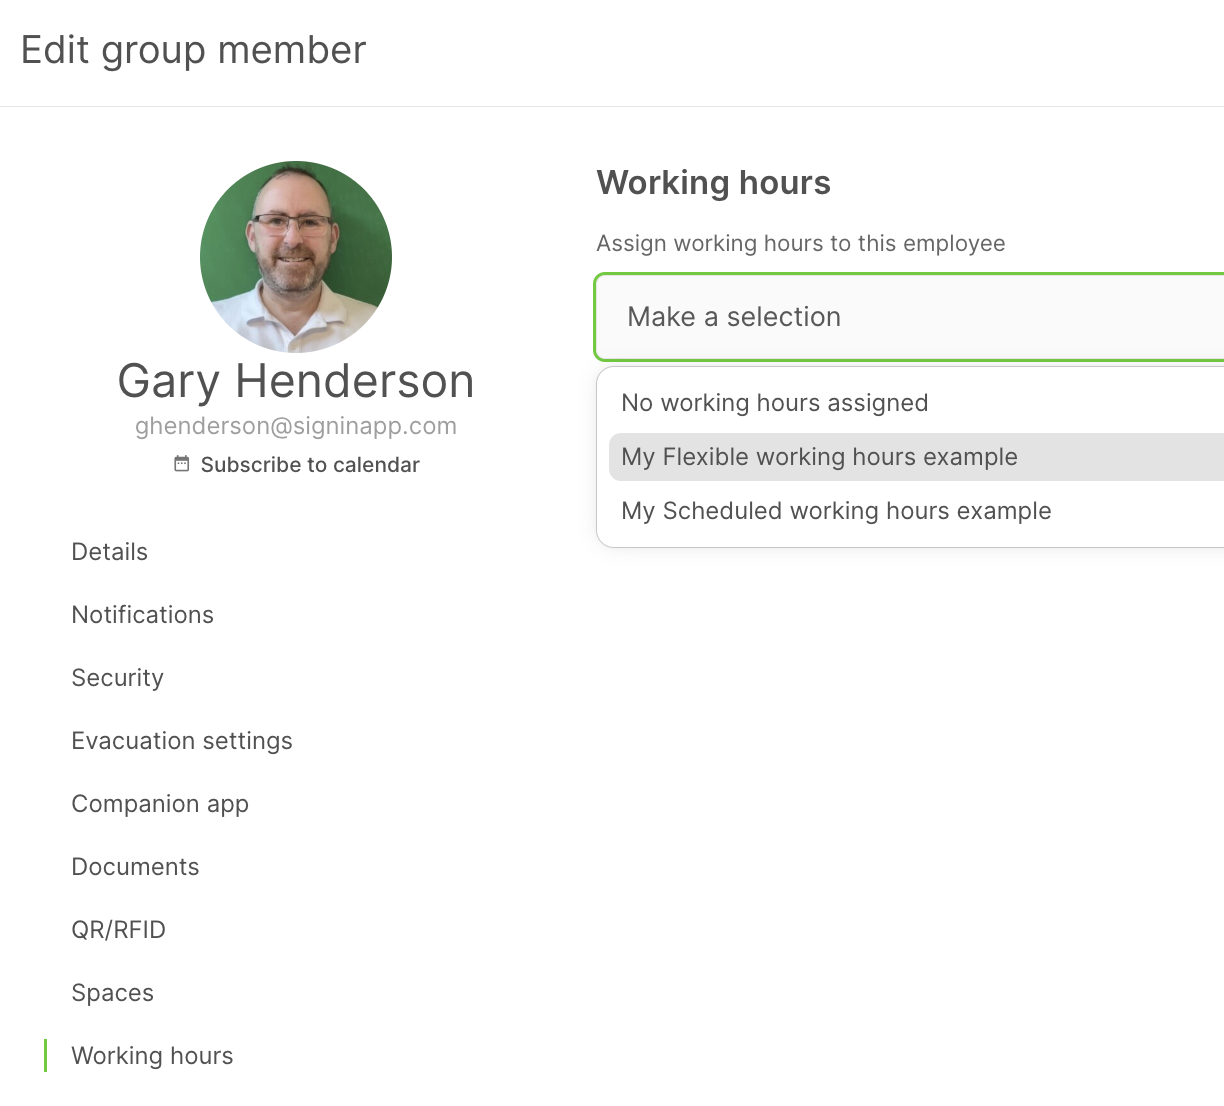
Once you’ve created working hours patterns, you can assign group members to them. When a group is added to Time & attendance, you will see an additional section when you edit a member at ‘Manage > Group > Members > Edit’ titled Working hours.
Here you can select the working hours that apply to each member.
Important
It is not possible to add or change a working hours allocation during the working day or shift time. New allocations or changes to existing working hours will take effect the following day.
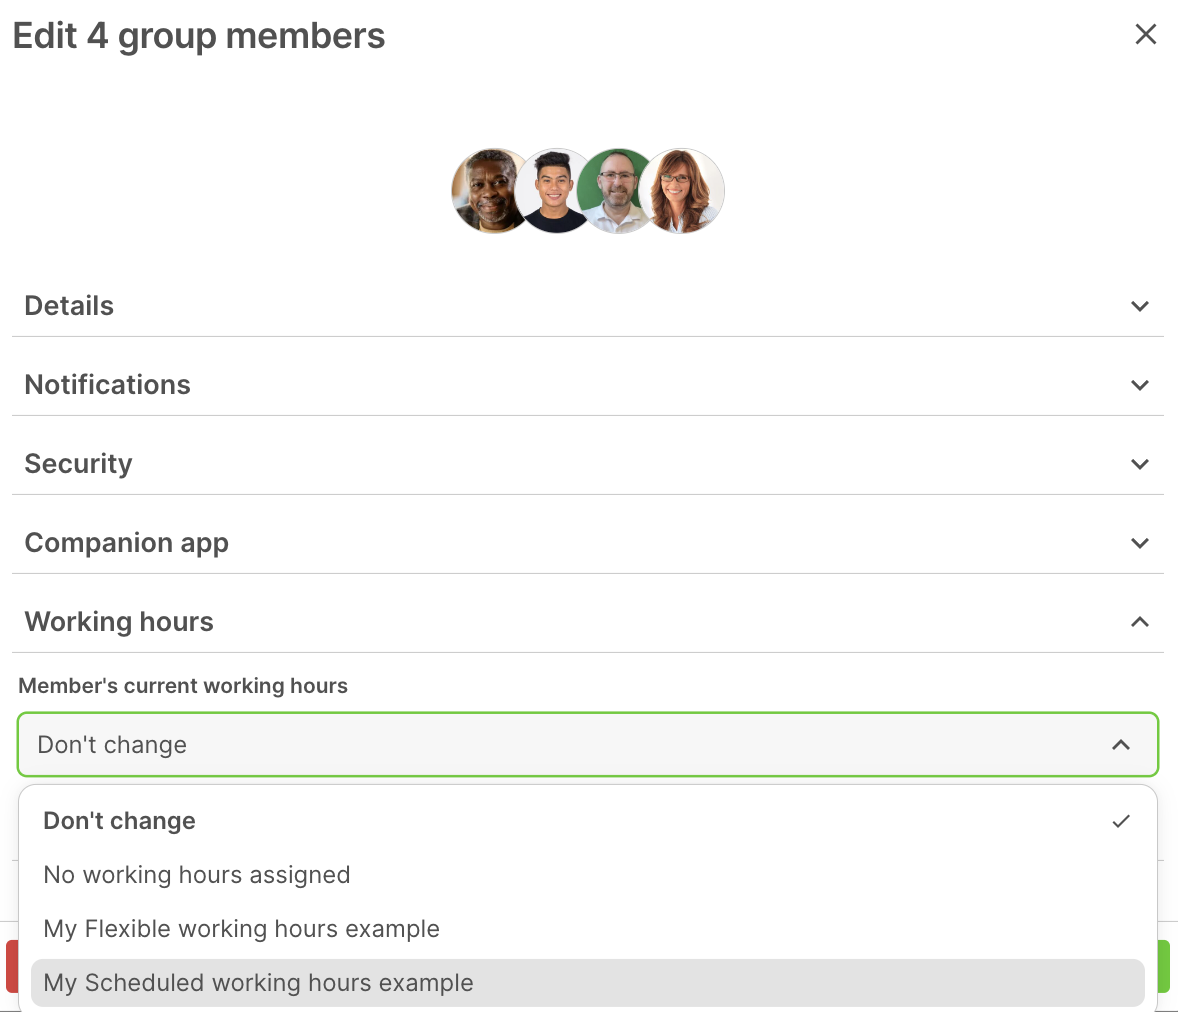
You can also allocate multiple group members to working hours by selecting multiple users from the Manage > Groups > Select group > Members page and choosing to edit all.
Closure days
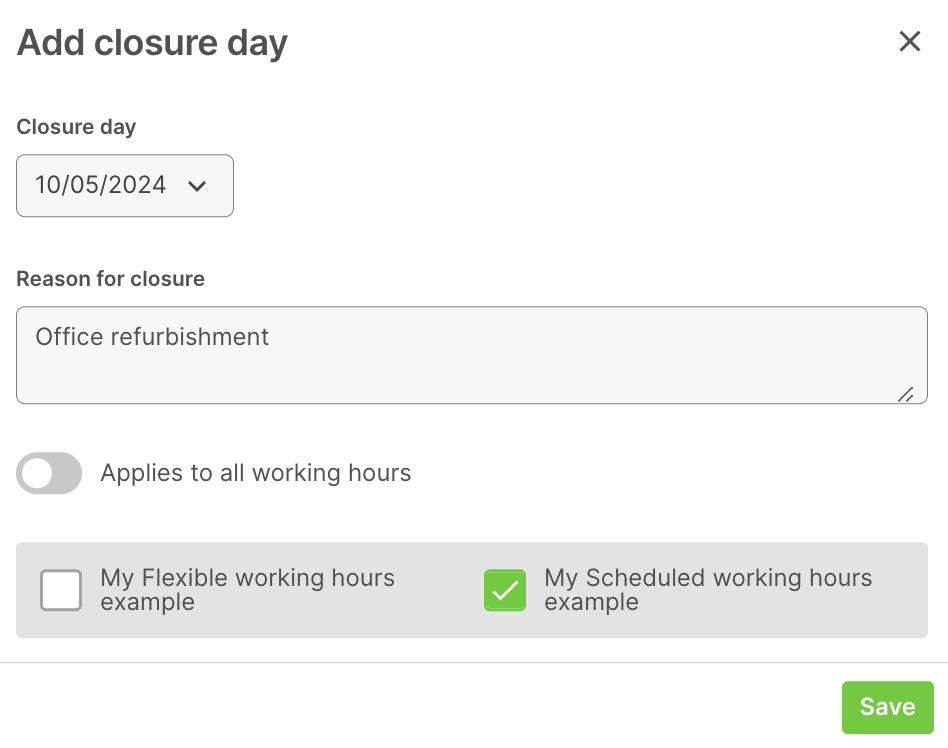
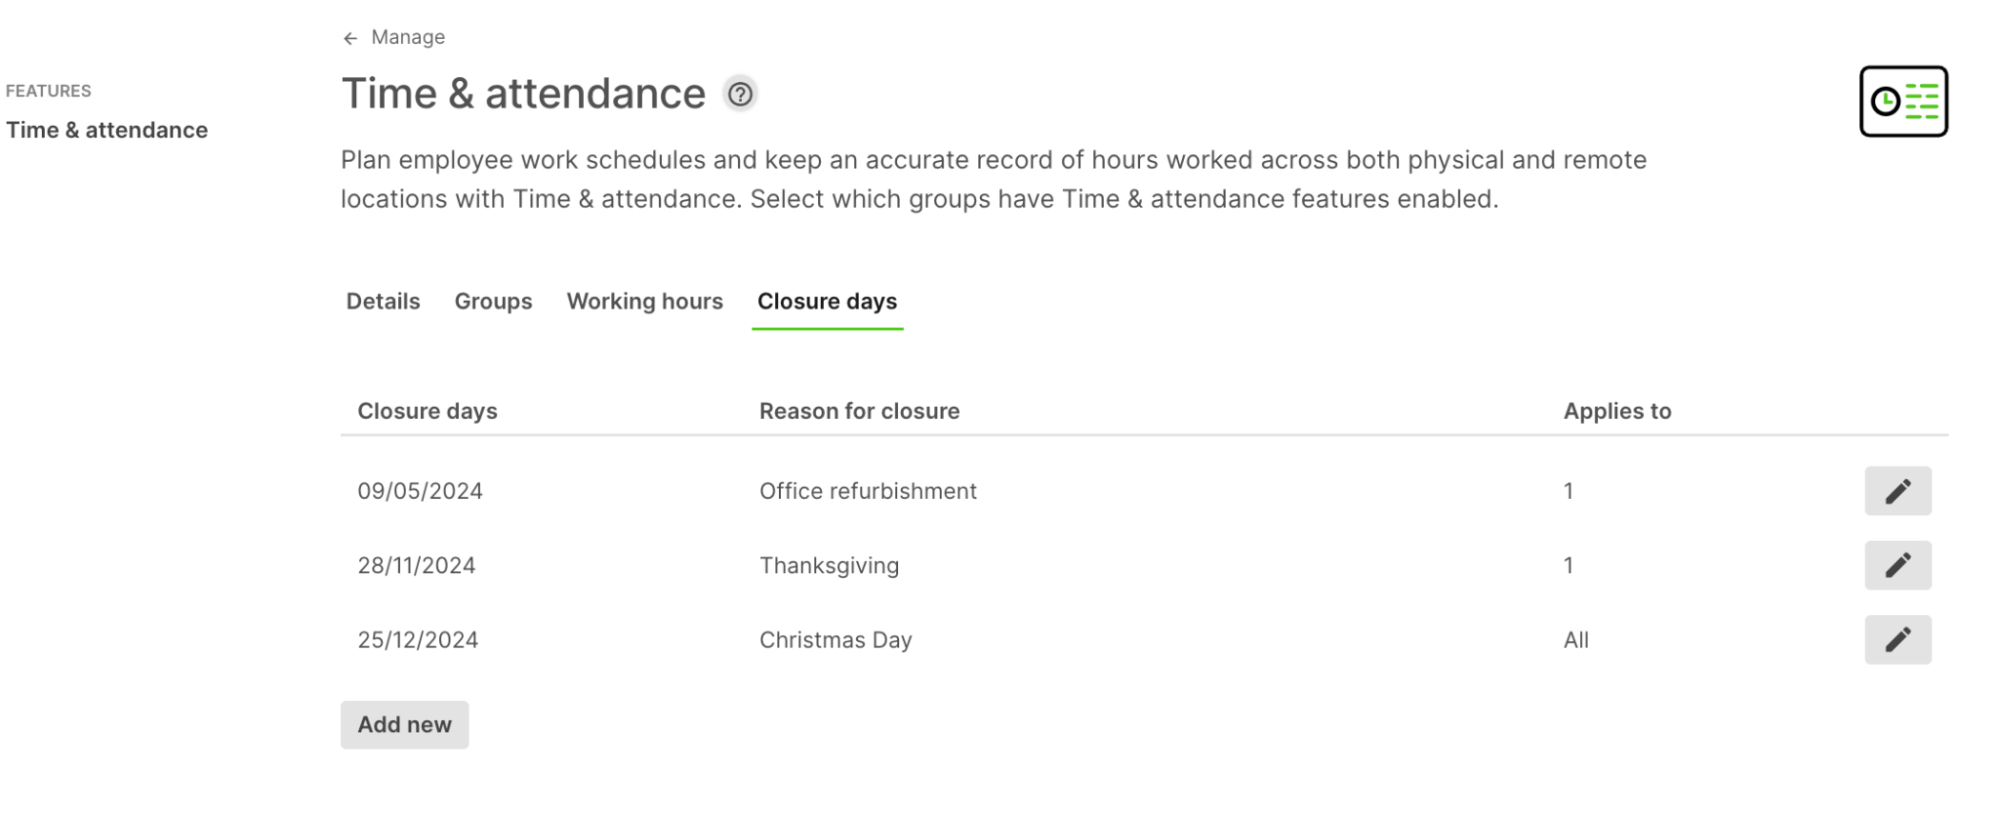
If you have specific dates that you wish to exclude from members expected working hours, you can create a closure date. This may be for a recognised national holiday or any other event that would change the working hours. You can choose whether this closure day is applicable to all working hours, or select the individual working hour patterns that the closure date applies to.
Absence Management
Absence Management is a feature that you can activate for any individual groups that have Time & Attendance enabled. It allows you or your employees to record absences related to PTO (Paid Time Off) or sickness. You can view the absence information within the timesheet report or access all leave requests and approvals in the new Absence report.
In this section, we'll guide you through the process of enabling the absence management feature, provide your group members with the ability to request or record absences throughout the day and use this new tool to approve and record your selected leave types.
Enabling Absence Management
To enable Absence Management for a group, navigate to `Manage > Groups > Select group > Time & Attendance’ In the Absence Management section, you can select ‘Enable’ . The first thing you need to choose is the start month of your absence period. The 1st day of the month selected will be the date that any allowance days will reset. For example, if you select ‘April’, the leave period will run from April 1st - March 31st. If you select ‘January’, the leave period will be from January 1st - December 31st. You now have the option to select which leave types you want to make available for this group to select and use. By default, all leave types will be enabled, so simply deactivate any that you do not require.
The ‘Total allowance days’ provides the option to set a group default allowance for any of your leave types. You can enter the total number of days in increments of 0.5 for the selected leave period. If you leave this option blank, it will be indicated using the ‘ - ‘ symbol. When you save these settings, a new absence report will become available, and employees will be able to request leave using the companion app.
Absence Management on Companion app
Group members who are in a Time & Attendance group with Absence management enabled will have new functionality in their companion app. Selecting the ‘ + ‘ icon will show a new function called ‘Request an absence’. After selecting the request option, you will be presented with the list of enabled leave types for your group. Once you have selected the leave type, you will then be able to enter the date range and number of working days. Your allowance will also be calculated so you can see how many remaining days you have to book of that leave type. Optional comments can also be included as part of the request.
On the home page of Companion app, you will also see a new section titled ‘Absences’. Here you will see your next upcoming absence and a link to show all absences. The ‘Show all absences’ button will display a list of all of your requests
- Pending approval - Absences that have been requested and are awaiting approval
- Upcoming absences - A complete list of all of your approved future absences
- History - A list of past absences
- Canceled - A list of any approved absences that were subsequently canceled by an administrator
- Declined - A list absence requests that were declined
Note
With companion app, you can delete any leave requests that are made but have not yet been approved. Once approved, only an administrator or Manager can cancel a leave request
Absence Management report
Absences can be viewed, approved and added in the new ‘Absence’ report located at `Reports > Absence’. Here you will see a complete list of every absence request and the status of each request. You can search or filter the list by date range, group, leave type, status and the group members name. Clicking on any line, you can view the full details including the submission details and any notes or approvals. All actions will be date and time stamped.
Adding an absence in the portal
There may be occasions where an administrator needs to add an absence on behalf of a group member. This can be done by selecting the ‘Add absence’ button within the absence report. Any absences added in the portal are automatically approved.
Approving an absence in the portal
When a group member has requested an absence using Companion app, they will have the status of ‘Pending’. A red pill icon will show on the Absence report button, and when you are looking at the report, you will see a ‘Pending requests’ button with a counter. If you select the ‘Pending requests’ button, each request will be displayed in a pop up window that will allow you to Approve or Decline. You can also view and approve individual leave requests by selecting them from the displayed list in the report
Absence request by email
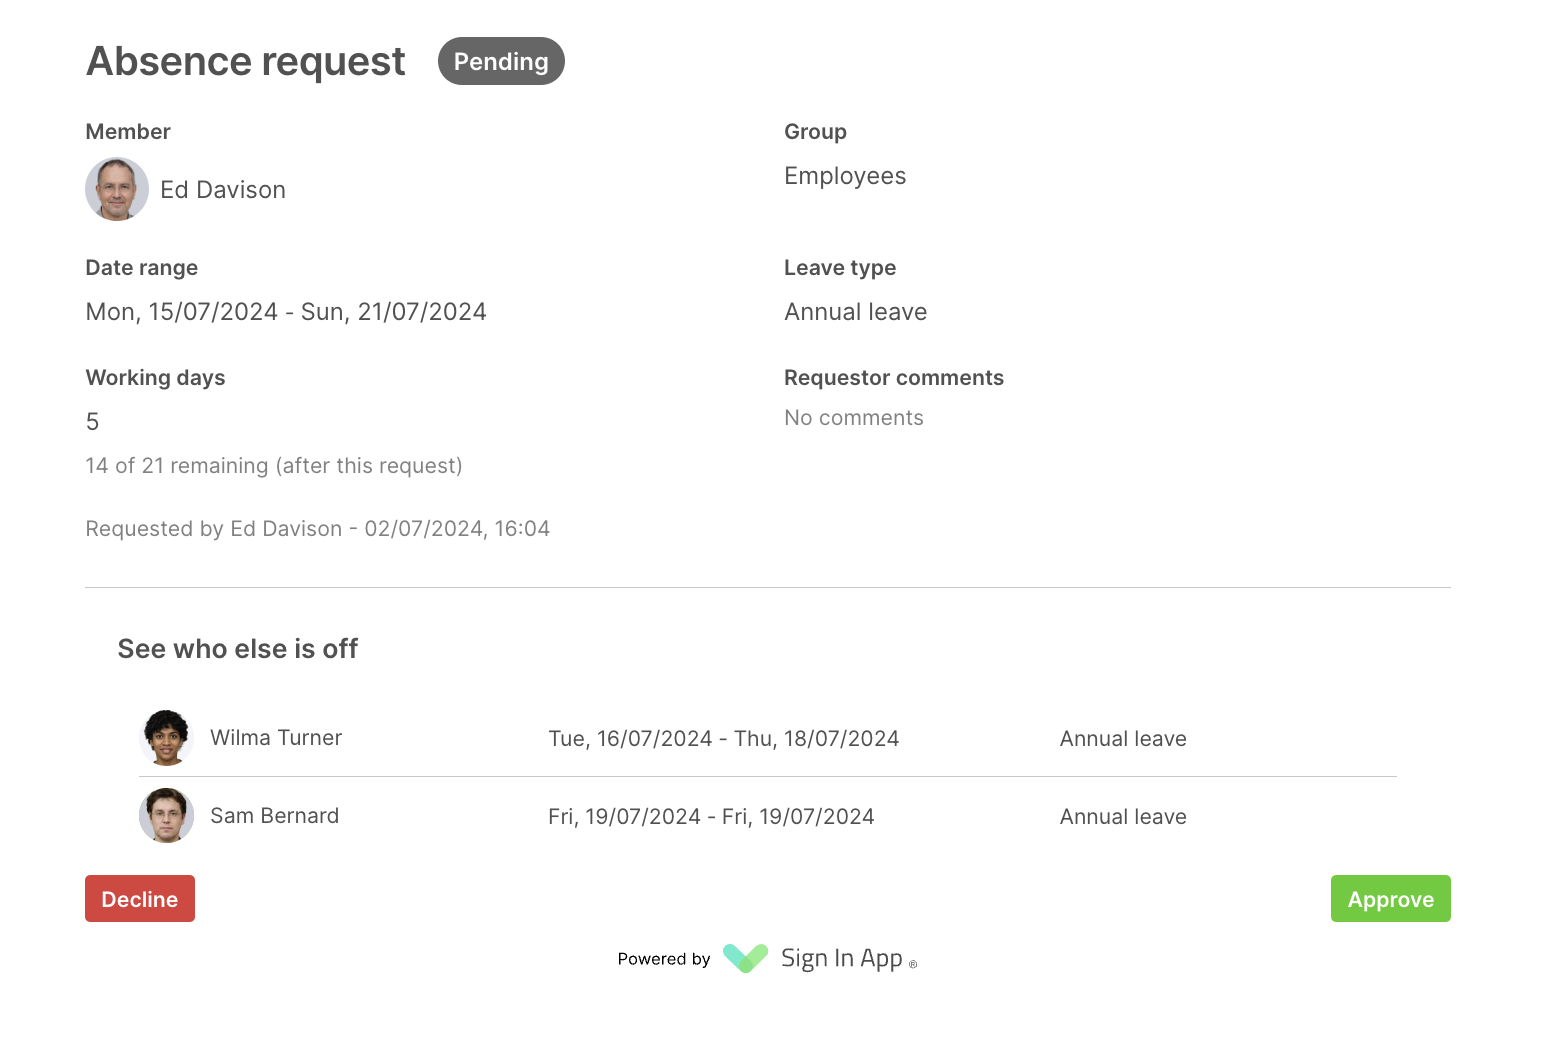
Some managers will not have access to the Sign In App portal, but still need to be able to approve or decline absence requests. When an absence is requested, the manager listed for the member making the request will receive an email. From this email they can approve or decline the request and also see who else is scheduled to be absent at the same time.
In the example below, Ed Davison has requested an absence for 5 days and an email has been sent to his manager. On the email the dates of the absence, the number of days, and the type of absence are listed.
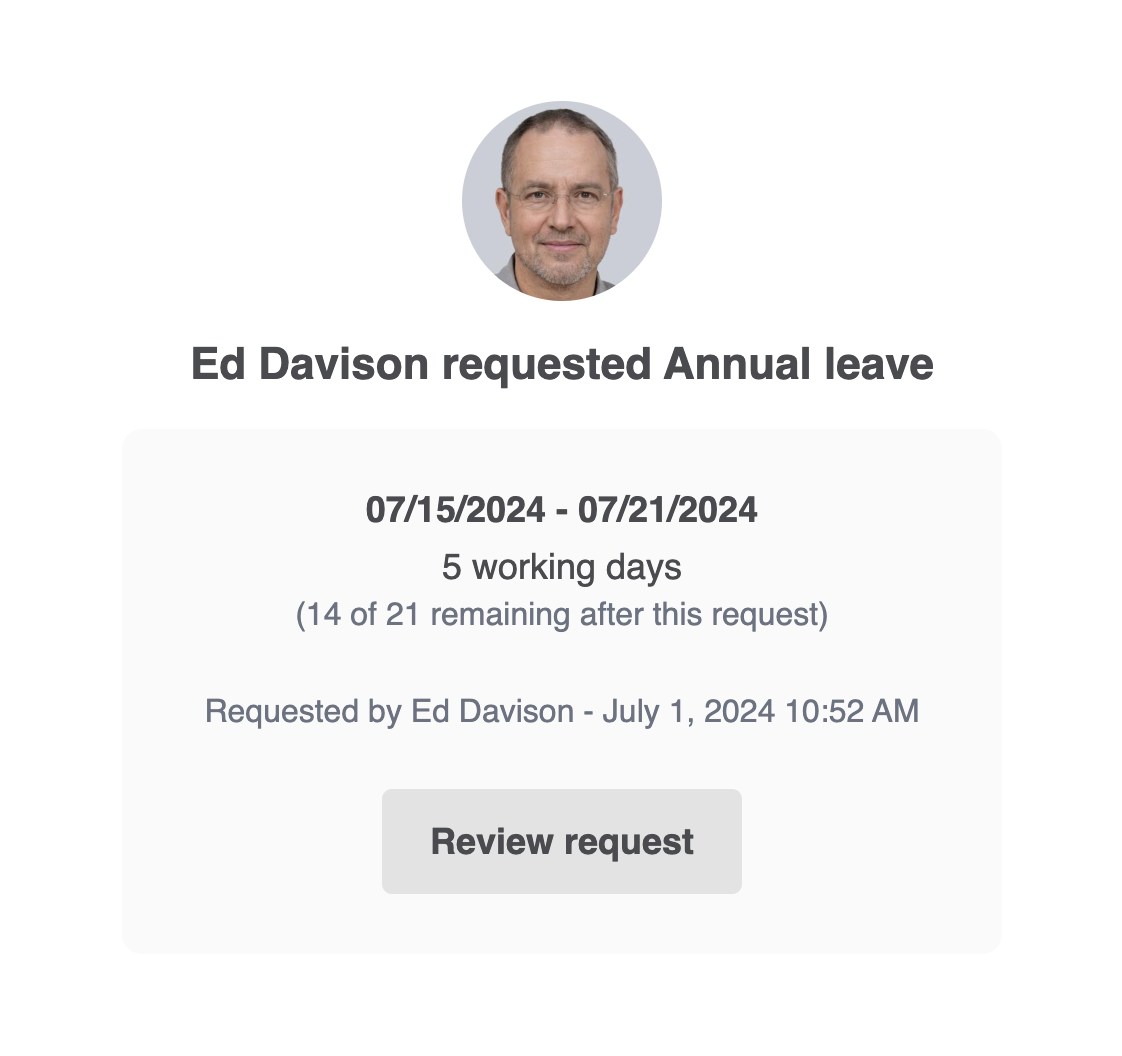
Clicking Review request will open up a magic link where the manager can approve or decline the request. This displays the Date range, the number of working days, and the Leave type. If other members with the same manager have approved absences at the same time they’re displayed under the See who else is off section.
Configuring managers
Configuring managers allows managers to approve absence requests by email meaning they don't require access to the Sign In App management portal. To set up your managers there are a couple of different options.
You can set a group default manager by heading to Manage > Groups > Select group > Details and set the manager from the Default group manager option. This means any new members created in the group will use the default group manager.
To edit an individual member’s manager, head to Manage > Groups > Select group > Members, search for the member, hover over the member and click Edit > Details. Under the Manager section, toggle off the Use group default and then select this member’s manager.

You can also use the bulk edit tools to select multiple members and assign a manager to them. Click here to read more about how to use the bulk edit tools.
We hope you've found this guide useful but if you have any questions please contact our support team at support@signinapp.com.

