Configure groups
Overview
Visitor groups allow you to customise the sign in experience for different types of visitor. You can create up to 20 visitor groups and each group is defined as either a standard visitor or repeat visitor group.
Important
Standard and repeat visitors behave quite differently in both the portal and the app, so it's important to read and understand the differences before you start creating your own visitor groups.
Creating a new group
To create a new group go to Manage > Groups and click Add new and you will see 3 different options.
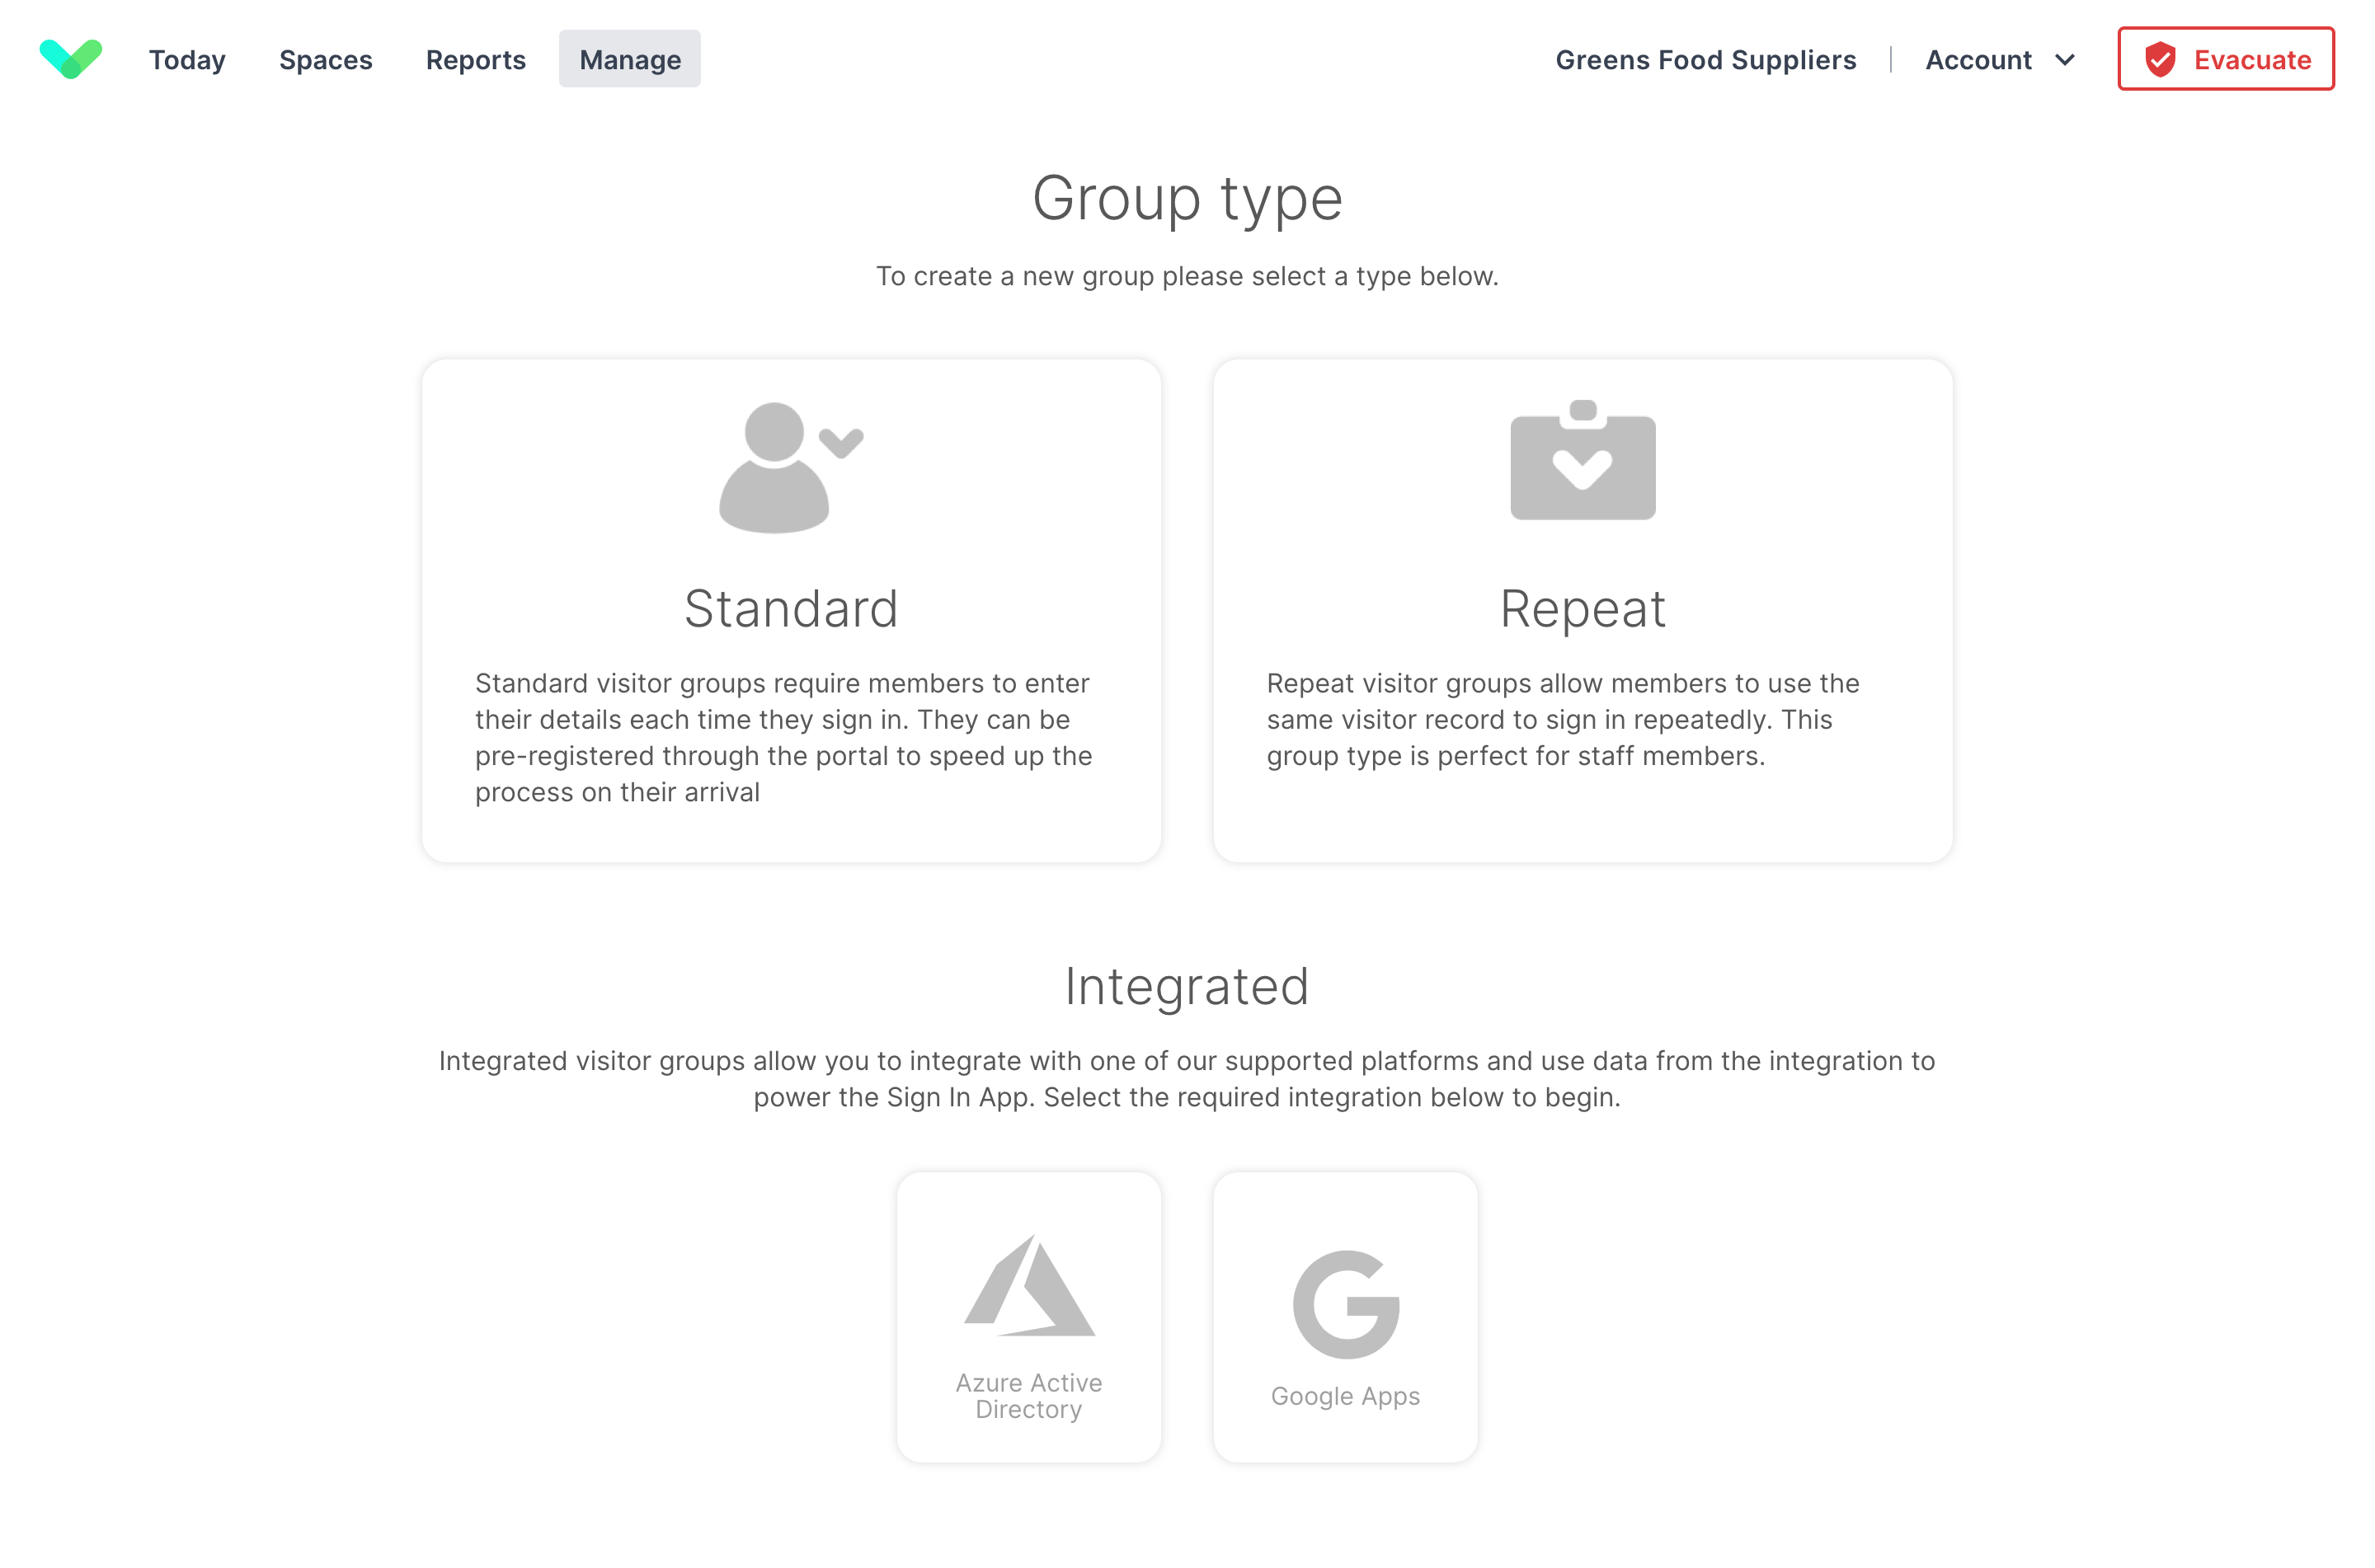
Please read the below descriptions to ensure you select the correct group type, as it can't be changed afterwards.
Standard visitor
A guest at your site. A standard visitor may be visiting you for the first time, or they may have been here before, but they are usually not frequent guests. They will sign in and out using the standard method where they will be asked to provide their name and additional information each time they arrive. The default 'Visitor' group is an example of a standard visitor group.
Repeat visitor (i.e. staff)
A repeat visitor is someone who is at your site regularly. They will have their own virtual visitor card with a photo and their name. This is the group type most frequently used for staff members. A QR or RFID code can be associated with each repeat visitor for easy scanning in and out. They will also have the option to use our free companion app.
Integrated (i.e. Microsoft Azure / Google Workspace)
Select this option if you want your group members to be managed in one of our external supported systems such as Microsoft Azure AD or Google Workspace. You will be able to customise the group options, personalising the sign in experience for this type of visitor, but the group members will automatically be kept in sync with the integrated system.
Managing a group
The options when managing a group are slightly different for standard and repeat visitor group types. In the walkthrough below, we'll go through each of the manage options for a group, clearly highlighting which options are specific to each group type.
Members (Repeat visitors)
The members section lists the repeat visitors for this group, allowing you to create and edit group members from a central location. For your regular visitors, staff or contractors, this is the screen where you manage them. From this view you can search for group members and use the filters to manage subsets of members.
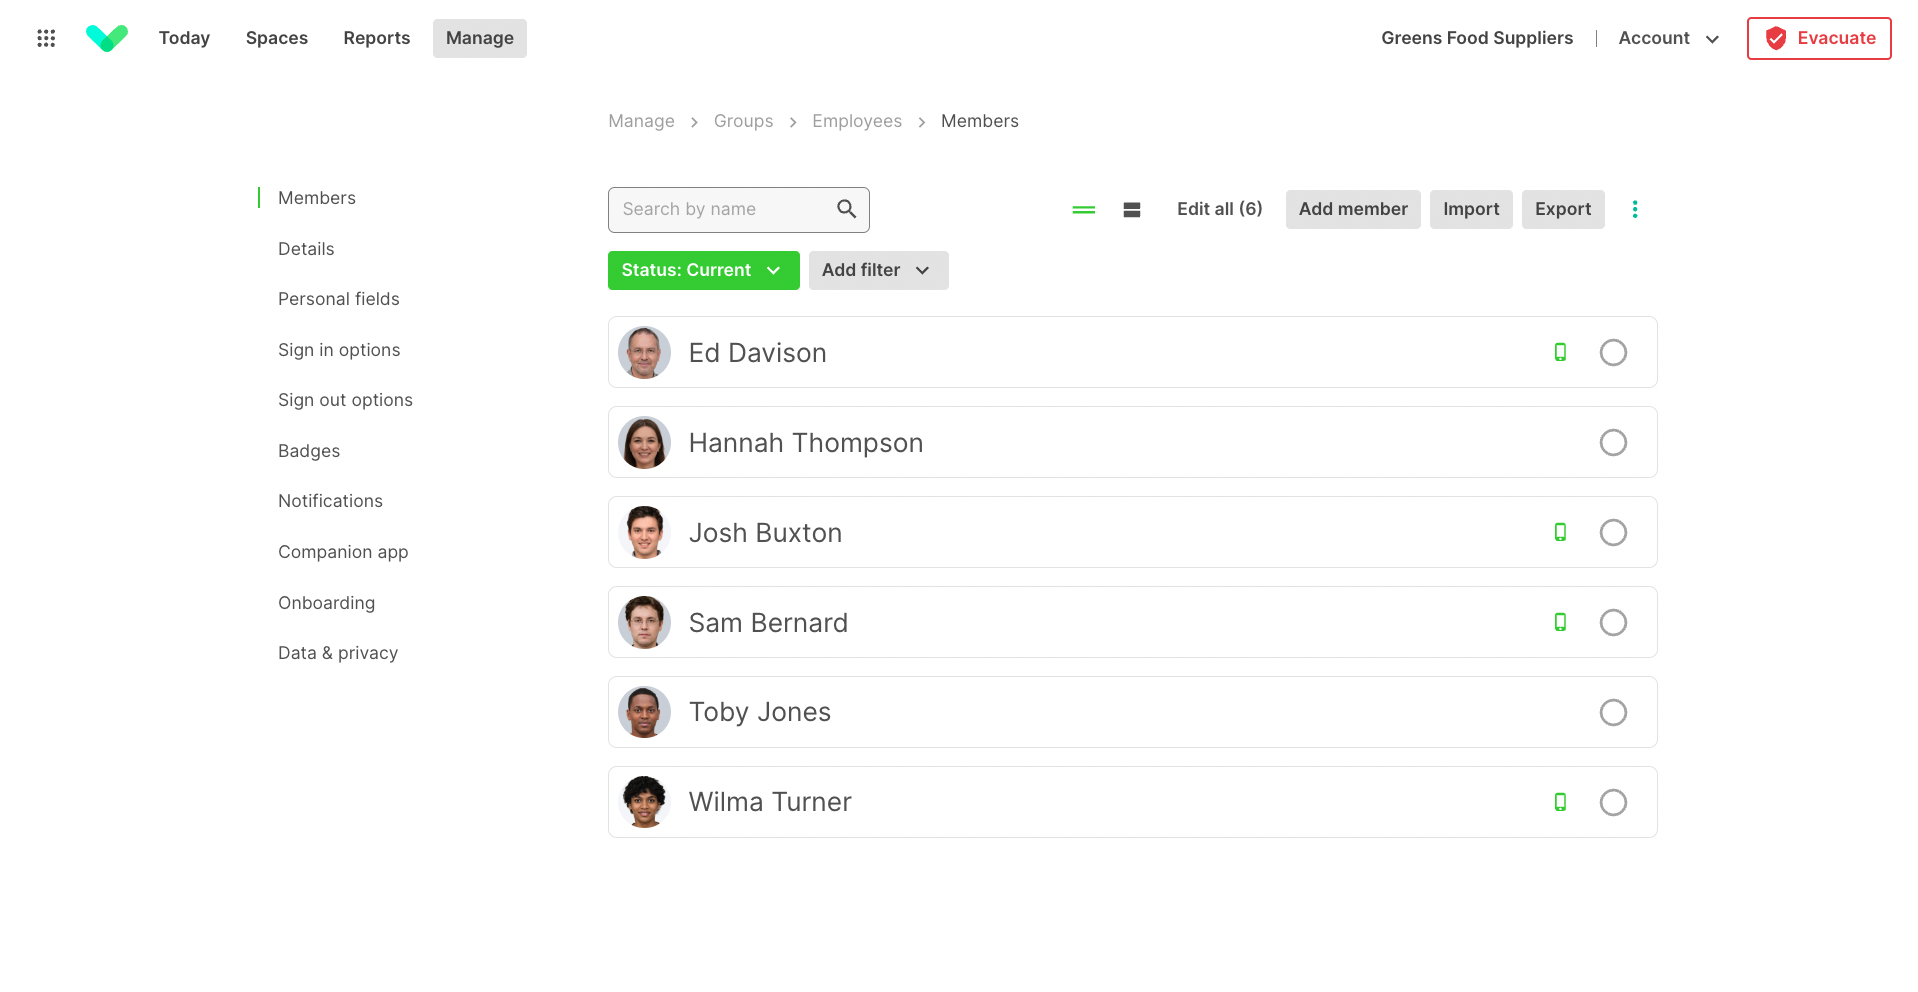
Group filter tools
You can use the group filter tools to filter the list of members based on their personal fields, this allows you to manage subsets of members including updating languages, notification preferences, Companion app permissions and more. To do this, click Add filter and then select the first personal field you’d like to filter on.
Tip
Click here to read about how to manage Personal fields.
In the example below we’re going to select Department
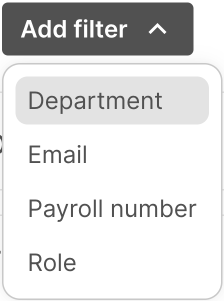
Important
If you have more than 50 unique options for a Personal field, the radio buttons are replaced with a search field.
We then get a list of all of the different options for that Personal field, we’re going to select Engineering
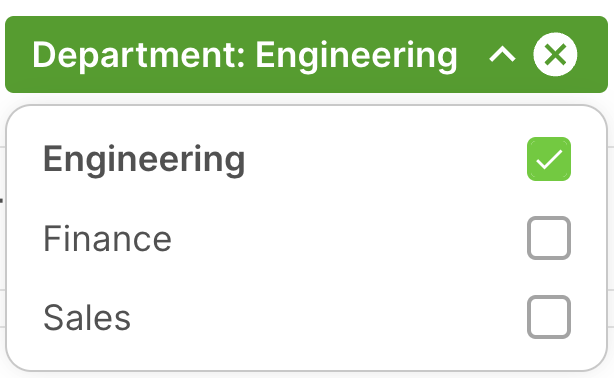
This filters the group members get a list of all of the members where their personal field department is set to Engineering.
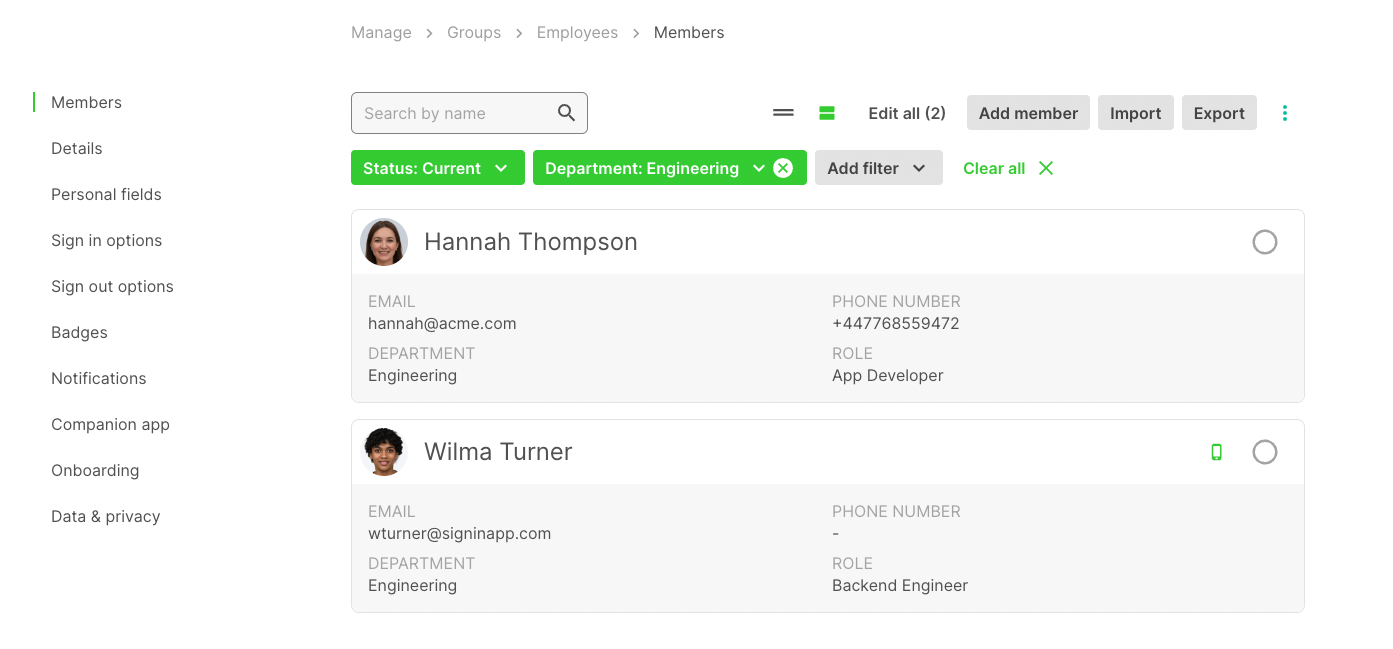
If you’d like to filter the members further you can add a second filter.
Bulk edit tool
The bulk edit tools allows you to edit all members in a group or members selected using the group filters.
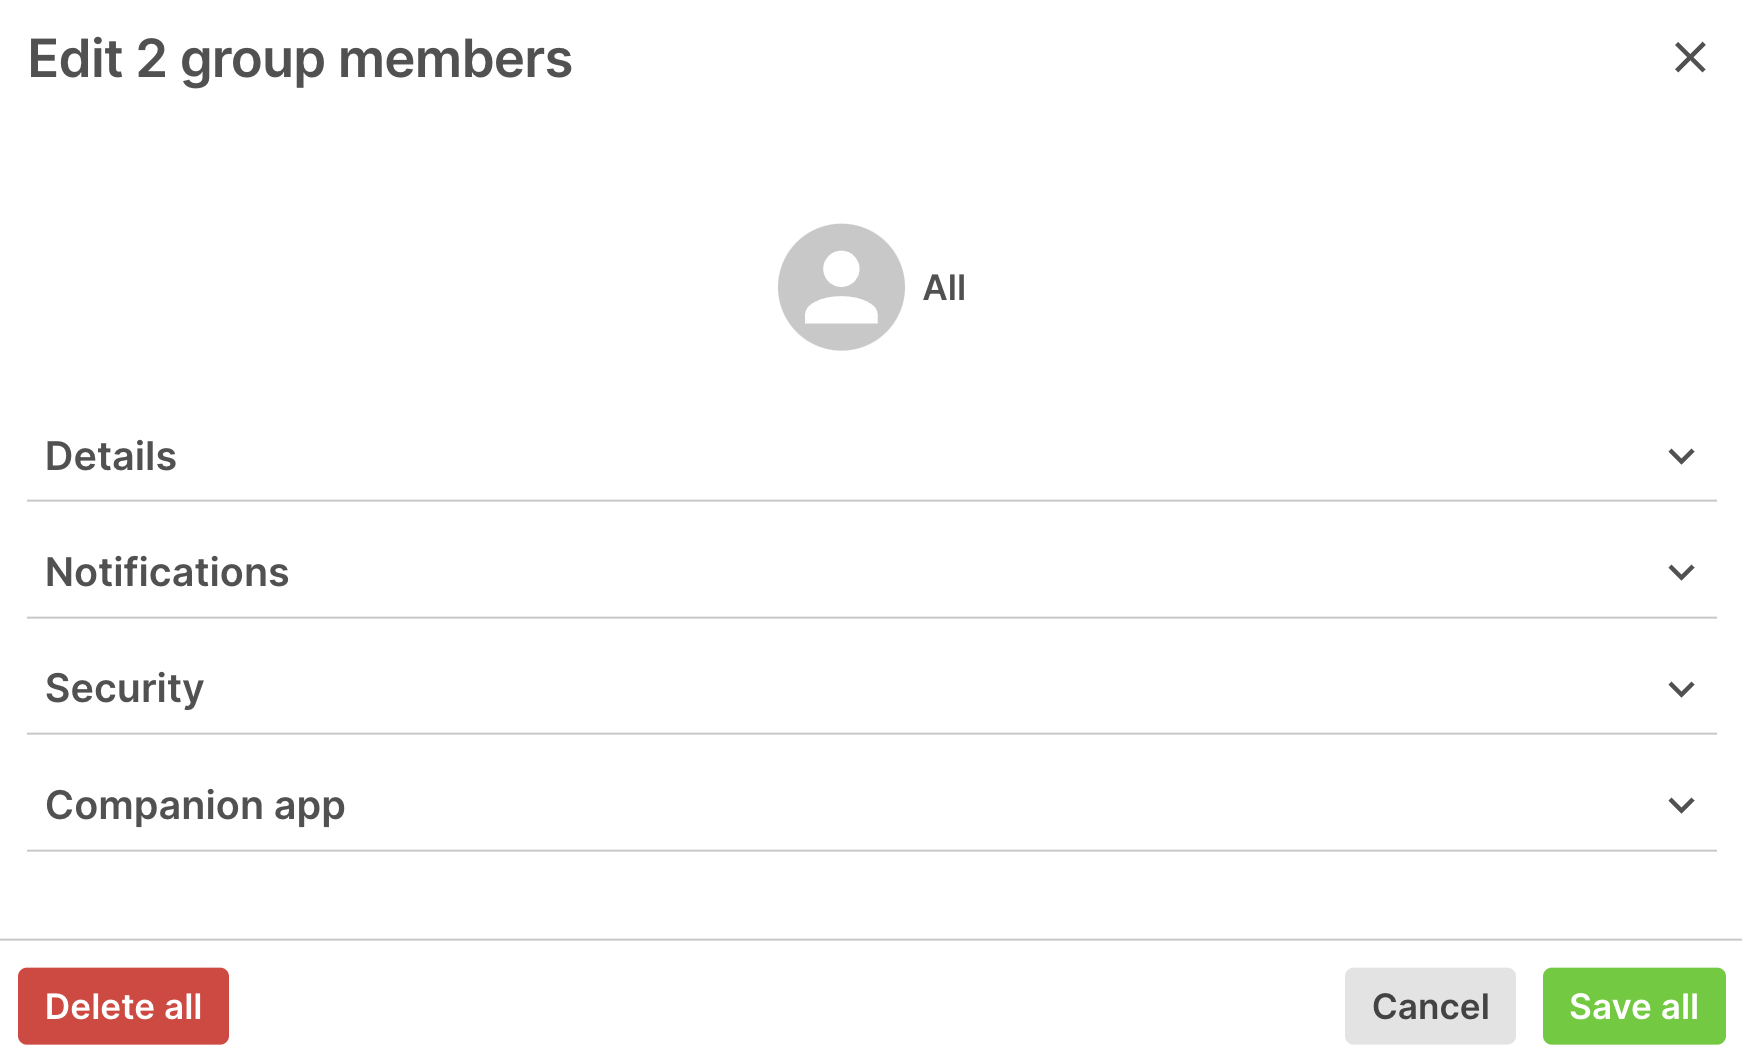
Details
- Language - Update the selected member’s language settings
- Change group - Move the selected members to another group
- Archive members - Archive the selected members
Notifications
- When a visitor signs in - Change the selected member’s notification preferences for when a visitor signs in
- When a visitor signs out - Change the selected member’s notification preferences for when a visitor signs out
Security
- Show on site - Change if the selected members should show on all sites or just one site
Companion app
- Use group default permissions - Set if the selected members should have the group default permissions or not. You can also update the Companion app permissions the selected members should have if they’re not set to the group default.
Import
This option allows you to import members into your group. From here you can also bulk update Personal fields for members. This guide explains how to do this in more detail.
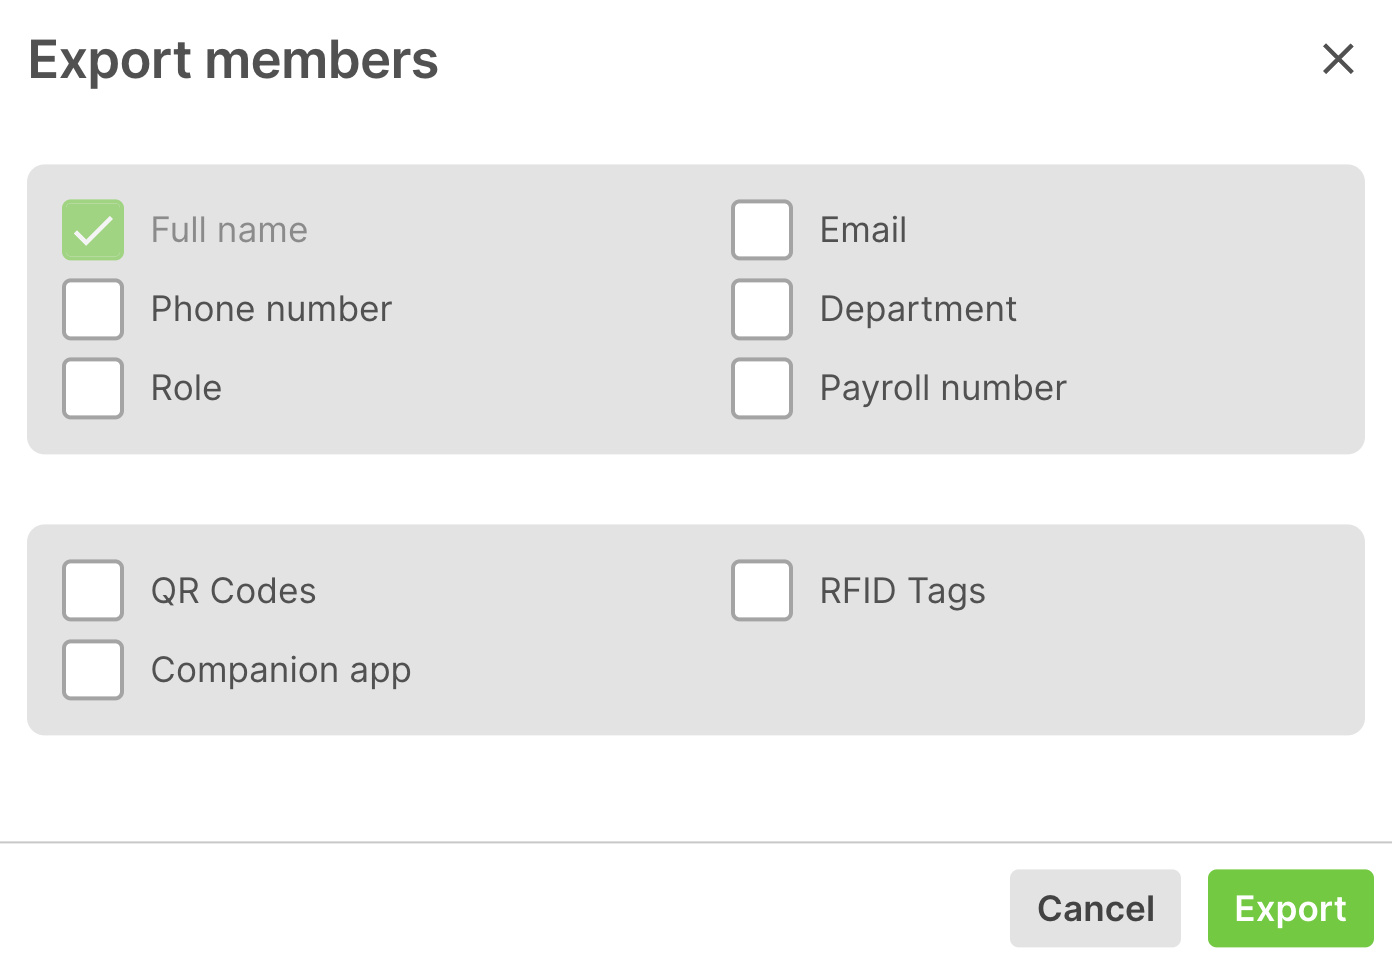
Export
The Export tool allows you to export the members of a repeat visitor group along with their QR codes, RFID Tags, and Companion app connections (this shows who has Companion app connected).
Tip
This is also a great way to get a list you can use for Importing with advanced options to bulk update members' personal fields.
Read more about using the import tool to update members' information here.
Add a group member
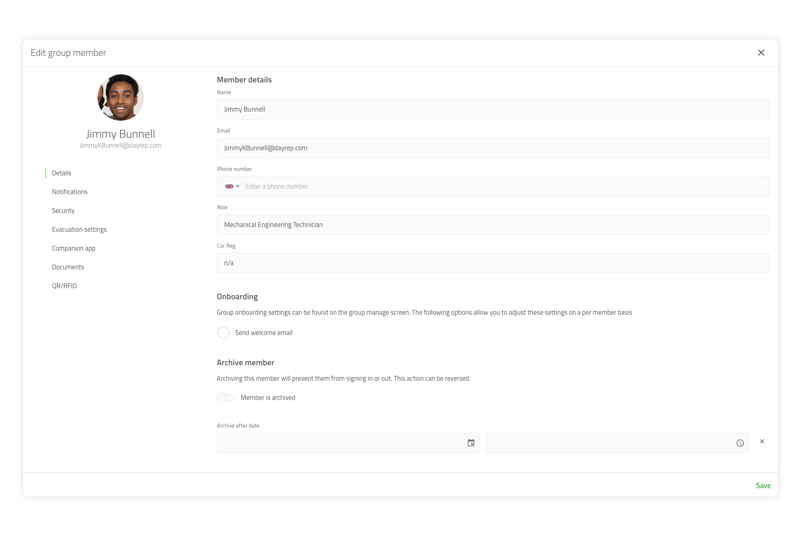
To add a repeat visitor to the group, click the Add member button. A new window will appear with
the following options;
Details
| Option | Description |
|---|---|
| Name | The full name of the repeat visitor |
| Email (optional) | The email address where notifications will be sent |
| Mobile (optional) | The mobile phone number where SMS notifications will be sent (with country code) |
| Role (optional) | A field for additional information |
| Language | Select the language for this member. Any emails they receive will be automatically translated into this language |
| Start date (optional) | Automatically un-archive this visitor on a certain date |
| End date (optional) | Automatically archive this visitor on a certain date |
| Welcome email | Allows you to send onboading emails with details of their visit |
Notifications
| Option | Description |
|---|---|
| When a visitor arrives | Change how this member is notified about events related to them. |
| When a visitor departs | Change how this member is notified about events related to them. |
| Notify other members | Notify another memeber at the event |
Security
| Option | Description |
|---|---|
| PIN | Secure this member by adding a PIN |
| Show on site | Which sites would you like this pin to show on? |
Evacuation settings
| Option | Description |
|---|---|
| Site | You can set which evacuation points this member belongs to at each site below. |
Companion app
| Option | Description |
|---|---|
| Can mobile sign in | Allow the staff member to sign in from their mobile when on site. |
| Can automatically sign in | Allow the staff member use auto sign in from their mobile when on site. |
| Can pre-register visitors | Allow the pre-registration of visitors from this staff member's smartphone. |
| Can access the evacuation list | Allow this user to access the site's evacuation list and generate reports. |
| Can view sign in history | Allow this user to view sign in history |
| Can access the today iew | Allow this user to view the today widget showing visitors signed in |
Send companion app invite email
Tick this and then click Save and send to send you an authentication code to log into the companion app.
Important
If your repeat visitor group is integrated, these options will be limited as group members are managed from the external system.
Spaces
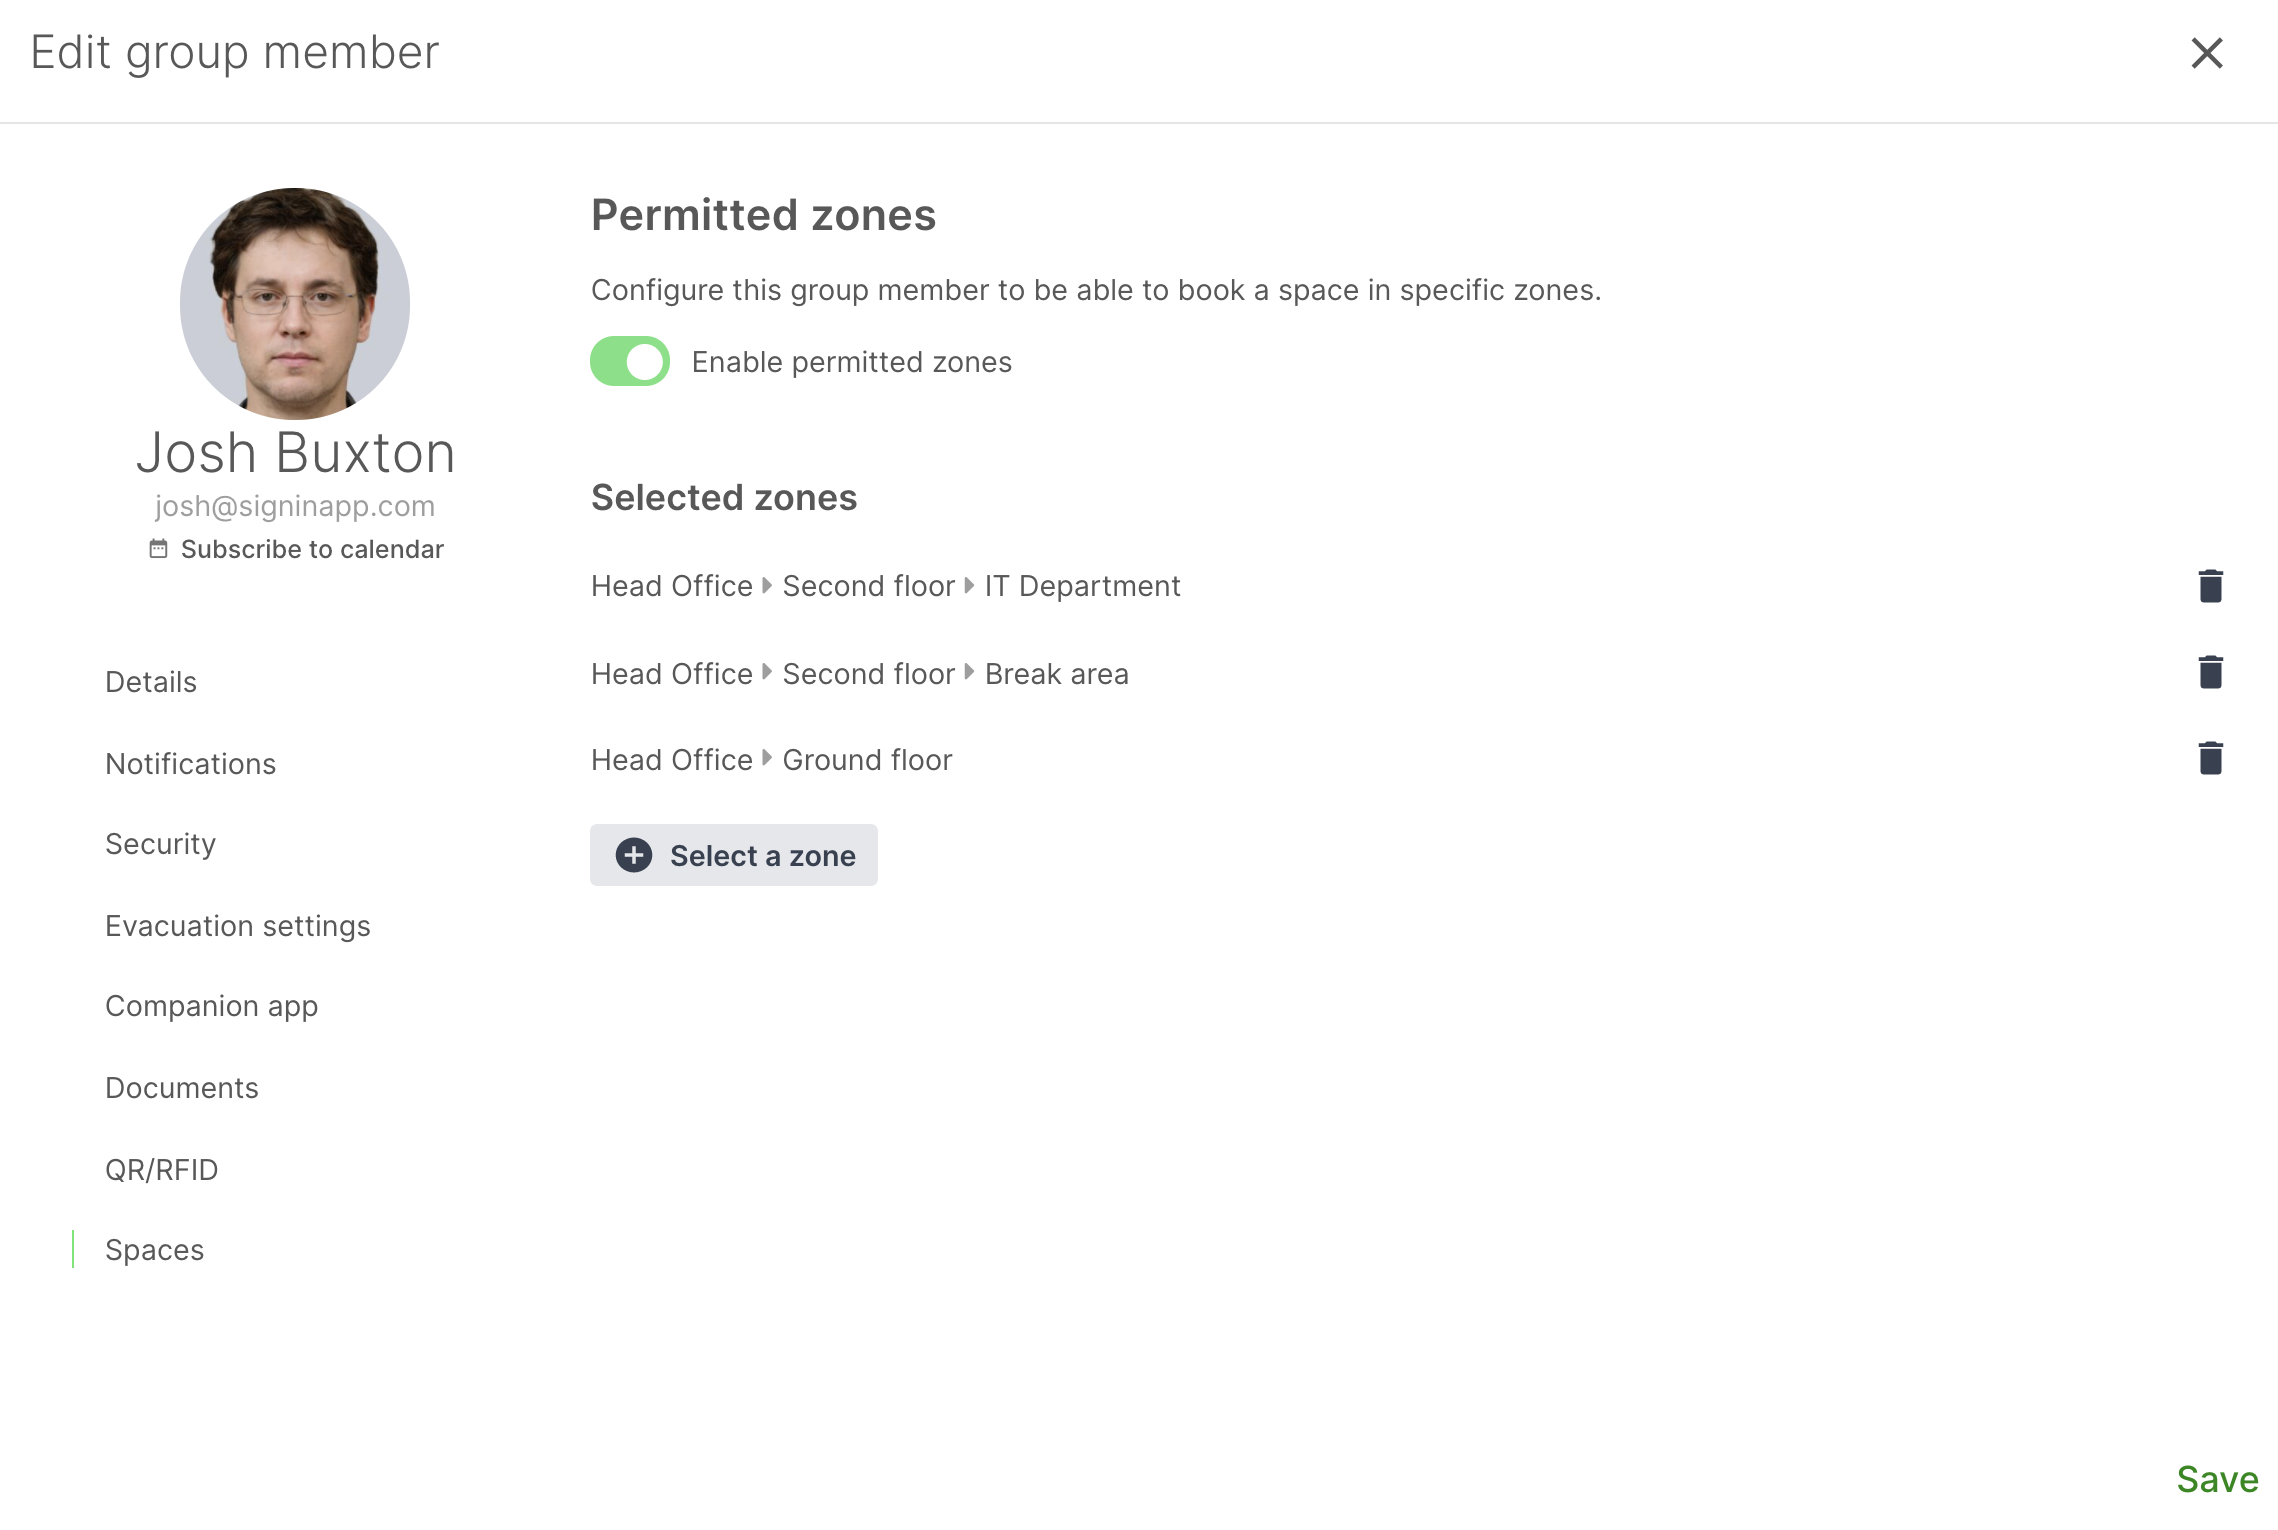
You may want to restrict the zones people are able to book a space in. This can help if you need to ensure that colleagues from the same department sit together. By default, members are able to book any space, toggle Enable permitted zones on to restrict which zones that member can book a space in. Click Select a zone and then select the zone from the dropdown to add it to the list of zones that member can book a space in.
Tip
Adding the highest level zone will allow that member to book a space in any of the zones contained within it.
TIP
If you aren't using zones in your Spaces floor plan you can read about setting this up here
Edit a repeat visitor
To make changes to a repeat visitor, hover over their record in the list and then click Edit and an edit window will appear. When editing a member you have all the options available when you add the member, but also some additional options under the Details section which aren't available when adding the member. When editing the member you can also manage documents, the member's QR/RFIDs, add a photo and view their visit history.
Details
| Option | Description |
|---|---|
| Archive member | Archiving this member will prevent them from signing in or out. This action can be reversed. |
| Change group | You can change which group this member belongs to by selecting the group below |
| Delete member | Deleting this member will remove them from this group |
Documents
| Option | Description |
|---|---|
| Generated documents | Documents generated from sign in or out |
| Uploaded documents | Allows you to upload documents to a member |
|
QR/RFID
| Option | Description |
|---|---|
| QR | Connect a QR code |
| RFID | Connect a RFID tag to Sign In App Tap |
Photo
To add a photo, hover over the profile icon on the top left of the edit window and then tap the pencil icon to add a photo. To delete the photo, tap the cross icon below the pencil.
History
To view a member's history, hover over their record in the list and then click History and you'll be taken to the history page for that repeat visitor.
Companion app connection
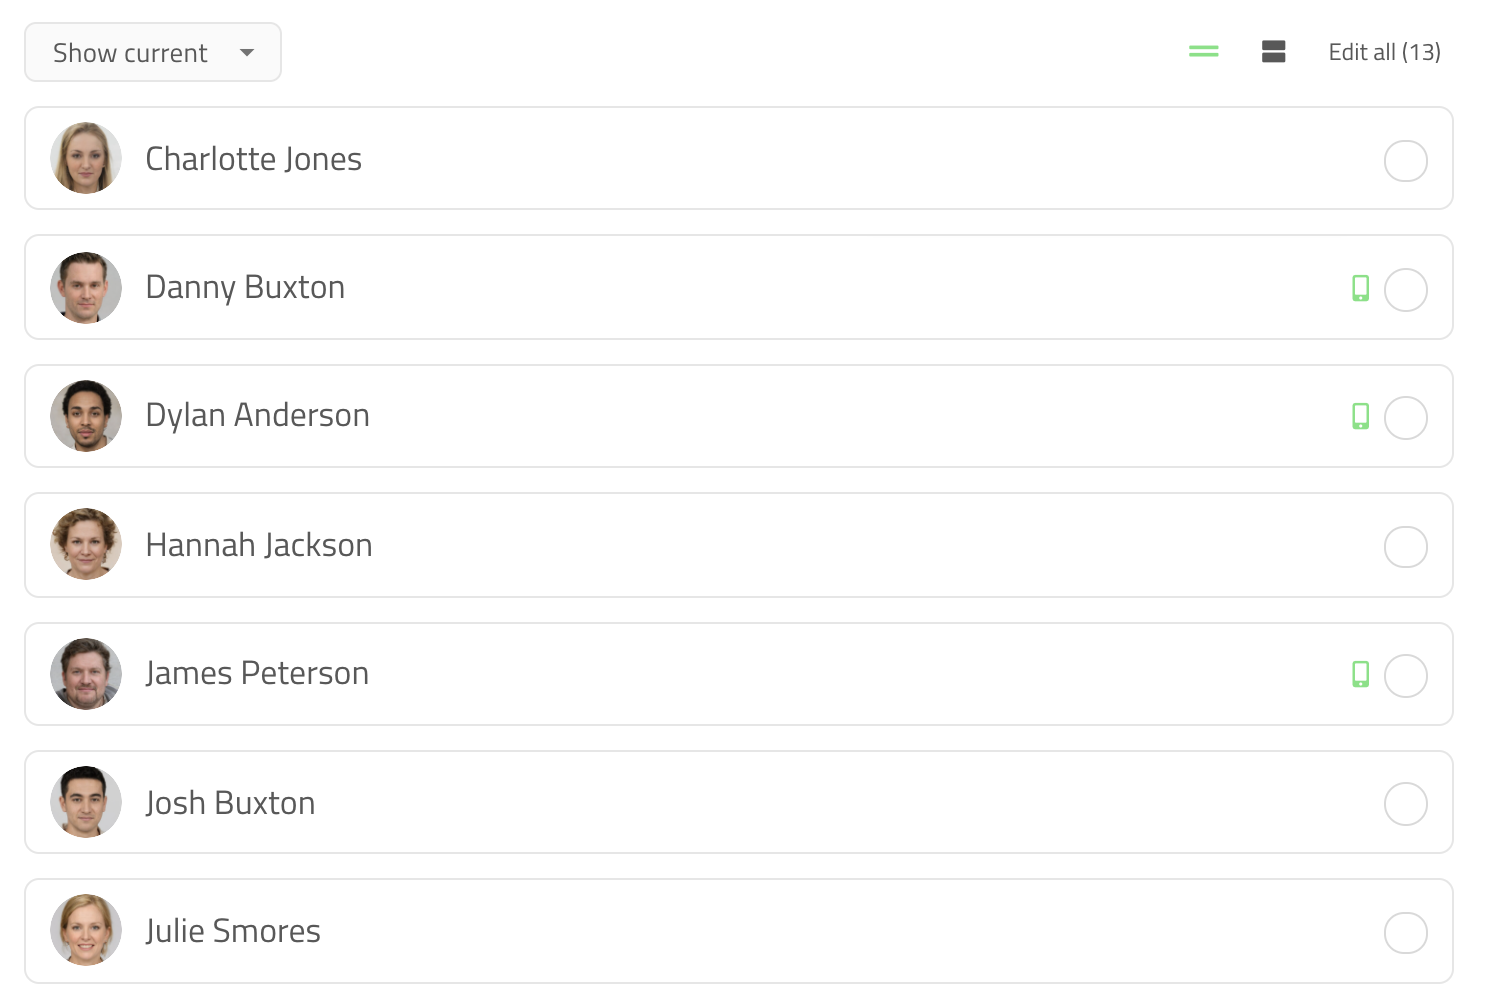
The green phone icon shows you at-a-glance who’s got companion app connected.
Details
Group name
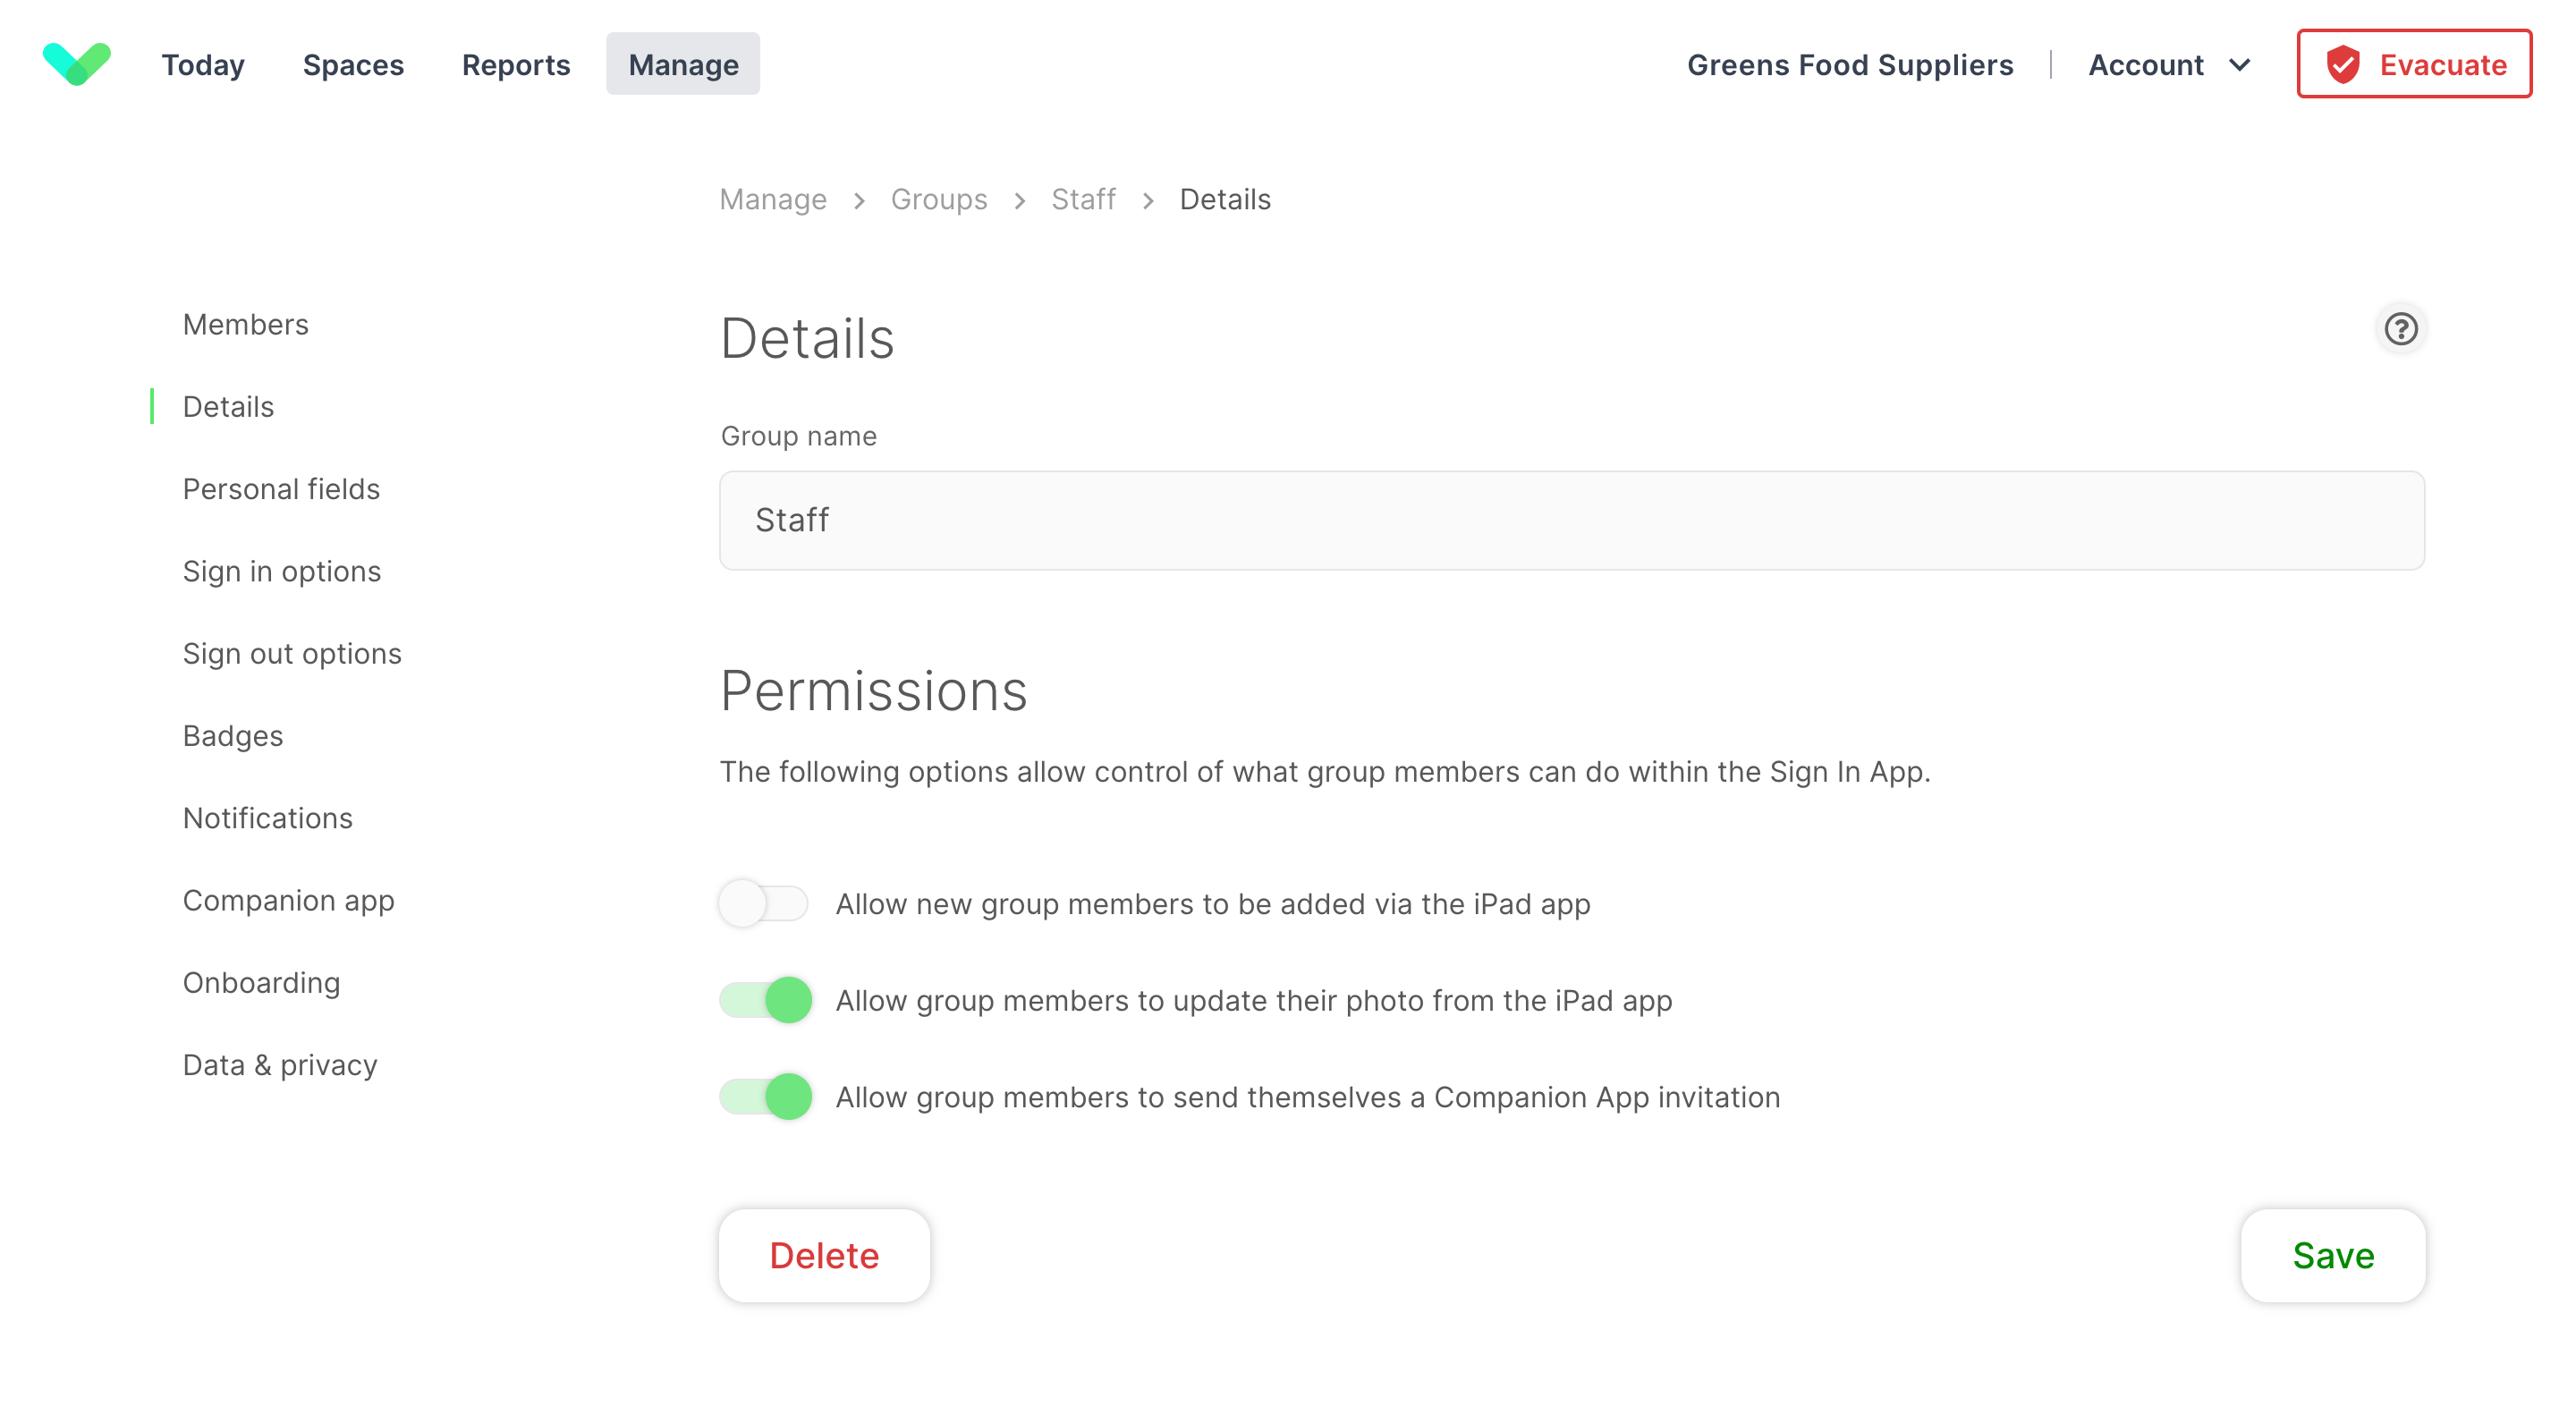
Here you can specify the name of the group. This appears on the iPad when your visitors sign in, so make sure to keep it short, simple and easily recognisable by someone using the system for the first time.
Custom translations
You can provide custom translations of group names that are then presented in the language of choice for the personing signing in.
Click here to read the how-to-guide for custom translations.
Permissions (Repeat visitors)
These options allow control of what group members can do within the Sign In App.
| Option | Description |
|---|---|
| Allow new group members to be added via the iPad app | With this option selected, an Add new button appears in the app, allowing group members to add themselves from the iPad. With this disabled all group members must be set up in the portal. (Not an option for synced groups) |
| Allow group members to update their photo from the iPad app | This option allows group members to update their photo from the iPad while signing in. When this option is turned off, photos can only be managed from the portal. (Not an option for synced groups) |
| Allow group members to send themselves a Companion App invitation from the iPad app | If a group member has either an email address or phone number against their record, this option will allow them to start using Companion App straight from the iPad. |
Delete group
Selecting this option will permanently delete the group and all group members.
Warning
Deleting a group is permanent and can not be undone. Data will be destroyed including history tied to individuals, their photo and any signed documents.
Personal Fields (Repeat visitors)
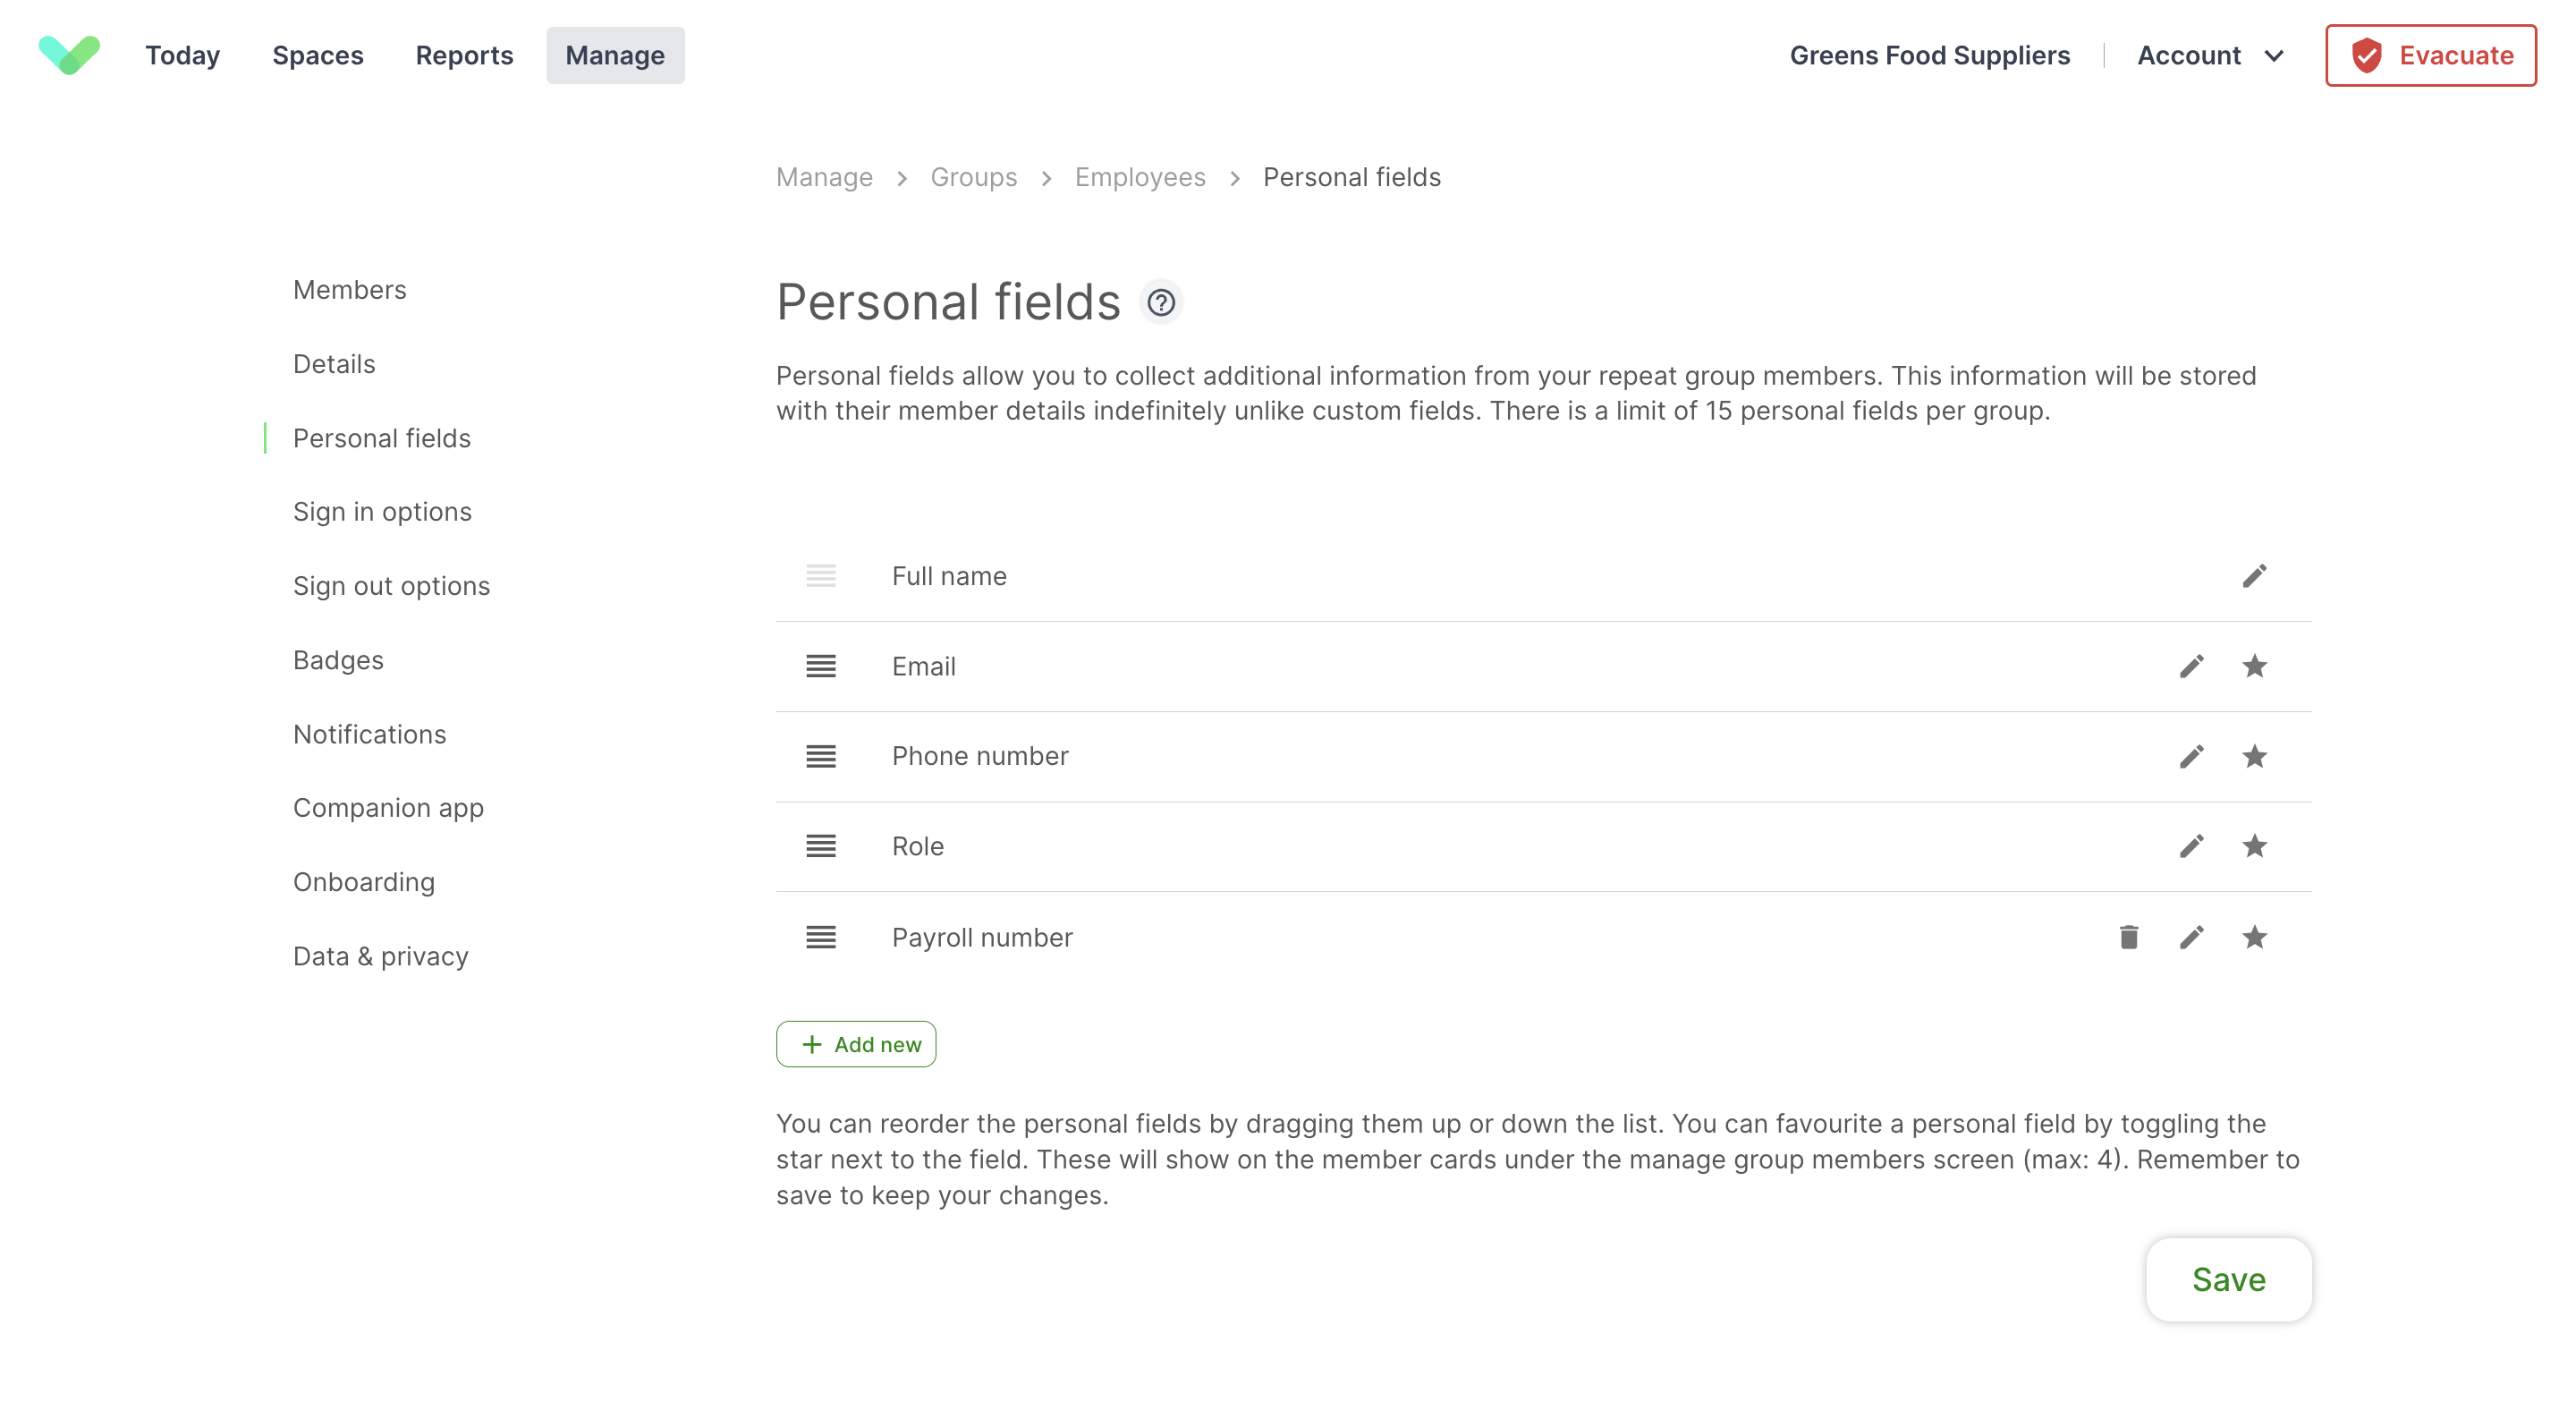
Personal fields allow you to collect additional information from your repeat group members. This information will be stored with their member details indefinitely unlike custom fields. There is a limit of 10 personal fields per group.
Edit personal field
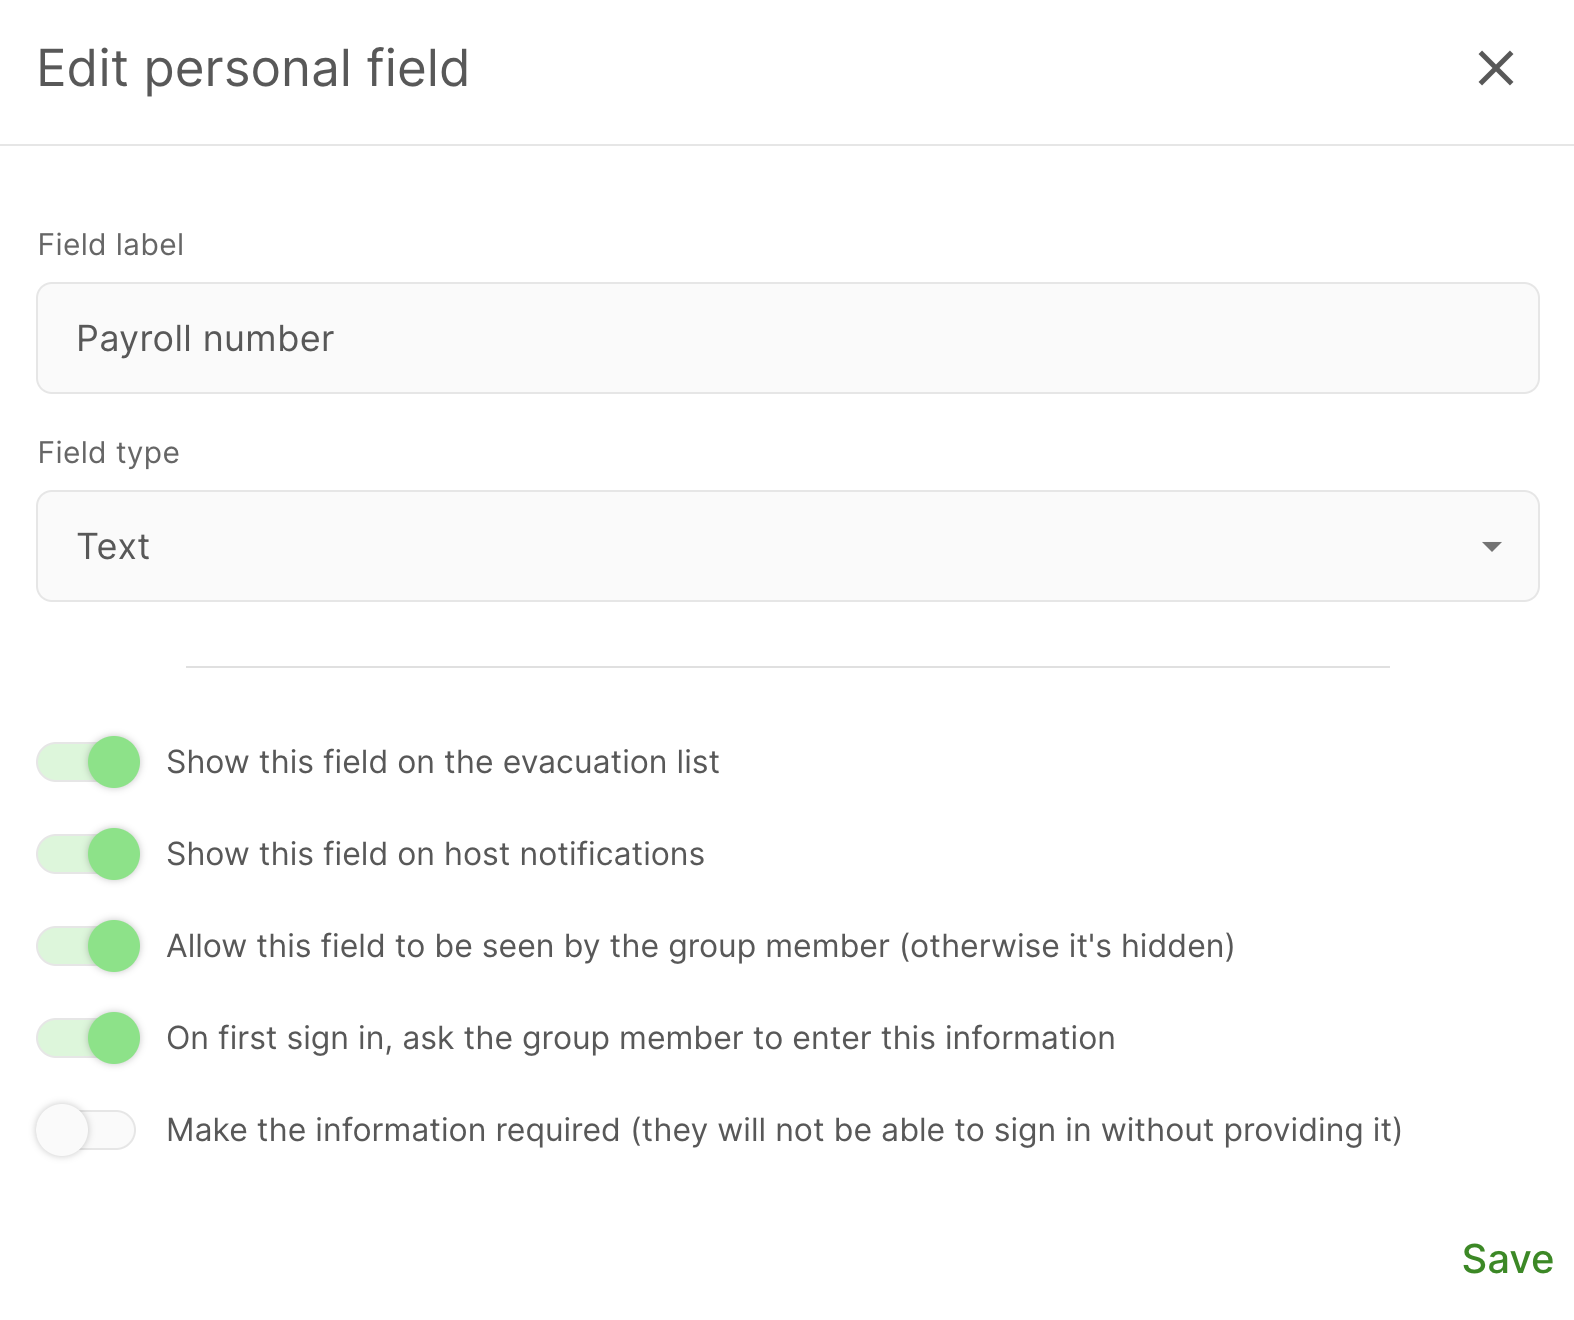
You can edit any personal field when it’s created or by clicking the pencil icon once it's created.
Field type
Select what type of information is being captured. The iPad will display a custom keyboard suited to the type of information you select (e.g. email displays the @ symbol immediately without having to press shift).
- Text - the standard keyboard is displayed
- Email - email addresses
- Number - the number keys are displayed
- Yes/No - display a yes/no option for visitors
- Dropdown - show a list of options for the visitor to choose from
Tip
Personal fields are for repeat visitors. If you want to gather more information from standard visitors then you can use custom fields.
Sensitive fields
Some fields in Sign In App may include sensitive or protected data that should only be visible to portal users with the highest level of access. The data is encrypted so it’s not visible in the Sign In App database. Sensitive fields can’t be favourited (so they appear on expanded views) or set to show on the evacuation list.
To set up a personal field that should be categorised as sensitive, go to Manage > Groups > Select group > Personal fields, click Add new and toggle ‘This field contains sensitive data’ on.
Important
You need to add a new personal field to categorise it as sensitive. The system personal fields (Email, Role, and Phone number) and existing additional personal fields cannot be categorised as sensitive.
Only portal users with the user role Administrator or a custom role with ‘Manage Sensitive Data’ permission enabled can view and edit sensitive data fields for group members. You can read more about setting up custom roles and permissions here.
Evacuation list
Toggle Show this field on the evacuation list on to show the personal field on the site evacuation list. This can be helpful when you need to know a person’s contact information in the event of an emergency.
Show this field on host notifications
Toggle this option on to include the personal field data in host notifications. This can be useful if you have a repeat visitor group for contractors using personal rather than custom fields, but still need to share this information with their host.
Visibility
If you might want to store some information against a member, but it isn’t necessary for them to see this information then toggle OFF Allow this field to be seen by the group member.
Visitor enters info
If you want to store information against a members details, but you don’t need them to fill this information in themselves, then toggle OFF On first sign in, ask the group member to enter this information. By default the member will be required to fill this information in.
Make this a required field
Set this personal field to be mandatory. A visitor will not be able to sign in without first completing this field. Toggle ON Make the information required.
Sign in options
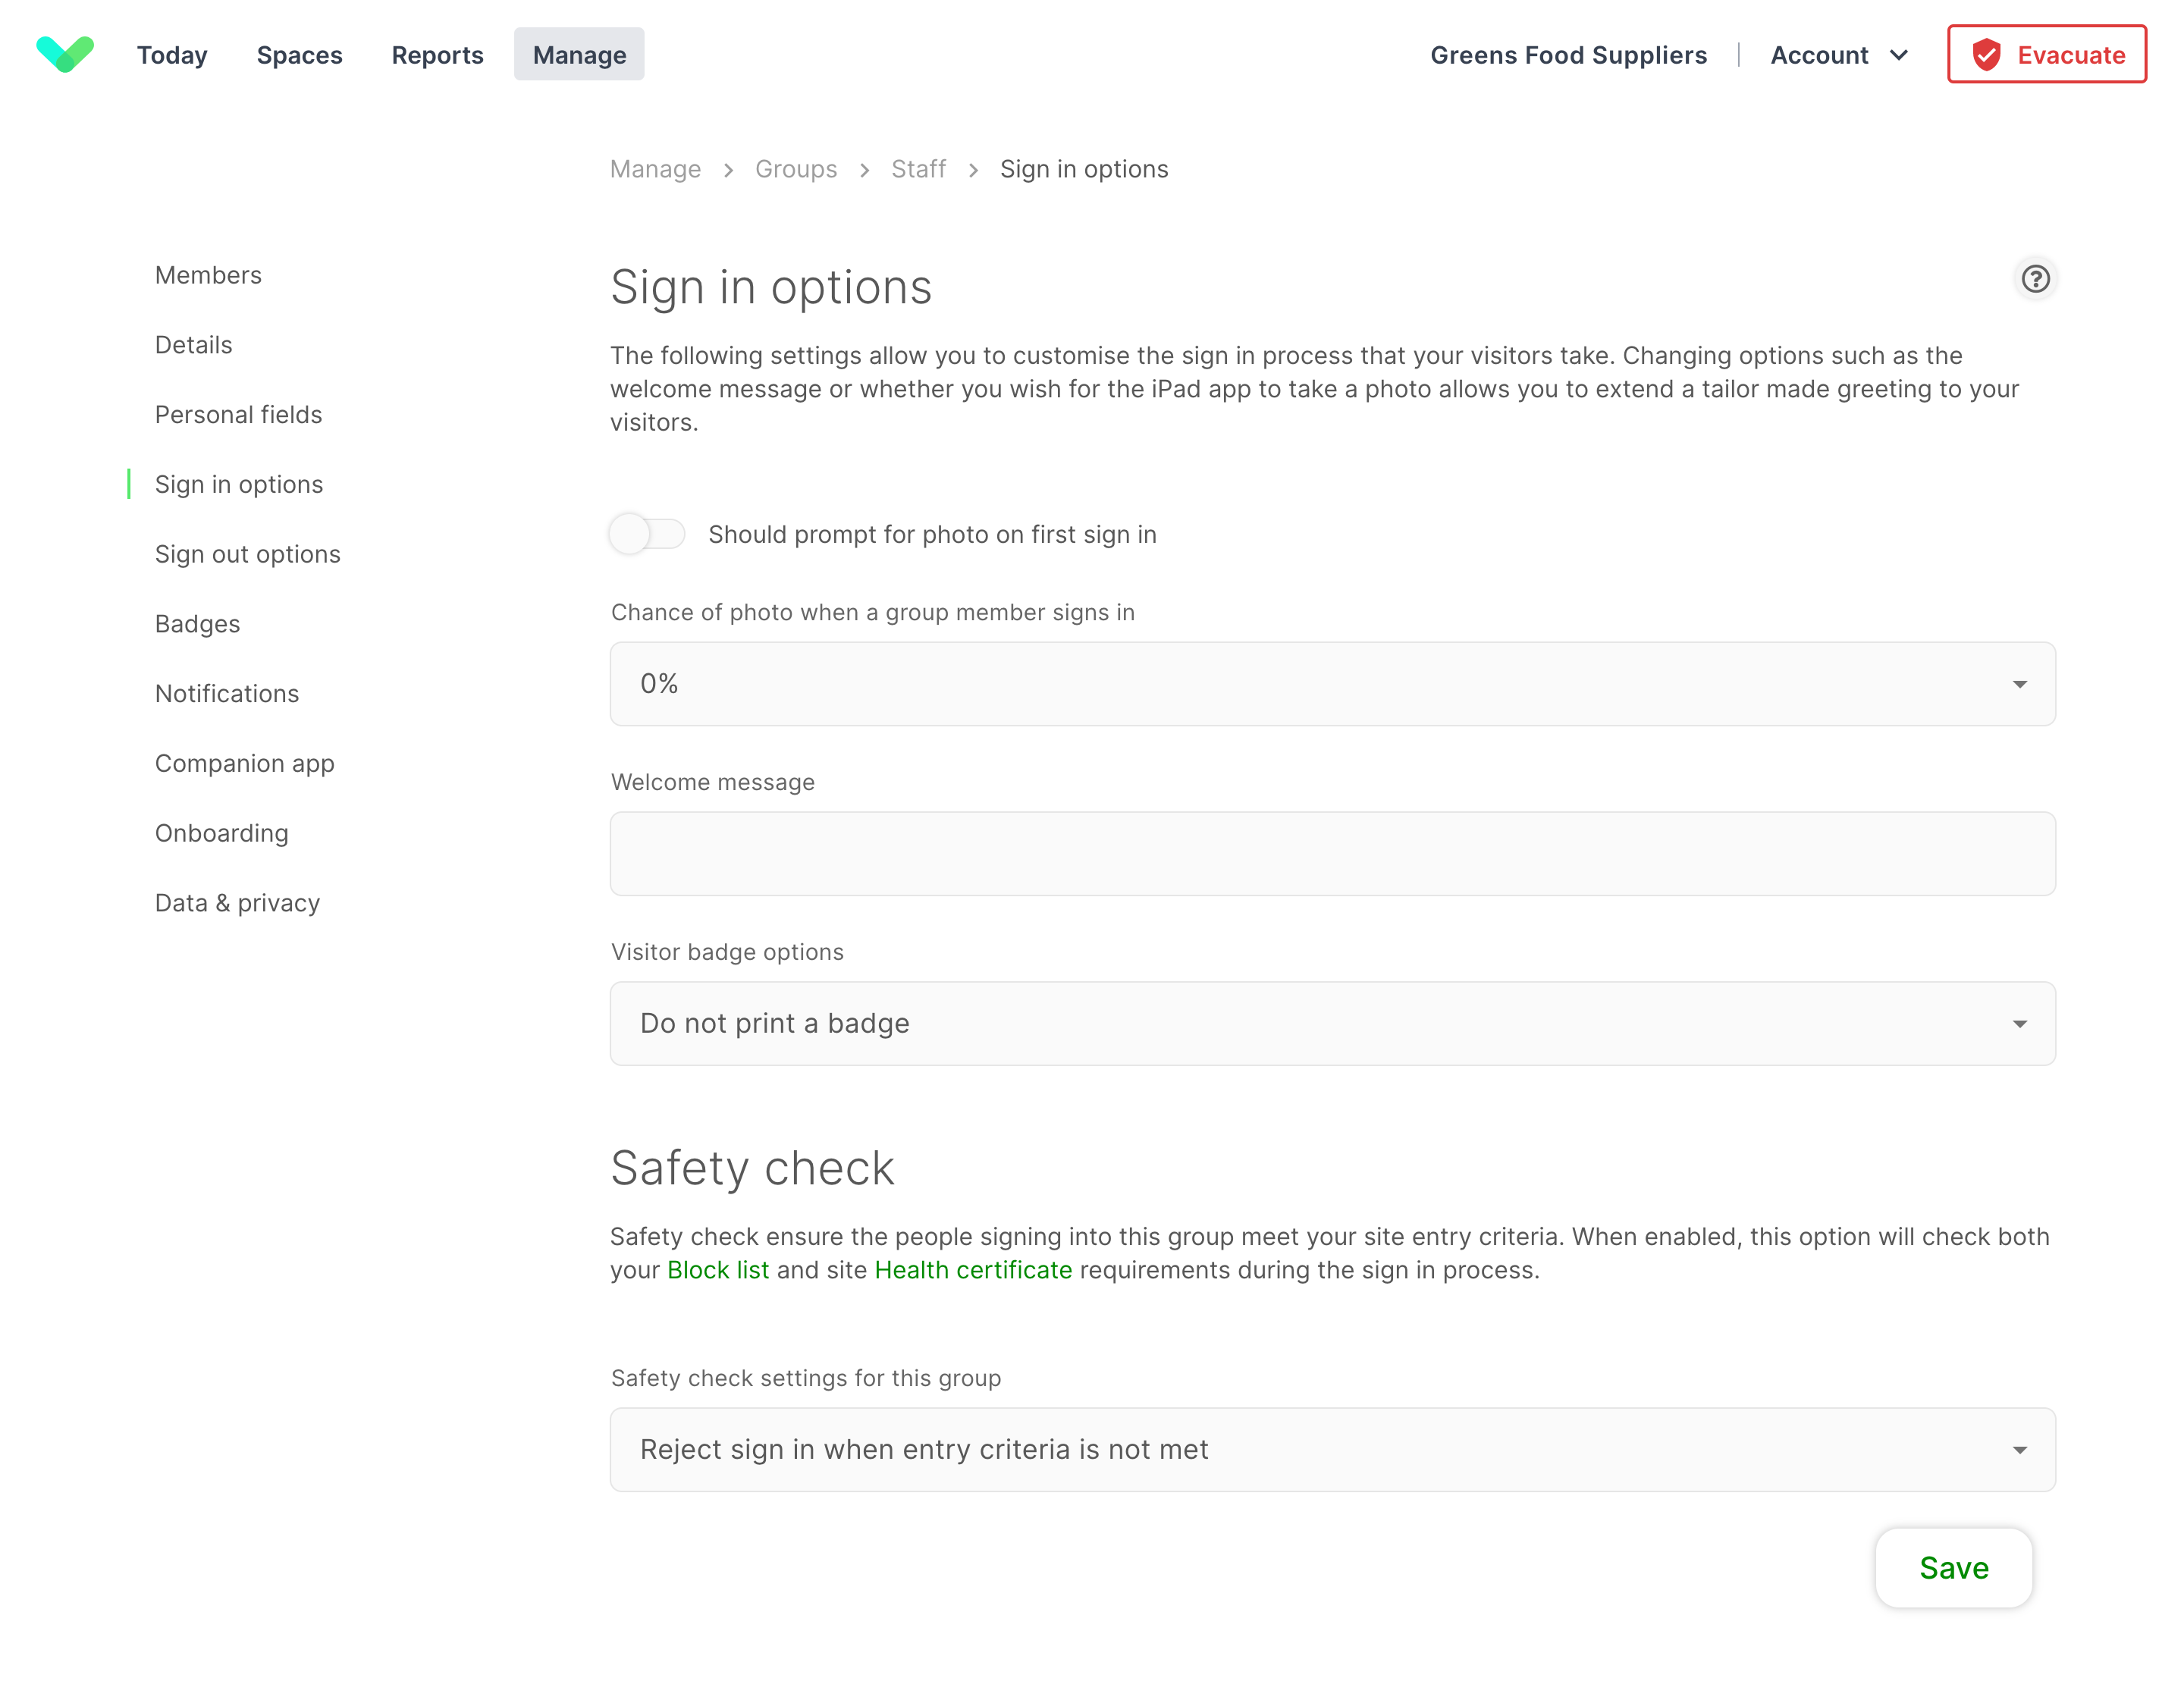
The following settings allow you to customise the sign in process that your visitors take. Changing options such as the welcome message or whether you wish for the iPad app to take a photo allows you to extend a tailor made greeting to your visitors.
Welcome message
When your visitor has finished signing in, your welcome message will be displayed. This is designed to fit on a single line, so keep it brief. If you leave the welcome message blank, 'Thank you for signing in' will be displayed.
Custom translations
You can provide custom translations of welcome messages that are then presented in the language of choice for the personing signing in.
Click here to read the how-to-guide for custom translations.
Prompt for photo

On first sign in
The first time a member signs in to this group they will be prompted to take a photo.
Do not prompt for photo
A photo will not be taken.
If they don't have one
If a member does not have a photo, the next time they sign in they will be prompted for a photo.
Chance of photo (Repeat visitors)
This option allows you to set how likely it is that a repeat visitor will be randomly selected to take a photo when signing in. This can be used to verify the identity of the person signing in and can be a deterrent for individuals signing in for others. The options range from 0% chance (default - a photo will never be requested) to 100% chance (a photo is required with every sign in). The photos taken can be viewed in the online portal History page.
Verify identity by comparing photo against profile photo
Enable the Identity match feature for this group. Click here to read more about this feature.
Visitor badge options

Do not print a badge
No badge will be printed when the visitor signs in.
Print a badge on first sign in only
A badge will be printed the first time the visitor signs in. This option is only available for repeat visitor groups.
Print a badge on each sign in
A badge will be printed every time a visitor signs in.
Tip
For repeat visitors you can also print a badge from the member settings in Sign In App on the iPad. How to to this is slightly different if you're using New or Original experience.
Block list settings
Manage the block list settings for this group. This is set to Don’t check by default.
Don’t check - Anyone signing into this group won’t be checked against the block list.
Allow sign in on match - If someone matches the block list they will be able to sign in but recorded as Block list matched.
Reject sign in on match - If someone matches the block list their sign in will be rejected and recorded as Block list matched.
Tip
To set up notifications for block list matches go to Manage and scroll down to find Notifications and set the event to Block list matched.
Sign out options
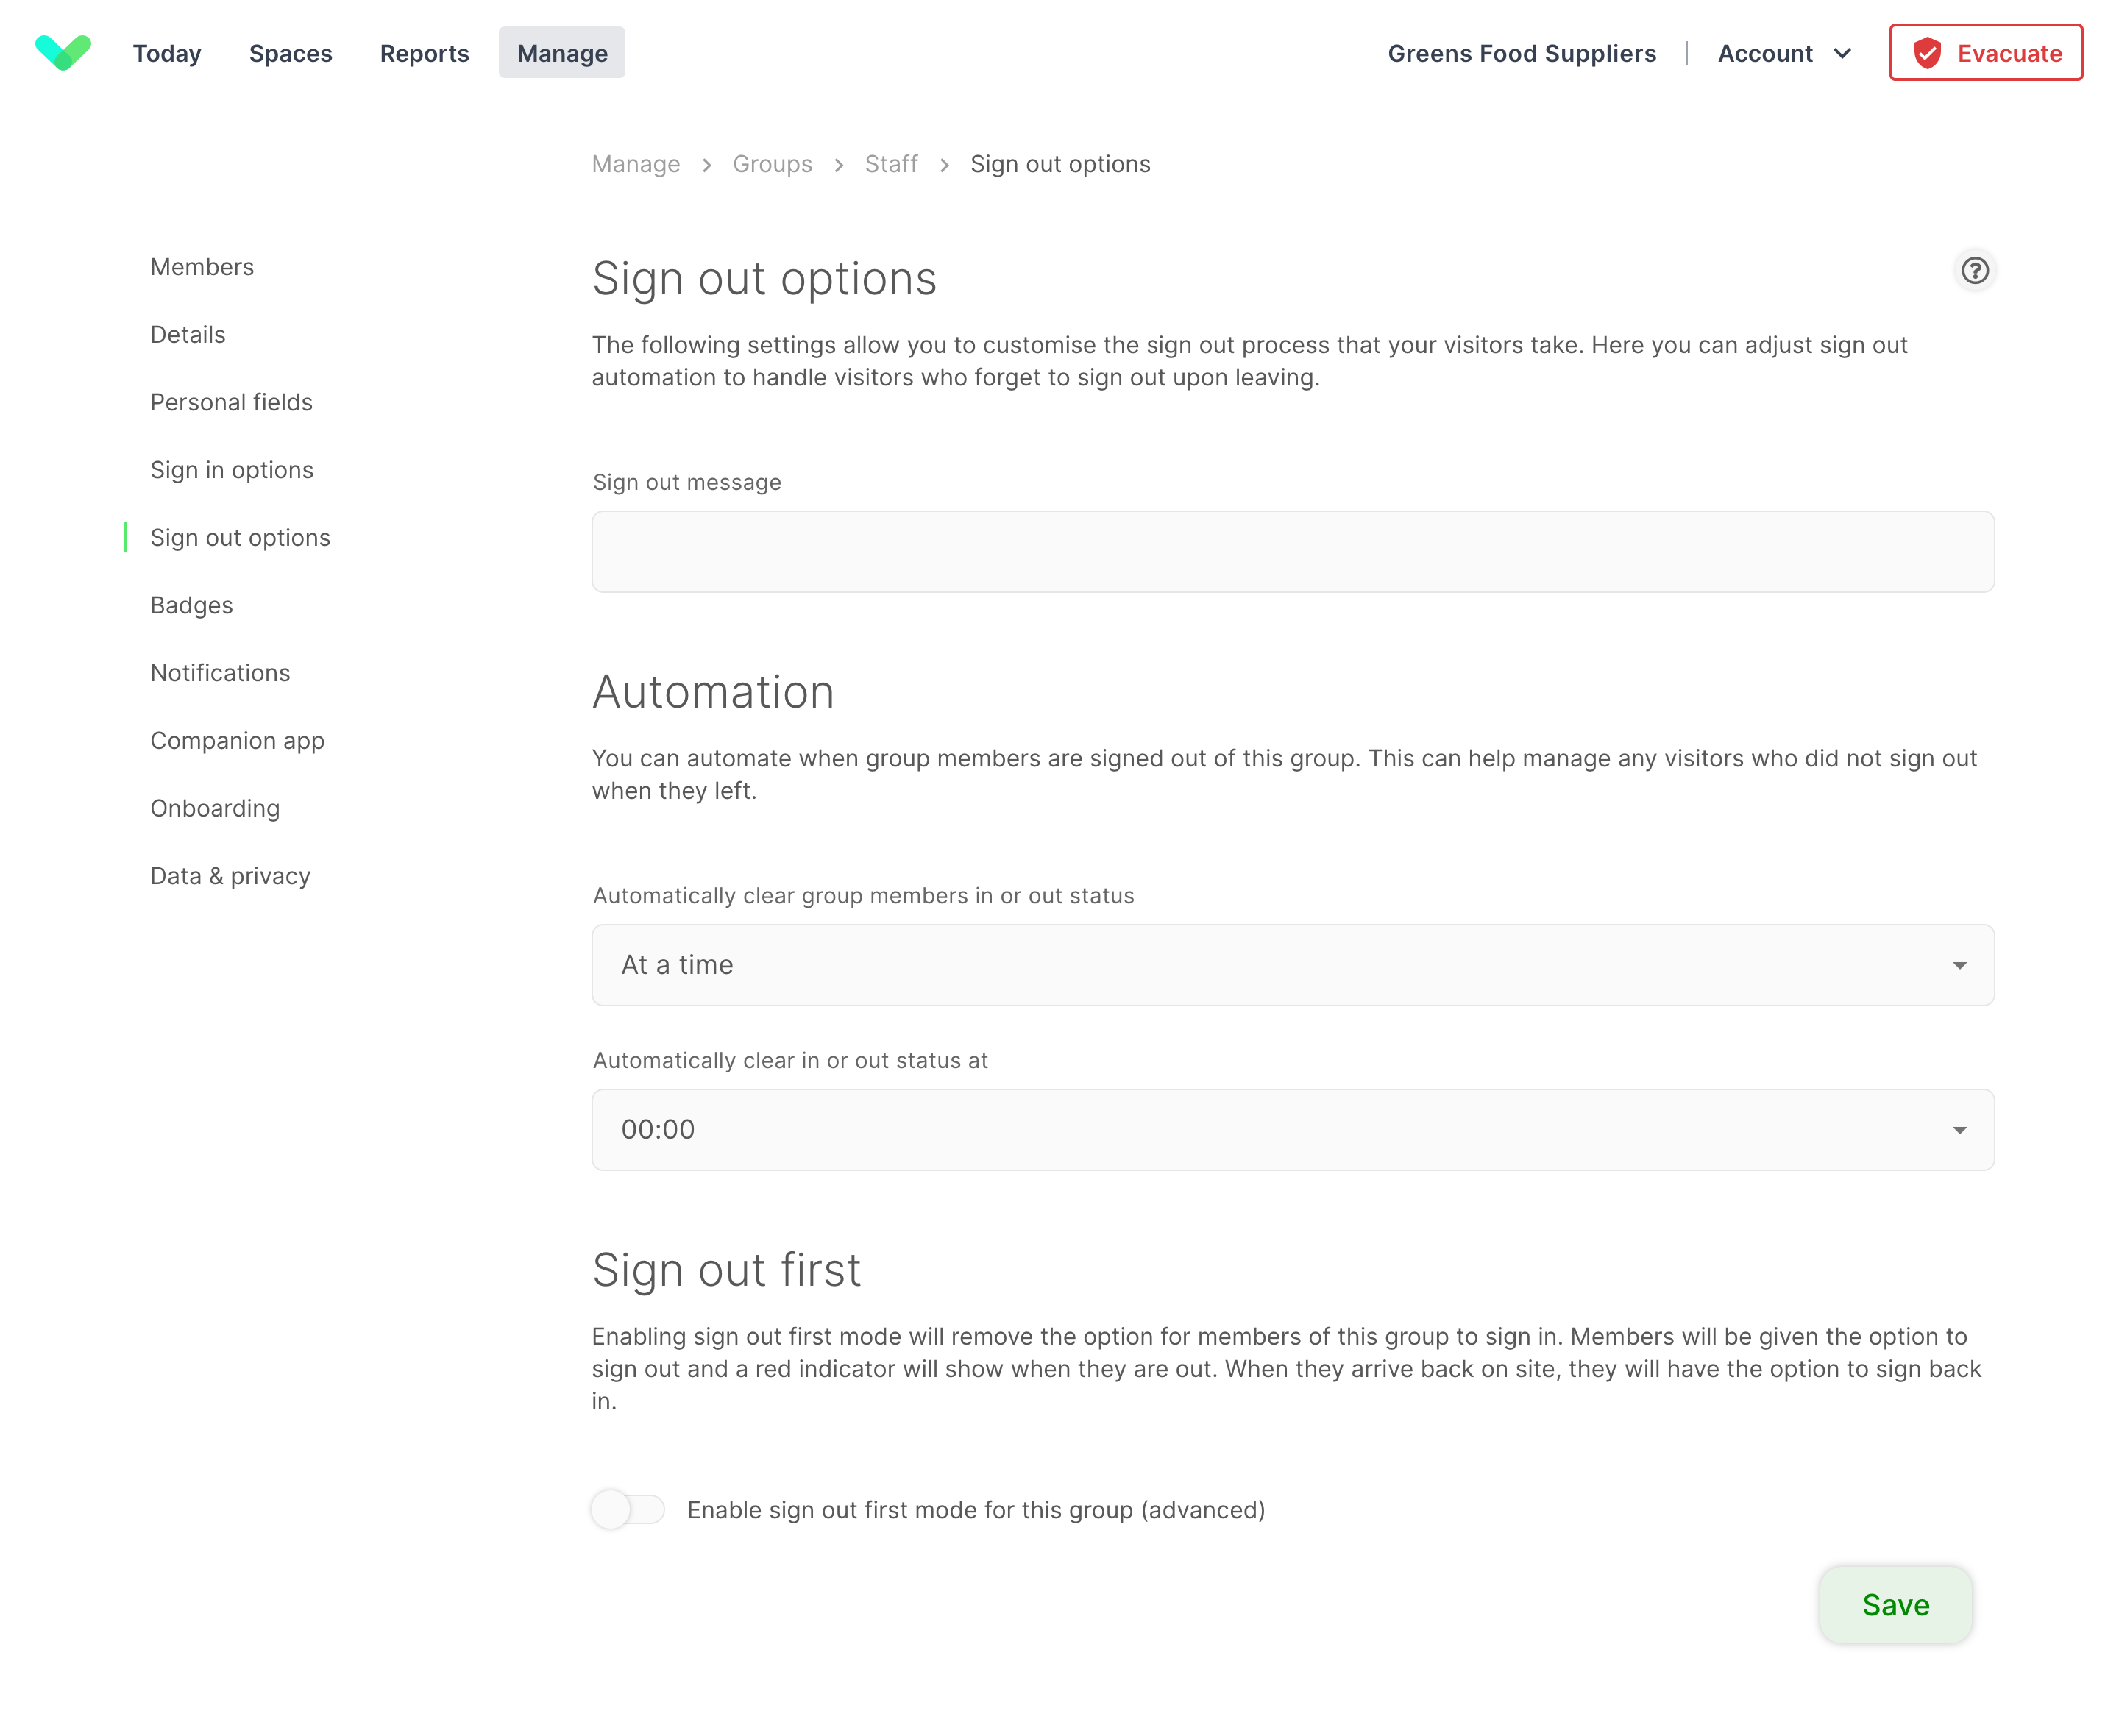
The following settings allow you to customise the sign out process that your visitors take. Here you can adjust sign out automation to handle visitors who forget to sign out upon leaving.
Sign out message
When your visitor has finished signing out, your sign out message will be displayed. This is designed to fit on a single line, so keep it brief. If you leave the sign out message blank, 'Thank you for signing out' will be displayed.
Automation
You can automate when group members are signed out of this group. This can help manage any visitors who did not sign out when they left.
| Option | Description |
|---|---|
| Never | Do not sign visitors out automatically. Your visitors will stay signed in until they sign out. |
| At a time | You can select what time of the day this group's visitors are automatically signed out. |
| After duration | Your visitors can be automatically signed out after a set number of hours. |
Enable sign out first mode for this group (Repeat visitors)
Enabling sign out first mode will remove the option for members of this group to sign in. Members will be given the option to sign out and a red indicator will show when they are out. When they arrive back on site, they will have the option to sign back in.
Badges
From this section, you can customise the badge design for the group selected. This gives you the ability to have different templates for each group. By default, the badge template for the group will be the site template.
Click here for more details about badges.
Notifications
Host notifications will notify a member of repeat visitor group when a visitor has arrived and selected them as their host. To use host notifications you need a custom field with the response type set to Notify list. A notify list will allow the visitor to search your repeat visitor groups and select the person they're visiting. You can configure custom fields by going to Manage > Sites > Select site > Custom fields.
Important
If members are not showing on your notify list it might be because the group isn't set to show on the site notify list. To check this go to Manage > Groups > Select group > Data & Privacy and under visibility ensure Include group on site notify list is toggled ON.
When a visitor arrives
Select Notify their host and then choose the default type of notification that is sent to members of this group when their visitor signs in. You can send host notifications using email, SMS, and MS Teams.

Tip
When a visitor sign in is rejected the host will be notified if you have When a visitor signs in set to Notify their host. Read more about setting up rejected sign ins here.
When a visitor signs out
Select Notify their host and then choose the default type of notification that is sent to members of this group when their visitor signs out. You can send host notifications using email, SMS, and MS Teams.
Tip
Click here to read the how-to-guide for setting up MS Teams host notifications.
Click here to read more about setting up Host notifications
Companion app (Repeat visitors)
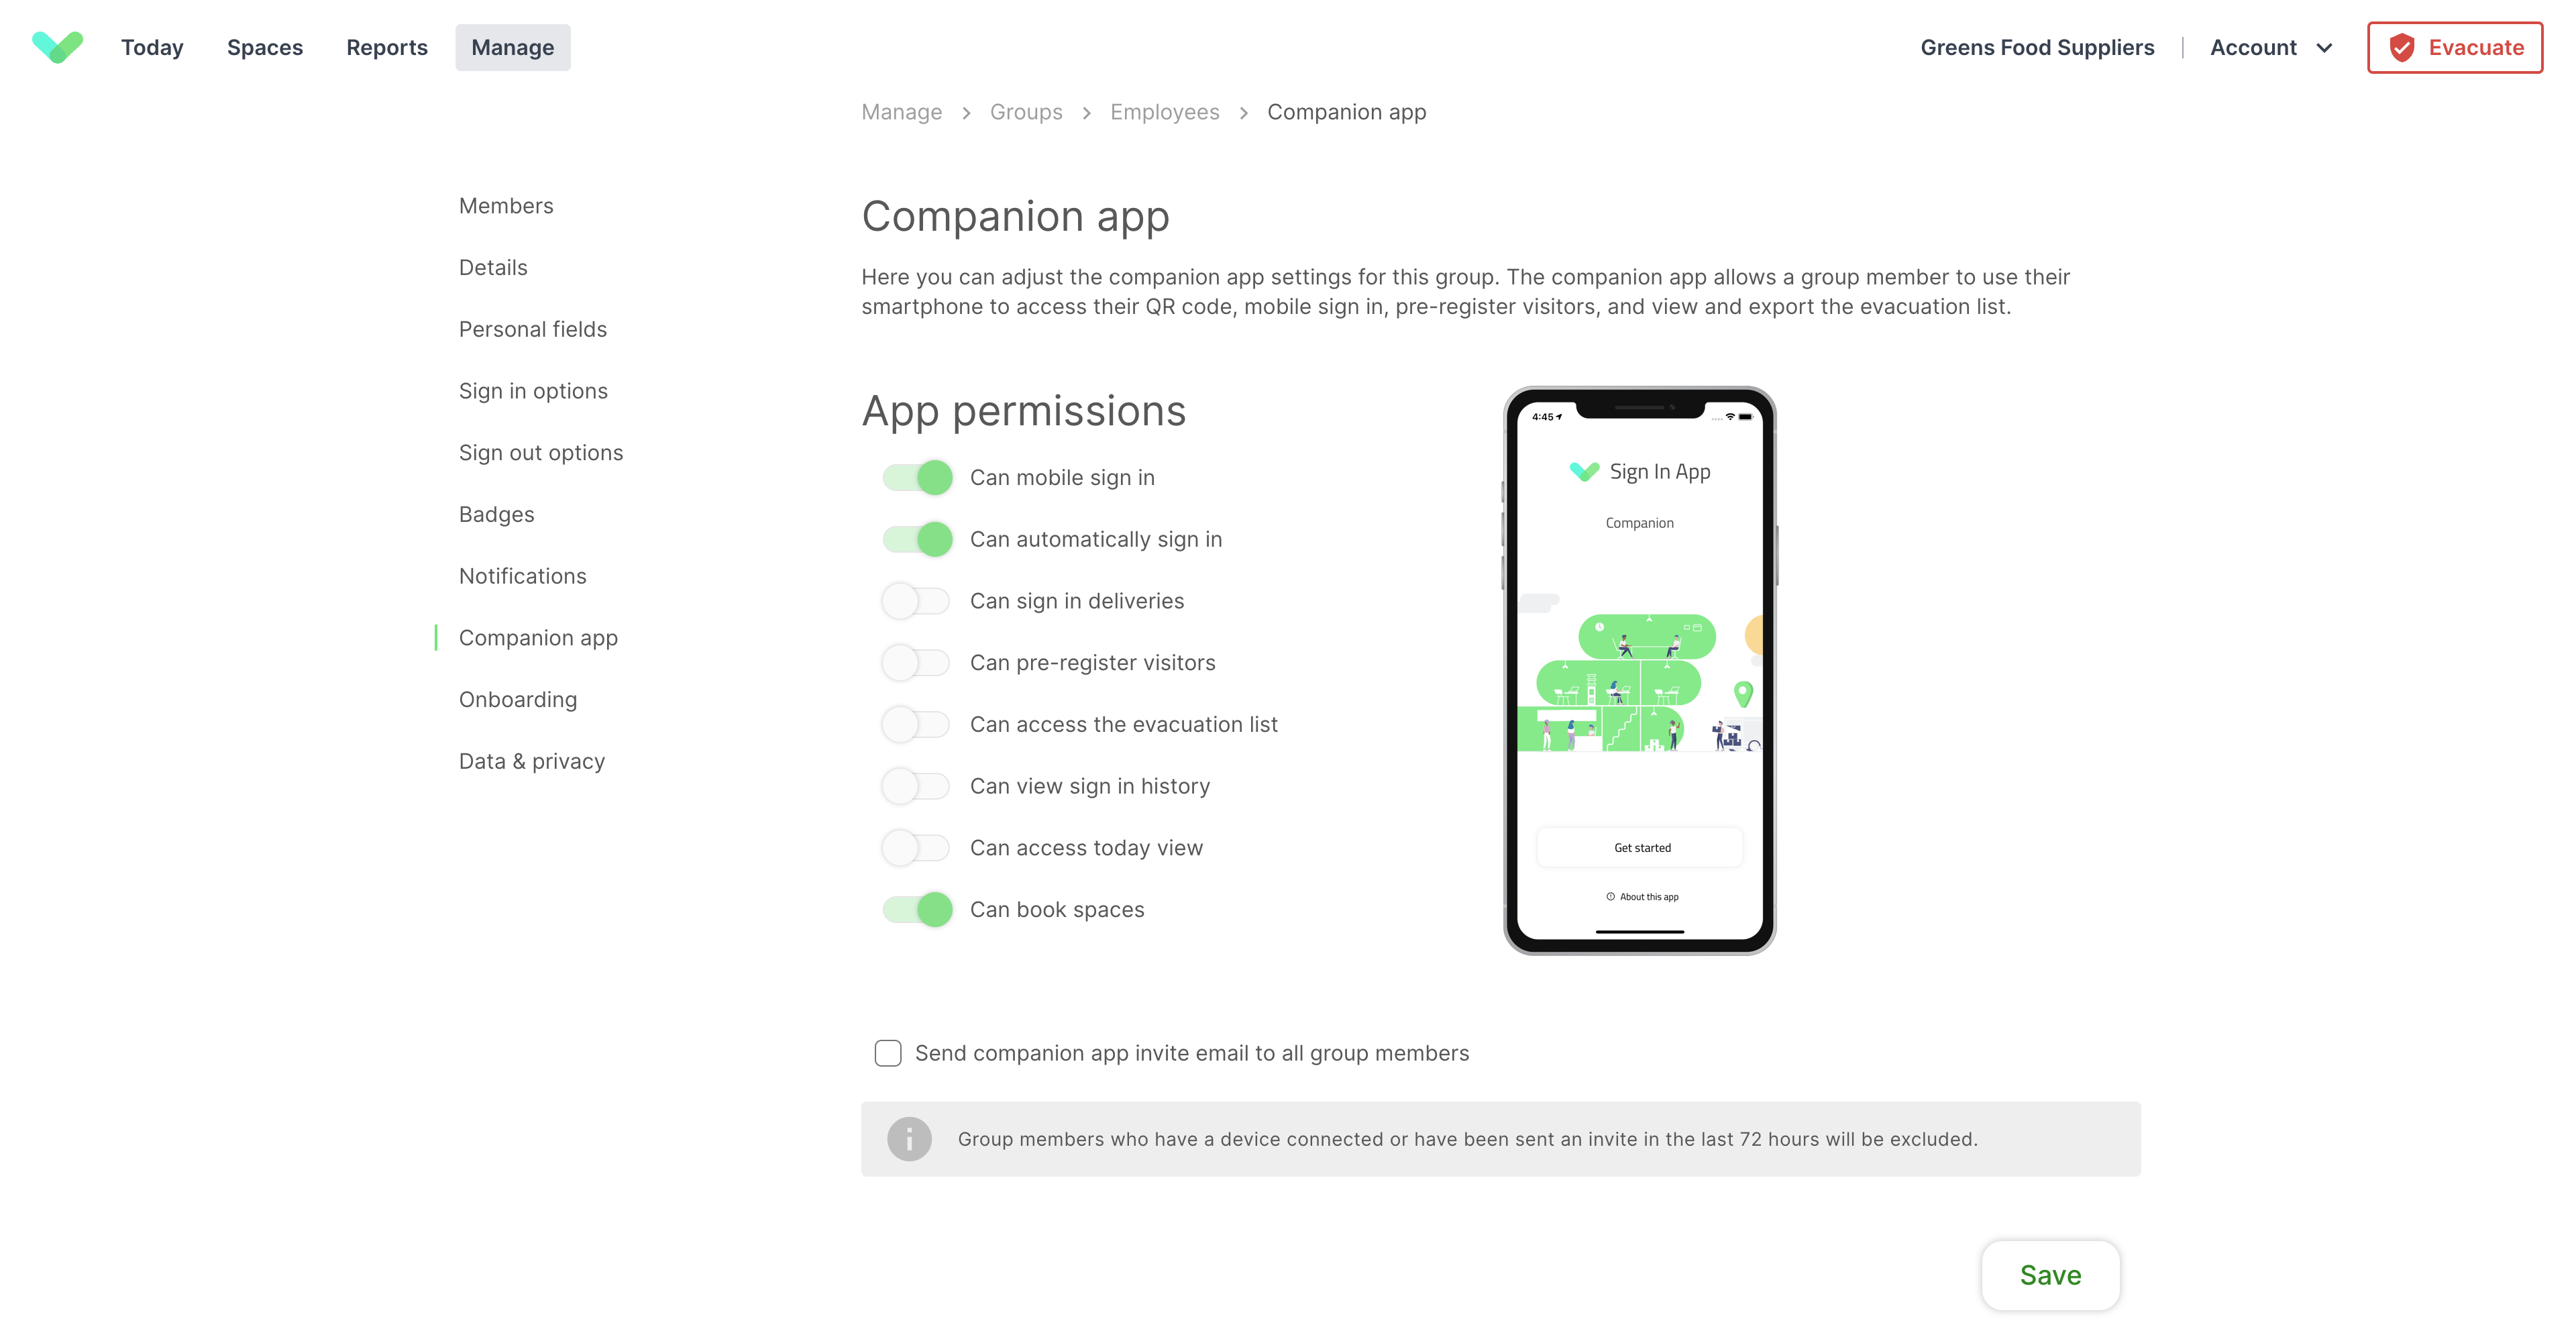
From here you can set the default Companion app permissions for each member of this group. Once you’ve done this, you can set individual members or the entire group to these default permissions.
Tip
To set an individual member to default permissions by going to Manage > Groups > Select group > Members, search for the member, click Edit > Companion app and toggle Group default on.
To edit Companion app permissions for an entire group go to Manage > Groups > Select group > Members and click Edit all and select Use group default permissions.
Tip
When a new member is added to the group they will inherit the Companion app permissions configured here.
Bulk Companion app invite
You can invite all members of a group to Companion app from here. Click Send companion app invite email to all group members and then Save and Send.
Important
Group members who have a device connected or have been sent an invite in the last 72 hours will be excluded.
Pre-registrations - (Standard visitors)
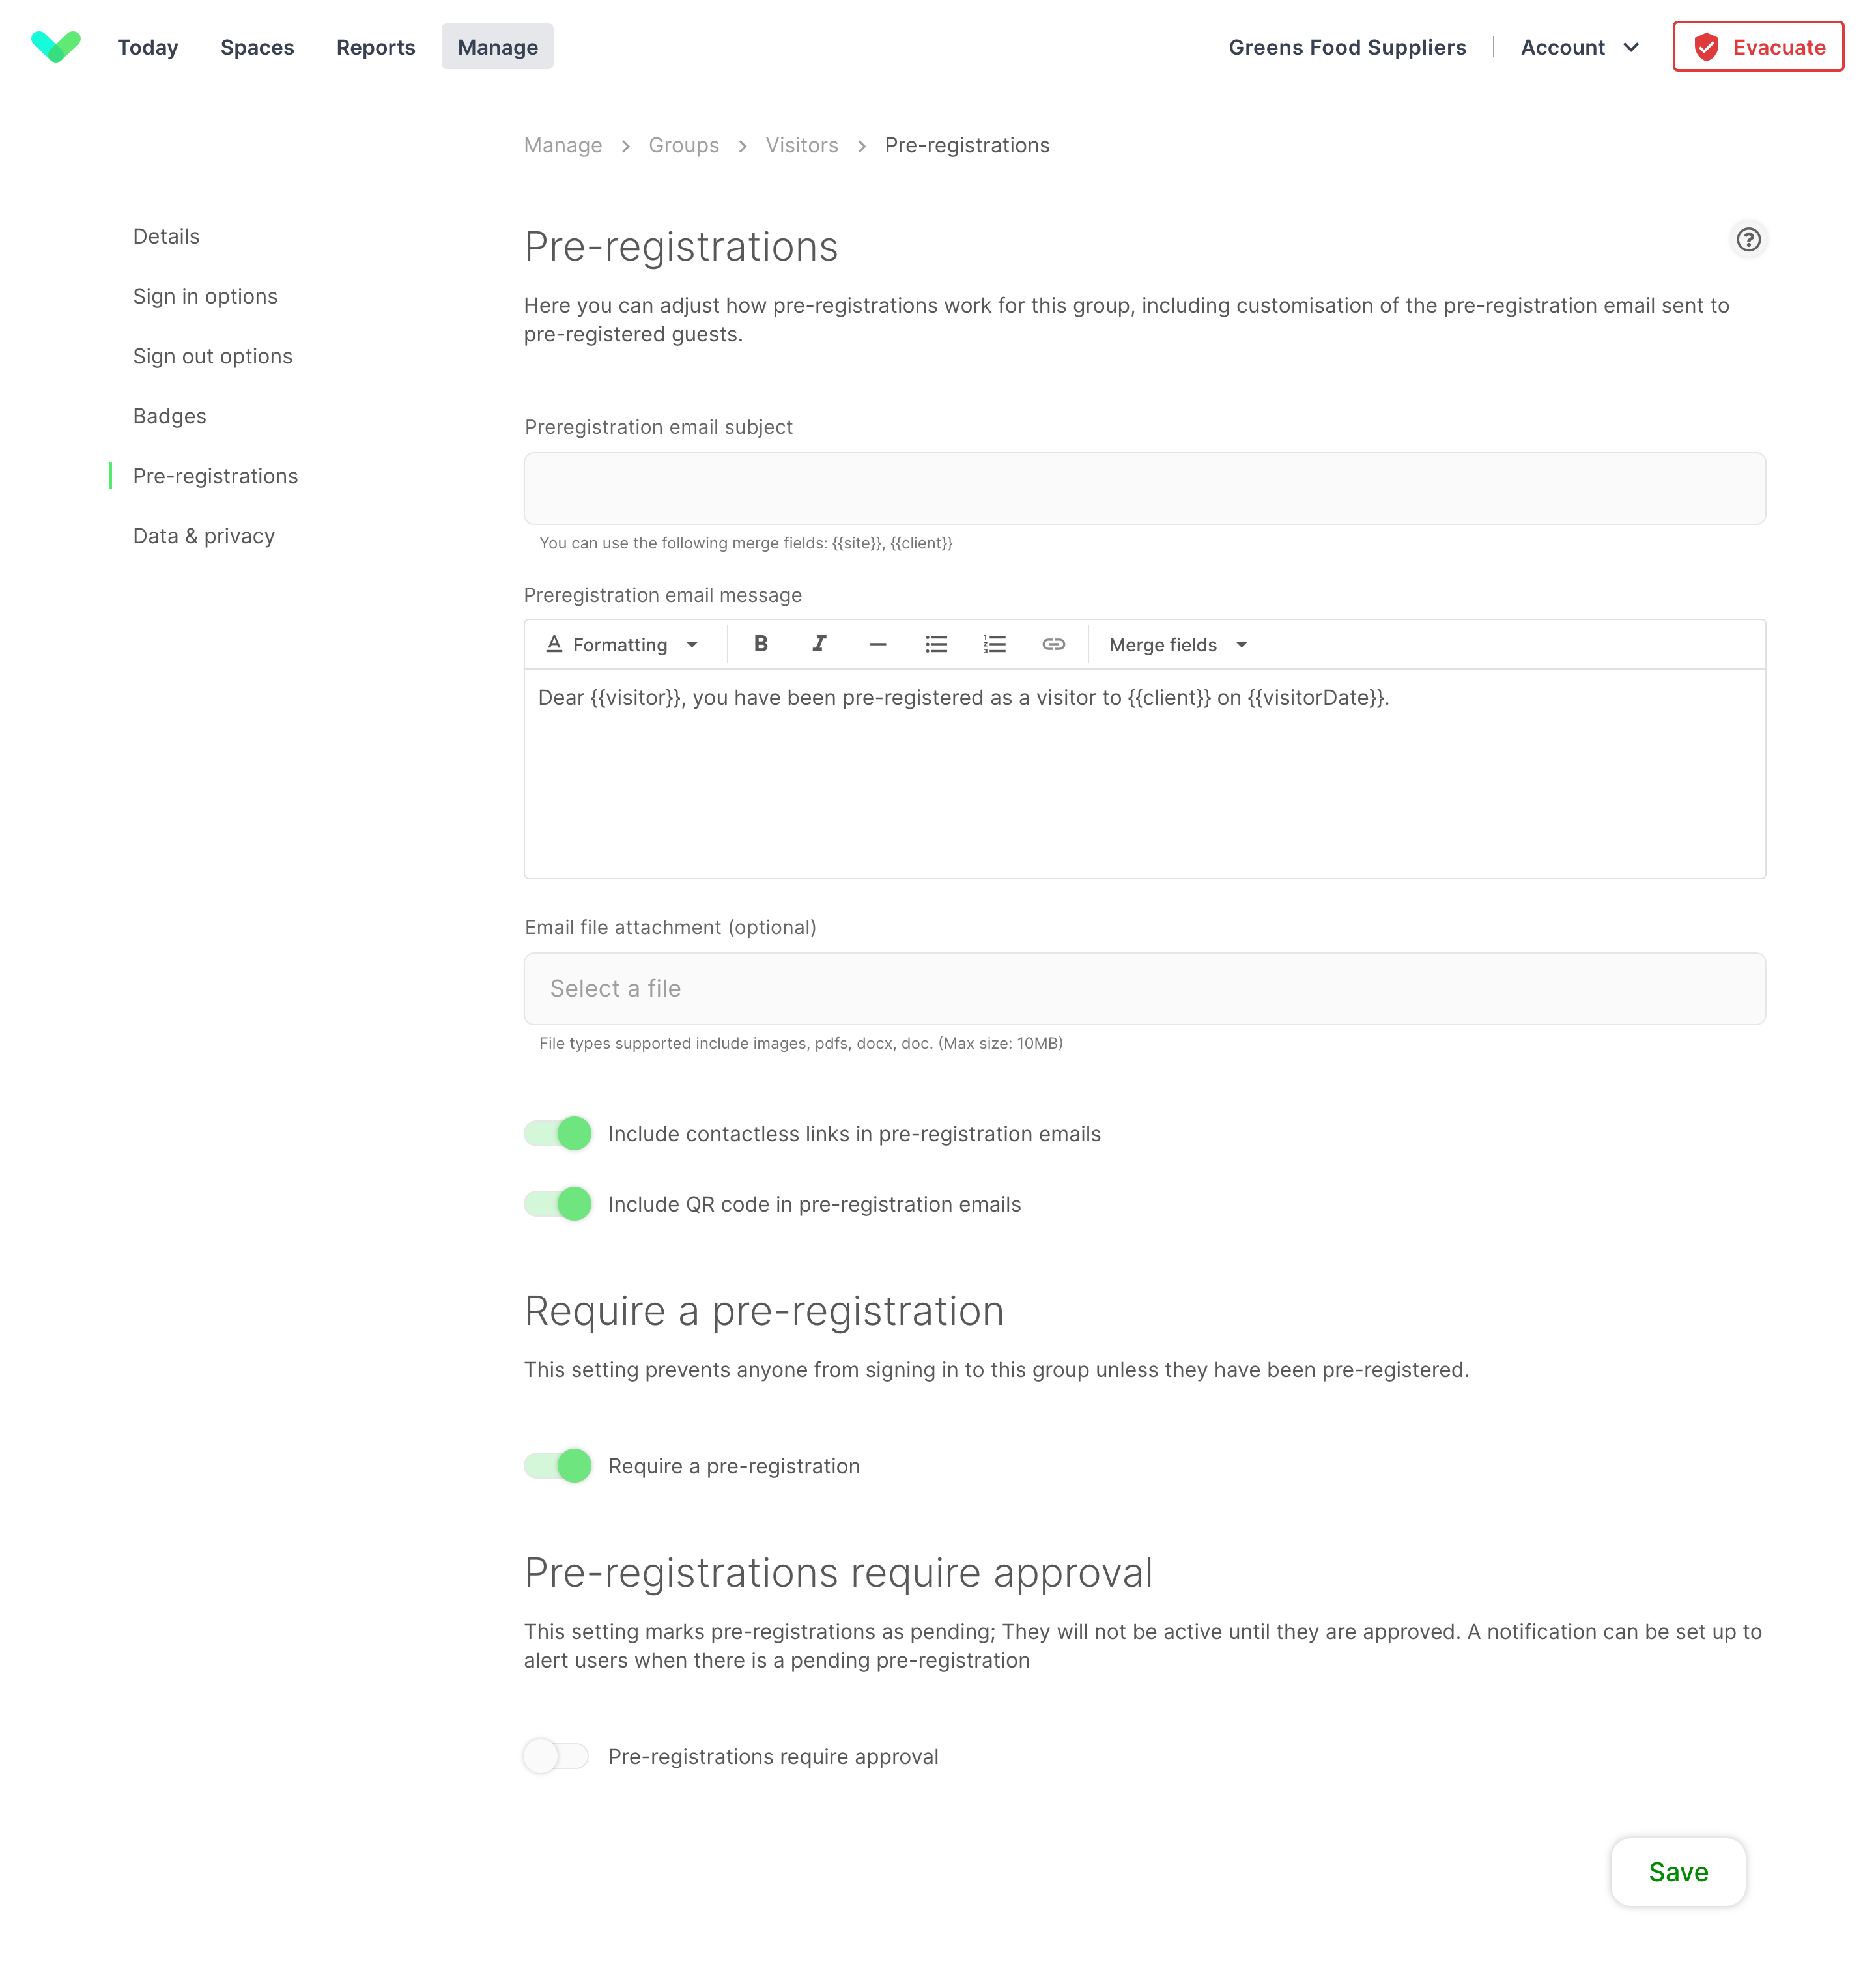
For a VIP experience, standard visitors can be pre-registered in advance. Here you can adjust how pre-registrations work for this group, including customisation of the pre-registration email sent to guests.
Pre-registration email subject
You can add a custom email subject to include specific instructions or information. By adding { {site } } or { { client } } you can choose to have the site name or account name show in the subject.
Pre-registration email message
The pre-registration email message is the contents of the email that are sent to the visitor when they've been pre-registered. You can use formatting to customise the email and merge fields to pull through visitor, site and group specific details.
Email file attachment
You can now add attachments to your pre-registration emails. These can include important health and safety information, pre-arrival documentation or company information. As this can be customised for each visitor group, it’s easy to provide specific information for each type of visitor ahead of their arrival.
Include contactless links in pre-registration emails
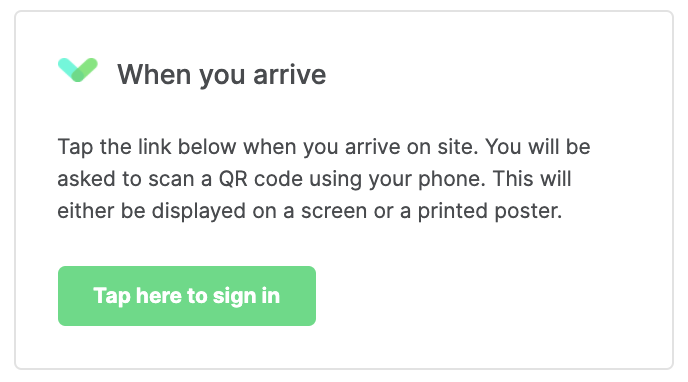
Toggle this option on to include a contactless link in pre-registration emails. The visitor just needs to tap the Tap here to sign in button and camera will be launched in a broswer, simply scan the contactless sign in QR code on the welcome screen of the iPad to complete the sign in. There is also a sign out button, tap this to sign out. Click here to read more about contactless features.
Include QR code in pre-registration emails
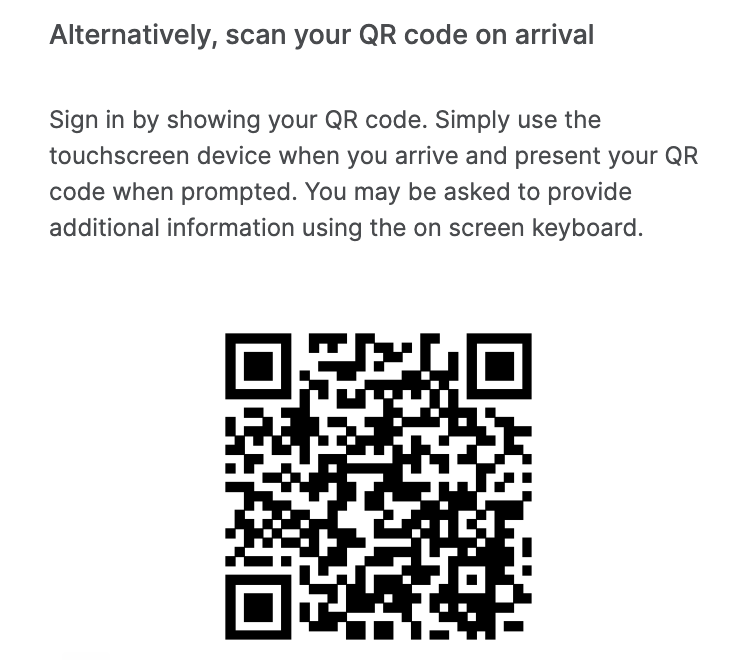
Toggle this option on to include a QR code on pre-registration emails. The visitor just needs to present the QR code to the iPad to sign in and again to sign out.
Require a pre-registration
This setting prevents anyone from signing in to this group unless they have been pre-registered. Visitors who attempt to sign in without a pre-registration will not have the option to continue their sign in.
Pre-registrations require approval
This setting marks pre-registrations as pending. They will not be active and the visitor won't be able to sign in as pre-registered visitor until they are approved. A notification can be set up to alert users when there is a pending pre-registration.
Editing of visitor records & Pre-registrations
You can update visitor details directly from the Today Page or History Report. Whether it's correcting a typo or fixing an entry error, maintaining accurate visitor records has never been easier. You can edit the records for both standard and repeat visitors.
No need to delete and recreate pre-registrations when changes are needed. You can:
- Modify the date or time of a visit.
- Resend invitation emails.
- Make any other necessary adjustments quickly and effortlessly
Tip
To use these editing capabilities, Portal users must have the following permission Manage Visitors > Edit Visitors enabled.
How to Use the Edit Feature
Navigate to the Today Page or History Report. Find the visitor record that needs updating and, providing you have the above relevant permission enabled, you should see an Edit button available. Select the Edit option to access this feature:

Through the ‘Edit Visit’ option, you will be able to edit all of the information held against the record, with the exception of the ‘Signed in’ and ‘Signed out’ fields. Custom fields will be displayed as static text fields and can be edited as such. Clearing the content from a field will remove it permanently from the visit record.
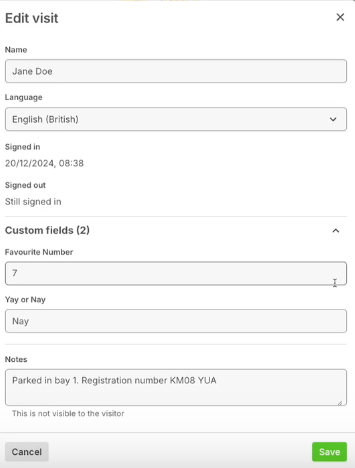
Click Save to confirm the changes to ensure the records are updated accurately.
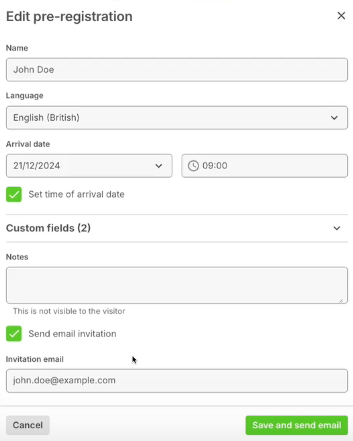
Pre-registrations can also be edited in the same fashion, and if an email invitation has been configured, the visitor will receive an email if any changes are made:
Important
When editing visitor pre-registrations you can only edit custom fields that have already been entered. If the field was left blank during the pre-registration you will not be able to edit the field after the pre-registration has been created. This does not apply to email addresses which can be added after the pre-registration is created if one was not provided initially.
Changes will be recorded in the audit log, but only the names of the changed fields will be shown and not the content to prevent any issues of privacy and data protection.
Onboarding - (Repeat visitors)
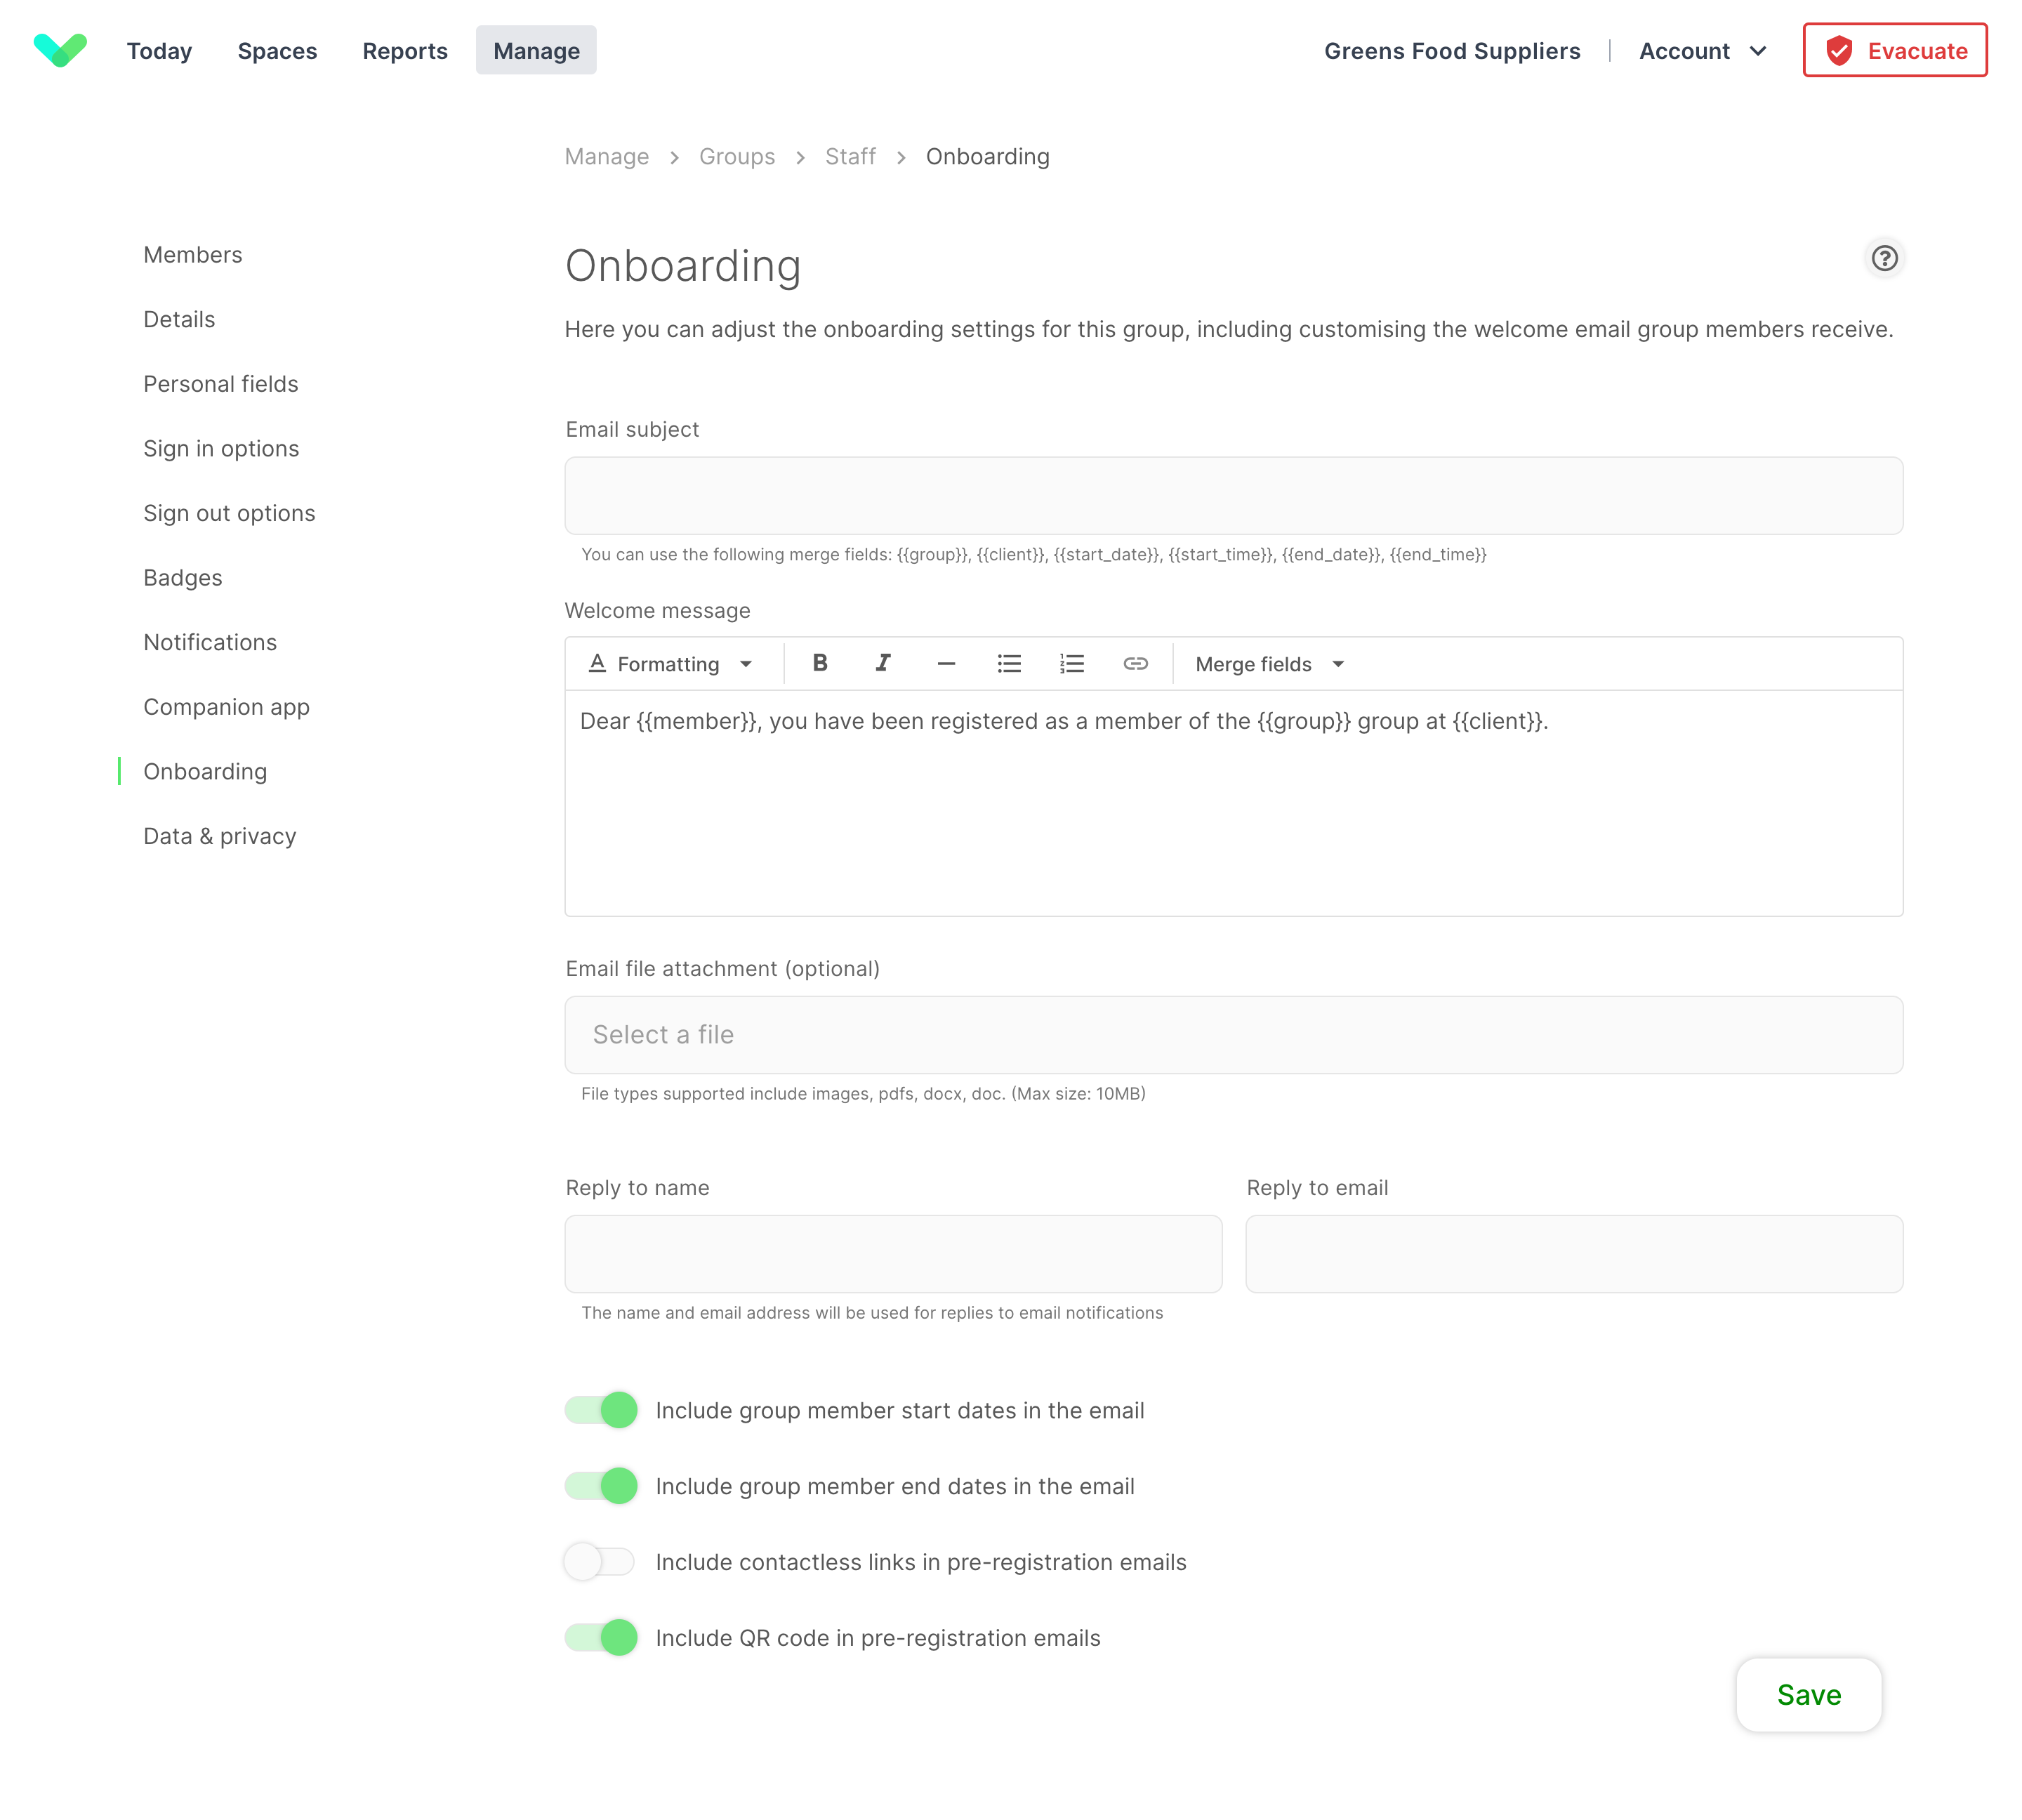
Inviting a repeat visitor allows you to send them an email with relevant information for their first visit. This can be great for new starters to introduce them to the organisation with all the relevant information.
Tip
When you add a new member to a repeat visitor group tick the Send welcome email and they will receive the onboarding email.
Email subject
Add a custom email subject to any welcome emails sent. You can use merge fields to add dynamic information such as the group, client, and start/end details.
Tip
To send an onboarding email you will need to provide their email address when adding them as a member.
Onboarding email message
Using this editor, you can customise the onboarding email that gets sent for this group when you Send welcome email from the member details or when importing members. Formatting options
include bold text, italic, headers, bullets and horizontal lines. To use merge fields from the visitor or site, click
and drag the merge fields displayed under the box.
Email file attachment
Attach a file (jpeg, png, pdf, docx, doc) here and it will be sent with the onboarding email e.g. site health and safety document or non-disclosure agreement. The max size of the file is 10MB.
Reply to
Add the name and email address of the person who should receive responses to welcome emails. This helps to direct any questions to the correct person.
Include start/end dates
Toggle to include start and end dates you've configured for the repeat visitor, giving them visibility of this information.
Automatic welcome emails
With integrated groups (Azure Active Directory, Google Workspace, and Wonde) you can send welcome emails and Companion app invites to a member when they’re added to the group.
Data & privacy
Group privacy options allow you to fully control how group member data is displayed or stored across Sign In App. From here you can manage how long data is retained for before deletion.
Member retention (Repeat visitors)
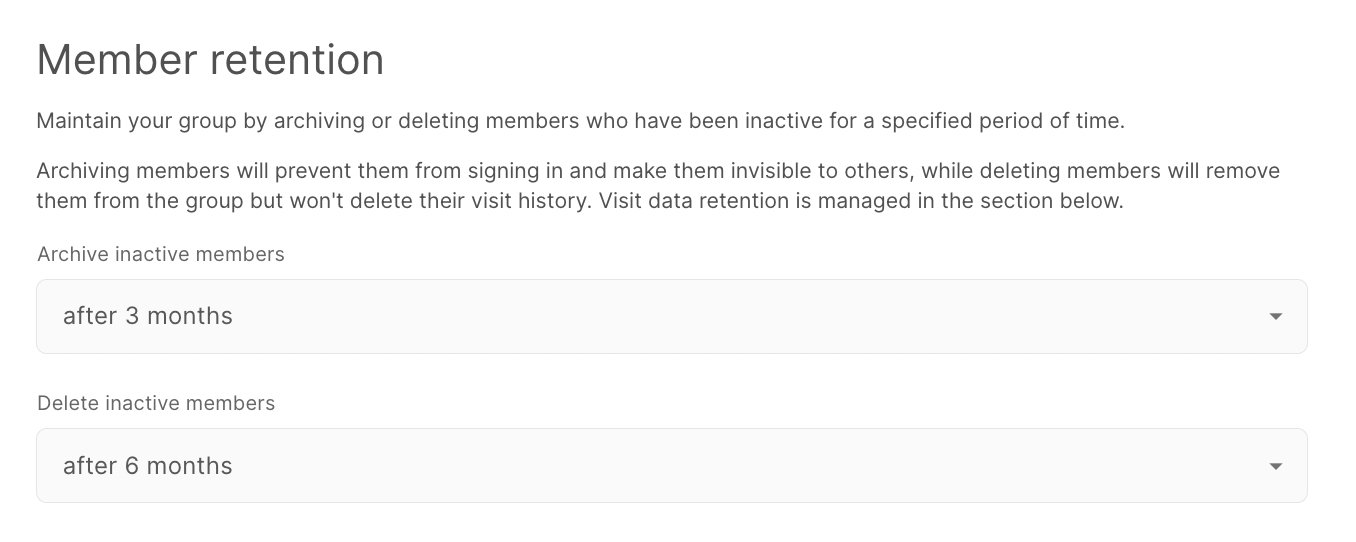
The Member retention allows you to maintain your group by archiving or deleting members who have been inactive for a specified period of time.
Important
Member retention settings are run every 24 hours.
Archive inactive members
Archiving members will prevent them from signing in and make them invisible to others, their Companion app link will remain active and if they are unarchived they can continue using the app. Archived members can be unarchived by going to Manage > Groups > Select group > Members, changing the Show current dropdown to Show archived, editing the member and under the Details section toggling Member is archived off.
Important
QR and RFID codes assigned to a member that is archived cannot be assigned to another member. The member needs to be deleted or the QR/RFID codes removed from the member for them to be available to be assigned to another member.
Delete inactive members
Deleting members will remove them from the group but won't delete their visit history. Visit data retention is managed by the Visitor data retention settings.
Warning
Deleting members is permanent and can’t be undone. All data attached to the member including documents, QR and RFID codes, and all other member settings are deleted along with the member.
Visit retention
Keep visit data
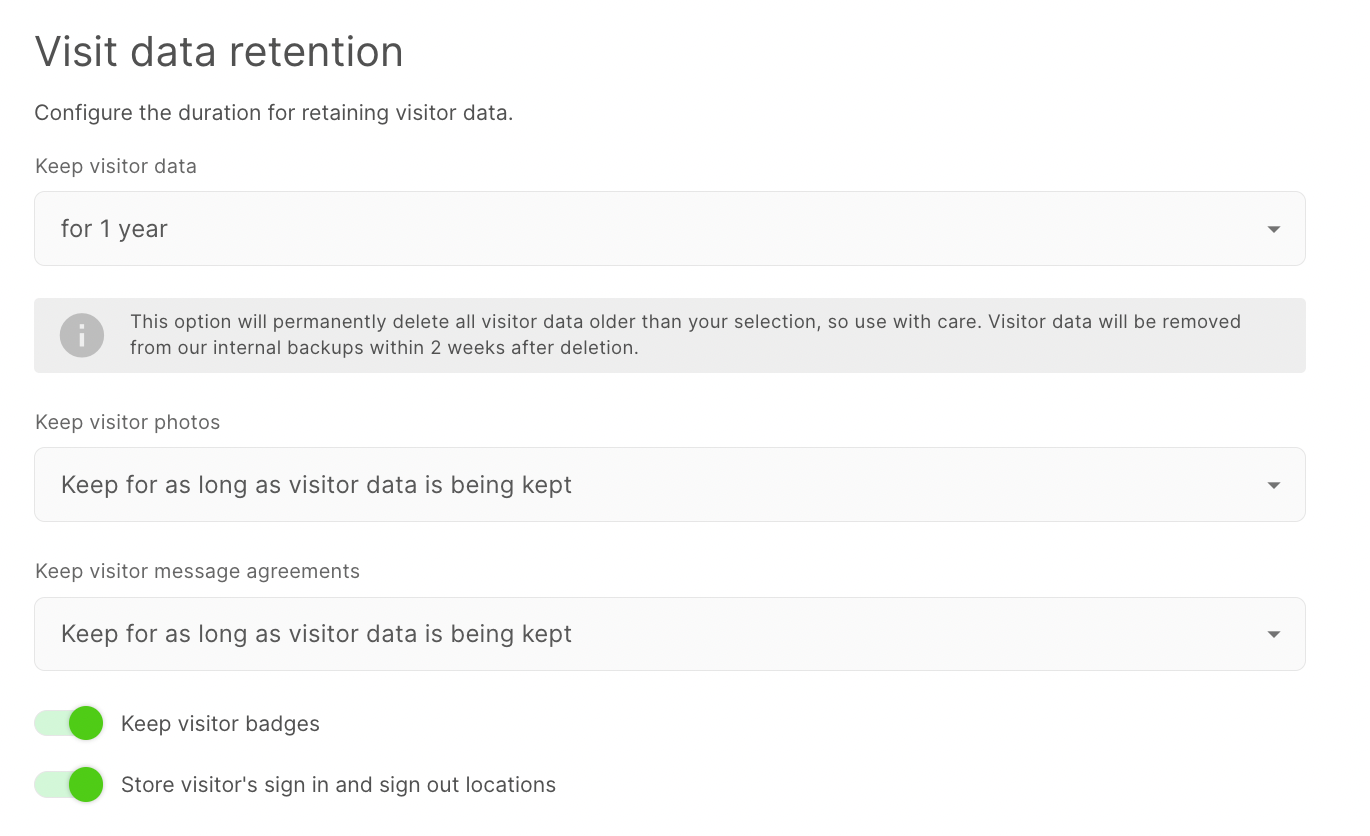
This is where you set the data retention period for this group. Each 'sign in' record will be kept for the duration selected. After this time, personally identifiable information will be deleted automatically and can not be recovered. By default all data is kept indefinitely unless specified here.
Keep visitor photos
By default visitor photos will be kept for as long as Keep visitor data is set to, but you can set a different data retention period for visitor photos here.
Keep visitor message agreements
The period of time visitor message agreements are kept for. By default this will be the same as Keep visitor data.
Keep visitor badges
Visitor badges are stored in the Reports > History section of the Sign In App portal. You can toggle this setting off if you don't want to keep visitor badges.
Store visitor's sign in and sign out locations
When someone signs in using Companion app their sign in and out location is stored against the visit record. This can be viewed on the Today section of the portal and in Reports > History. Toggle this off if you do not want to store visitor's sign in and sign out locations.
Tip
If you toggle Store visitor's sign in and sign out locations off, if signing in to a physical location Companion app will still check the device's location to ensure the person is inside the site geofence, but will not store this location in the portal.
Visibility
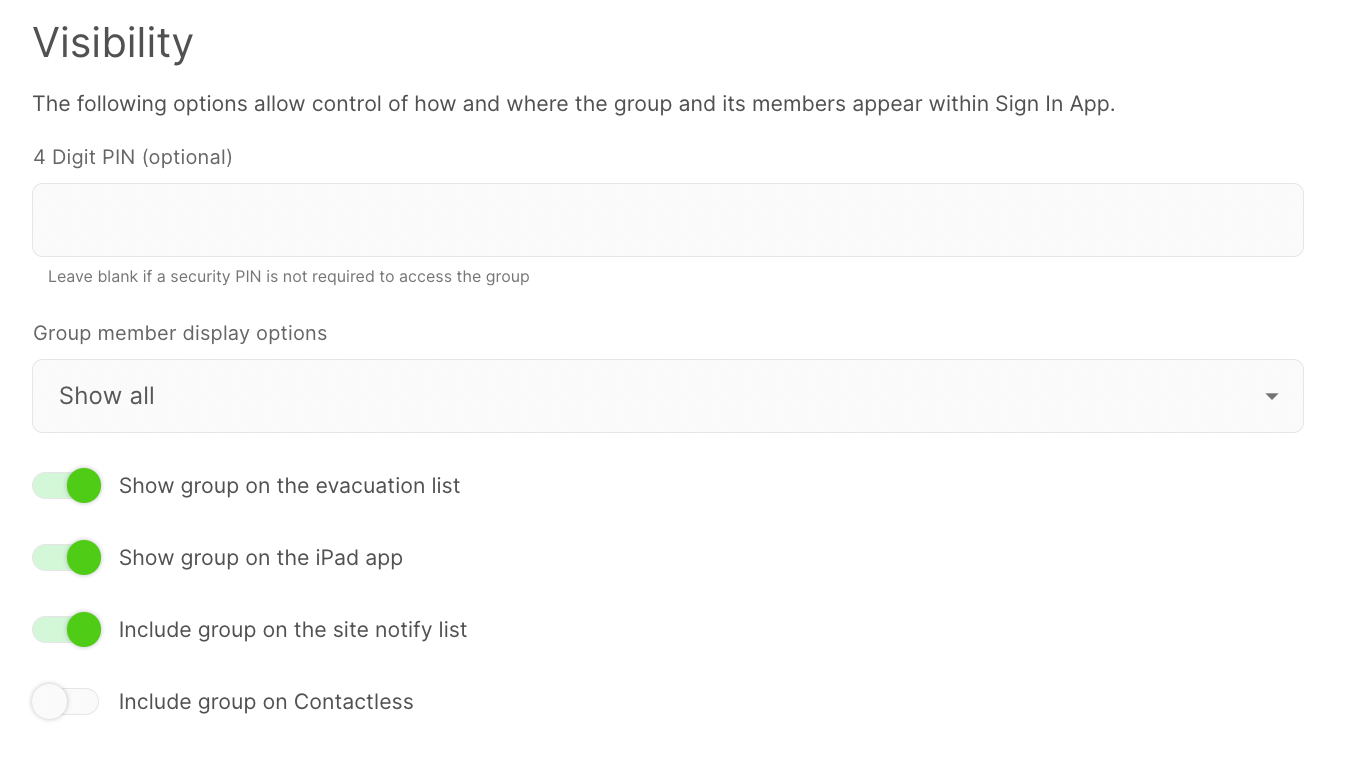
4 Digit PIN (Repeat visitors)
Add an optional 4 digit PIN if you want to hide the entire group from visitors. The PIN will need to be entered each time the group is selected.
Group member display options (Repeat visitors)
By default, repeat visitor groups are displayed in a grid with group member names and photos visible. The user can search for their name or scroll through the list to find their record. This advanced option allows you to hide the grid and require users to search for their name for added privacy.
| Option | Description |
|---|---|
| Show all | All group members are visible |
| Show with autocomplete enabled | Group members are hidden and start appearing after 3 letters are typed |
| Show with exact matches only | Group members are hidden and only appear when a full name is typed into the search box |
Show on the evacuation list
Untick this option if you don't want this visitor group to show on your evacuation list.
Show group on the iPad app
If this option is unticked, the group will not show on the iPad and group members will not be able to sign in unless they use the portal, companion app or QR code.
Include group on Contactless
Toggling Include group on Contactless on will mean that members of this group can sign in using contactless sign in without needing a welcome email.
Warning
With this option enabled, any person with access to your contactless QR code will be able to search members of this group from their smartphone device. This may expose personal data such as the group member's name and any personal fields stored against them. Contactless QR codes which are displayed on the iPad app are invalidated and refreshed every hour. Sign In Point QR codes are valid for as long as they exist in the portal.
Notification Allow-lists
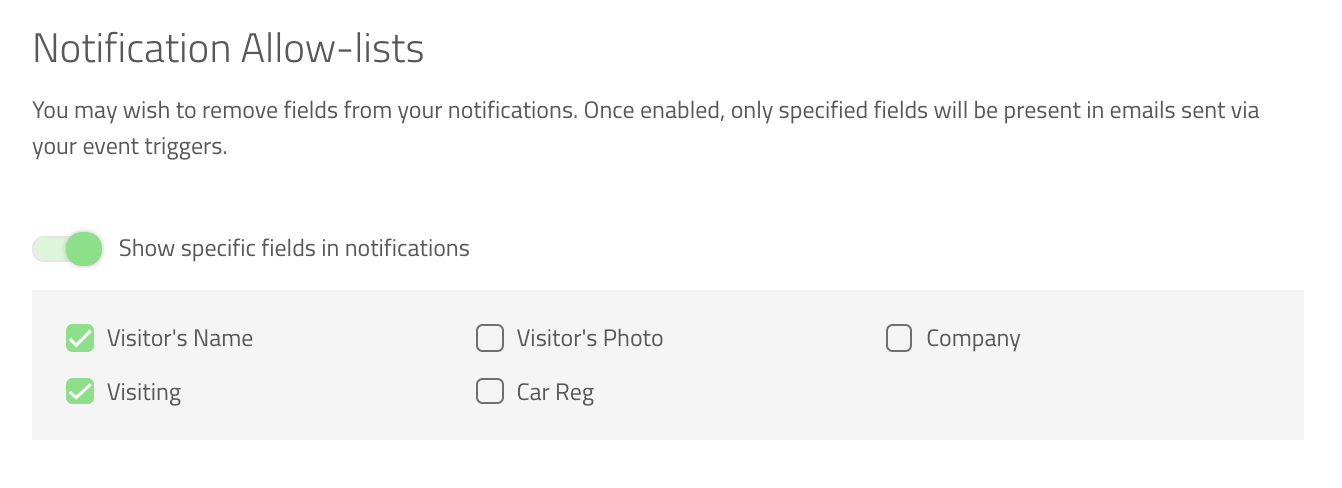
You might wish to remove fields from your notifications for privacy or security reasons. By default, the visitors name, all custom fields, and the visitor photo will be included in both host and group notifications. By toggling Show specific fields in notifications on you can select what information should be included in notifications. In the example below, any notifications would include the visitor’s name and who they’re visiting, but not other personal information or their photo.

